- id_13107172
- Version: 3.0
- Date: Aug 29, 2019 1:34:30 AM
Rear cover removal and installation
Prerequisites
| Required persons | Preliminary requirements | Procedure | Finalization |
|---|---|---|---|
| 1 | Not Applicable | 60 minutes | Not Applicable |
| Item | Quantity | Effectivity | Part number | Manufacturer |
|---|---|---|---|---|
| Cut-Resistant Gloves | 1 Pair | - | - | - |
| Nonmagnetic Titanium Service Tool Kit, Large Set | 1 | - | 5112581 | - |
| Item | Quantity | Effectivity | Part number | Manufacturer |
|---|---|---|---|---|
| Rear Covers | 2 | - |
See FRU Manual |
- |
|

This document contains the procedures for Rear Cover removal and Installation. The Rear Covers consist of two halves. The Right Rear Cover must be removed to access the Body Hybrid Module.
Procedure
- Remove the Rear Pedestal Covers (five screws, two at the top of each cover and one holding both covers at the lower back).
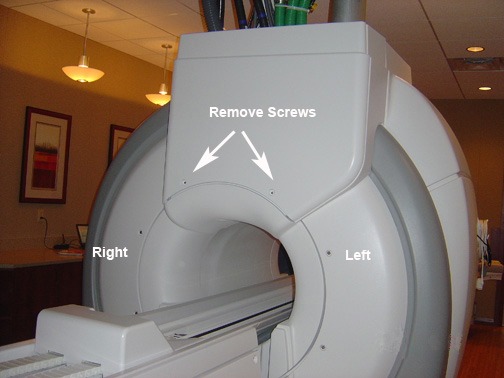
- Remove the two Rear Cable Cover screws and slide the cable cover
straight up to disengage from the upper hooks.
Figure 1. Rear cable cover screw locations
- Remove the Side Cover from the appropriate Rear Cover (see Side Cover Removal and installation).
- Remove the Skirt Cover from the appropriate Rear Cover (see Skirt Cover Removal and Installation).
- Remove the Top Side Cover.
- Remove the appropriate Rear Cover by removing the screws shown
below.
Figure 2. Rear cover screw locations

- Reverse the removal procedure to install the Rear Cover. Ensure proper fit.
Finalization
No finalization steps.