
- Discovery MR750 3.0T System Service Methods
- 5690009-2EN Revision 4
- 00000018WIA304ECE20GYZ
- id_131058582.0
- Feb 22, 2021 1:47:06 AM
3.0T HD 8-Channel Cardiac Coil FRUs and Replacements
Prerequisites
| Required persons | Preliminary requirements | Procedure | Finalization |
|---|---|---|---|
| 1 | Not Applicable | 30 minutes | Not Applicable |
| Item | Quantity | Effectivity | Part number | Manufacturer |
|---|---|---|---|---|
| Standard tool kit | 1 | - | - | - |
| Item | Quantity | Effectivity | Part number | Manufacturer |
|---|---|---|---|---|
| GE 3.0T HD 8CH Cardiac System Cable | 1 | - |
2414707 | - |
| GE 3.0T HD 8CH Cardiac System Anterior Coil Assembly | 1 | - |
2414705 | - |
| GE 3.0T HD 8CH Cardiac System Posterior Coil Assembly | 1 | - |
2414706 | - |
About this task
Follow this process to replace the cable assembly on the 3.0T HD 8-Channel Cardiac Coil by GE/USAI. This document also contains the FRUs and accessories for the 3.0T HD 8-Channel Cardiac Coil.
Replace Coil Cable
Procedure
- Disconnect the SMB plug and the DC plug on the anterior coil
cable end from the anterior interface board.
Figure 1. Anterior Cable Assembly 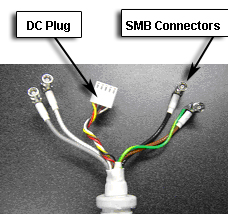
- Remove the old anterior cable assembly.
Figure 2. Anterior DC Plug Assembly 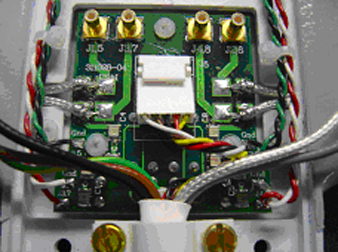
- Fix the anterior cable section of a new coil cable assembly
on the anterior section of the coil and reattach the cable clamp with
the two screws. Connect all four SMB plugs and the DC plug to the
corresponding receptacles on the interface board.
Figure 3. Anterior SMB Connector Assembly 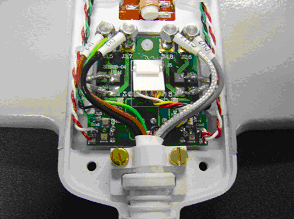
- Remove the two screws that hold down the cable clamp assembly.
Figure 4. Posterior SMB Connector Assembly 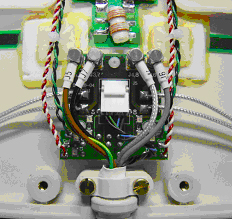
- Disconnect the SMB plug and the DC plug on the posterior cable
end from the posterior interface board.
Figure 5. Posterior Cable Assembly 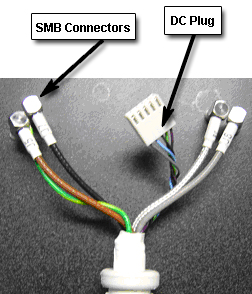
- Fix the posterior section of a new coil cable assembly on the
posterior section of the coil and reattach the cable clamp with two
screws. Connect all four SMB plugs and the DC plug to the corresponding
receptacles on the interface board.
Figure 6. Posterior DC Plug Assembly 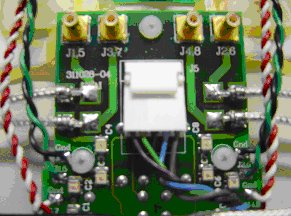
Replace Anterior Coil Assembly
Procedure
- Remove anterior coil cover.
- Remove the two screws that hold down the cable clamp assembly Figure 3.
- Disconnect the SMB plug and the DC plug on the anterior coil cable end from the anterior interface board Figure 1.
- Remove the old anterior coil assembly.
- Fix the anterior coil cable on a new anterior coil assembly and reattach the cable clamp with the two screws. Connect all four SMB plugs and the DC plug to the corresponding receptacles on the interface board Figure 3.
Replace Posterior Coil Assembly
Procedure
- Remove posterior coil cover.
- Remove the two screws that hold down the cable clamp assembly Figure 4.
- Disconnect the SMB plug and the DC plug on the posterior coil cable end from the posterior interface board Figure 4.
- Remove the old posterior coil assembly.
- Fix the posterior coil cable on a new posterior coil assembly and reattach the cable clamp with the two screws. Connect all four SMB plugs and the DC plug to the corresponding receptacles on the interface board Figure 4.
- Close the posterior coil cover.
FRUs and Other Accessories
Procedure
Finalization
Finalization
No finalization steps.