
- Discovery MR750 3.0T System Service Methods
- 5690009-2EN Revision 4
- 00000018WIA30EDCE20GYZ
- id_131067182.0
- Feb 22, 2021 1:46:56 AM
3.0T HD 8CH Shoulder Array Coil FRUs and Replacement
Personnel Requirements
| Required Persons | Procedure Timing |
| 1 | 30 minutes |
Procedure Overview
This document contains the cable replacement procedure for the 3.0T HD 8CH Shoulder Array Coil by NeoCoil, catalog M3340CC and the field replaceable units (FRUs) (see Field Replaceable Units).
Preliminary Requirements
Tools and Test Equipment
Standard Tool Kit, Qty. 1
Replacement Parts
HD 8CH Shoulder Coil Cable Assembly, 5271265-3 (NeoCoil: NC008931), Qty. 1
Procedure
Cable Removal
You will need the torque screw driver (8in-lbs) from the tool kit and the anti-static station.
-
Remove screws from preamp housing.
-
Carefully open housing halves and set aside cover.
-
Remove four cable clamp screws from the housing.
Figure 1. Cable Clamp Screws 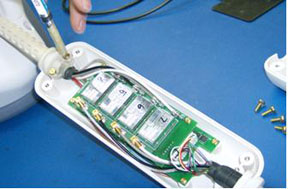
-
Remove screws from four corner locations on the large PCB.
Figure 2. PCB Screws 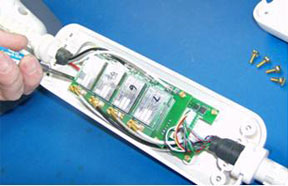
-
Remove all eight cable connectors. Pull cable connector straight from socket to ensure no damage is done to the socket center pin. Check center pin for damage.
Figure 3. Cable Connector Removal/Replacement 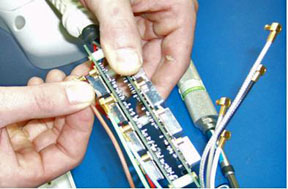
-
Remove DC Connector. Use a flat screw driver to gently pry each side until loose.
Figure 4. DC Connector 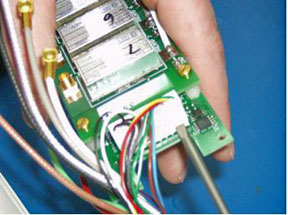
-
Discard cable.
Cable Replacement
| Channel | Coax Cable |
| 1 | Brown |
| 2 | Red |
| 3 | Green |
| 4 | Blue |
| 5 | Black |
| 6 | Gray |
| 7 | White |
| 8 | Clear |
-
Following the color code in Table 1, attach the new cable connectors (see Figure 3) and DC Connector (see Figure 4).
-
Set PCB assembly into housing and replace screws to 8in-lbs. Pay close attention to the positioning of the cables.
Figure 5. Coil Cable Placement 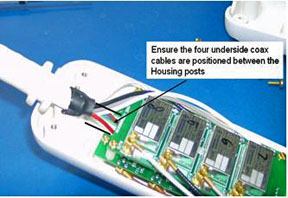
-
Replace cable clamp screws and torque to 8in-lbs.
-
Carefully replace cover ensuring no cables or wires are pinched by the housing.
-
Replace housing screws and torque to 8in-lbs.
Field Replaceable Units
| Description | GE Part # | NeoCoil # |
| 3.0T HD 8CH Shoulder Coil Assembly with Cable | 5271265-2 | NC009930 |
| HD 8CH Shoulder Coil Cable Assembly | 5271265-3 | NC008931 |
| 8CH Shoulder Coil Phantom Holder Assembly | 5271265-5 | NC008932 |