Install the host computer.
Prerequisites
| Personnel requirements |
|---|
| Required persons | Preliminary requirements | Procedure | Finalization |
|---|
| 1 | - | 30 minutes | - |
| Tools and test equipment |
|---|
| Item | Quantity | Part number | Manufacturer |
|---|
| Screwdriver | 1 | - | - |
| ESD Strap | 1 | - | - |
| Consumables |
|---|
| Item | Quantity | Part number | Manufacturer |
|---|
| GE Equipment Maintenance Sticker Note: Not needed for hard drive or DVD replacement procedures. | 1 | 5661793 | - |
| Replacement parts |
|---|
| Item | Quantity | Part number | Manufacturer |
|---|
| Dell T5820 MR Global Host W-2123 64GB Nvidia SSD | 1 | 8780011-02 | - |
| GOC Dust Filter for T5820 | 2 | 5793940 | - |
| Adhesive-Backed Velcro, 2 x 4 inches | 1 | 46-317475P2 | - |
Procedure
- Carefully put the computer back inside the GOC brackets. Secure the brackets as needed.
- Attach and tighten the strap(s) to secure the computer.
- Connect the computer cables and make sure all connections to the GOC and host computer are secure.
Figure 1. Dell T5820 cable configuration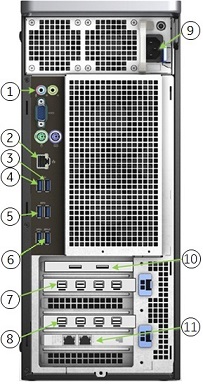
Table 1. Dell T5820 cable configuration | Item | Run # | Description |
|---|
| 1 | NA | GOCAA (line in, line out) |
| 2 | NA | Site ethernet |
| 3 | E3048 | To Keyboard USB port |
| 4 | NA | Mouse USB cable |
| 5 | E3037 | To system cabinet top J25 |
| 6 | NA | 1-wire Adapter |
| 7 | NA | Brainwave on host (optional) |
| 8 | E3046 | To LCD monitor |
| 9 | NA | Power cable |
| 11 | E3502 | To System Cabinet Top J63 |
- Remove the dust filter and Velcro strips from the old computer and examine them for reusability.
Figure 2. Dust filter attachment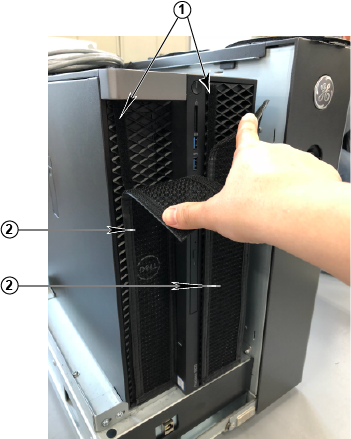
| 1 | Velcro strips |
| 2 | Dust filter |
- Install the Velcro strips on the computer.
- If you can reuse the Velcro strips, install them.
- If you cannot reuse the Velcro strips, install a new set.
- Install the dust filter.
- If you can reuse the dust filter from the old computer, then clean and install it.
- If you cannot reuse the dust filter, then install a new one.
- Connect the short ground lead that connects the left side panel to the GOC main chassis at the center of the lead.
- Secure the left side panel to the GOC.
- Get a GE equipment maintenance sticker, and write today's date on the sticker. Put the sticker on the GOC where it is easily visible.
Note: When replacing the hard drive or DVD drive, a maintenance sticker is not required.
Finalization
Remove LOTO from the GOC to return power.