
- SIGNA MR355 / SIGNA MR360
- Service Manual
- 5856356-3EN Revision 5.0
- Basic Service Documentation. Copyright General Electric Company.
- 00000018WIA30B74F20GYZ
- id_131060451.1
- Jul 6, 2019 12:03:28 AM
Dir 2377126 Lite Patient Transport Service Methods Manual
Dir 2377126 Lite Patient Transport Service Methods Manual
SignaLite and HDe Patient Transport Service Methods Manual 185971.pdf
Download and use the most recent version of 2377126 from the Online Document Library.
Inspection after Replacement
This section describes the Inspection Procedure after any FRU part is replaced.
-
INSPECTION AFTER REPLACEMENT OF HYDRAULIC CYLINDER: INSPECTION AFTER REPLACEMENT OF HYDRAULIC CYLINDER
-
INSPECTION AFTER PATIENT TABLE HYDRAULIC PUMP ASSEMBLY REPLACEMENT: INSPECTION AFTER PATIENT TABLE HYDRAULIC PUMP ASSEMBLY REPLACEMENT
-
INSPECTION AFTER PATIENT TABLE CASTERS REPLACEMENT: INSPECTION AFTER PATIENT TABLE CASTERS REPLACEMENT
-
INSPECTION AFTER DOCK HOOK REPLACEMENT: INSPECTION AFTER DOCK HOOK REPLACEMENT
-
INSPECTION AFTER TABLE UP LIMIT CABLE REPLACEMENT: INSPECTION AFTER TABLE UP LIMIT CABLE REPLACEMENT
-
INSPECTION AFTER SECONDARY CRADLE LATCH ACTUATING CABLE REPLACEMENT: INSPECTION AFTER SECONDARY CRADLE LATCH ACTUATING CABLE REPLACEMENT
-
INSPECTION AFTER CRADLE INTERLOCK CABLE REPLACEMENT: INSPECTION AFTER CRADLE INTERLOCK CABLE REPLACEMENT
-
INSPECTION AFTER FLIPPER DOCK/UNDOCK CABLE REPLACEMENT:INSPECTION AFTER FLIPPER DOCK/UNDOCK CABLE REPLACEMENT
-
INSPECTION AFTER PRIMARY CRADLE LATCH CABLE REPLACEMENT:INSPECTION AFTER PRIMARY CRADLE LATCH CABLE REPLACEMENT
-
INSPECTION AFTER HYDRAULIC FILTER REPLACEMENT:INSPECTION AFTER HYDRAULIC FILTER REPLACEMENT
-
INSPECTION AFTER DOWN RELEASE CABLE REPLACEMENT:INSPECTION AFTER DOWN RELEASE CABLE REPLACEMENT
-
INSPECTION AFTER REPLACEMENT OF HYDRAULIC CYLINDER IN CASE OF FAILURE IN:INSPECTION AFTER REPLACEMENT OF HYDRAULIC CYLINDER IN CASE OF FAILURE IN
-
INSPECTION AFTER BELLOWS REPLACEMENT:INSPECTION AFTER BELLOWS REPLACEMENT
-
INSPECTION AFTER PUMP LINK REPLACEMENT:INSPECTION AFTER PUMP LINK REPLACEMENT
-
INSPECTION AFTER SPRING BOOSTER REPLACEMENT :INSPECTION AFTER SPRING BOOSTER REPLACEMENT
-
INSPECTION AFTER CRADLE SIDE LOCK ADJUSTMENT:INSPECTION AFTER CRADLE SIDE LOCK ADJUSTMENT
-
INSPECTION AFTER VERTICAL DRIVE SCISSOR ASSEMBLY REPLACEMENT:INSPECTION AFTER VERTICAL DRIVE SCISSOR ASSEMBLY REPLACEMENT
-
INSPECTION AFTER CRADLE RELEASE FROM PATIENT TRANSPORT ADJUSTMENT:INSPECTION AFTER CRADLE RELEASE FROM PATIENT TRANSPORT ADJUSTMENT
-
INSPECTION AFTER PLACEMENT OF NEW DEAD STOPPER ASSEMBLY:INSPECTION AFTER PLACEMENT OF NEW DEAD STOPPER ASSEMBLY
-
INSPECTION AFTER REPLACEMENT OF PINCHGUARDS AND ARM BOARD BUMPERS:INSPECTION AFTER REPLACEMENT OF PINCHGUARDS AND ARM BOARD BUMPERS
-
INSPECTION AFTER REPLACEMENT OF DOCK LINK ASSEMBLY:INSPECTION AFTER REPLACEMENT OF DOCK LINK ASSEMBLY
-
INSPECTION AFTER REPLACEMENT OF CRADLE HANDLE:INSPECTION AFTER REPLACEMENT OF CRADLE HANDLE
INSPECTION AFTER REPLACEMENT OF HYDRAULIC CYLINDER
-
Dock the Table and move the Table to the up limit position. Verify that the Table and Bridge are horizontally aligned and there is no height difference of Table and Bridge at right and left position.
-
Verify that there is no part caught by wire or any movable module.
-
Place the 159Kg Load evenly on the Cradle. If using the phantom, refer to the following illustration.
Figure 1. 159Kg Load 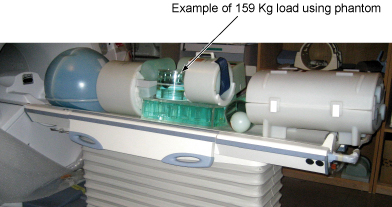
-
Verify that Table moves up and down fully and smoothly using the pedal of Table.
-
Verify that Table moves up and down fully and smoothly using the pedal of Dock.
-
Verify that Cradle moves in and out fully and smoothly.
-
Verify that the amount of oil is properly filled.
-
Verify that oil is not leaked from the cylinder. Refer to following illustration for check points.
Figure 2. Oil leakage check 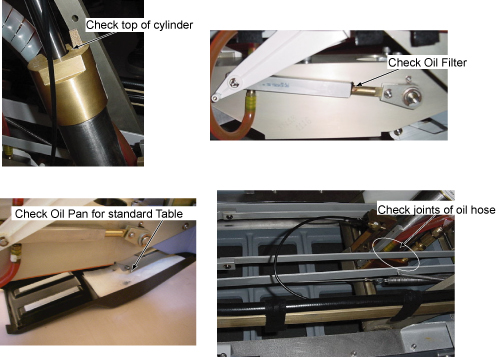
-
Verify that all of the parts and the screws are installed.
-
Verify that there is no wound or dirt on the Table, Cradle, Pad, and Patient Strap.
INSPECTION AFTER PATIENT TABLE HYDRAULIC PUMP ASSEMBLY REPLACEMENT
-
Dock the Table and move the Table to the up limit position. Verify that the Table and Bridge are horizontally aligned and there is no height difference of Table and Bridge at right and left position.
-
Verify that there is no part caught by wire or any movable module.
-
Place the 159Kg Load evenly on the Cradle. If using the phantom, refer to the following illustration.
Figure 3. 159Kg Load -
Verify that Table moves up and down fully and smoothly using the pedal of Table.
-
Verify that Table moves up and down fully and smoothly using the pedal of Dock.
-
Verify that Cradle moves in and out fully and smoothly.
-
Verify that the amount of oil is properly filled.
-
Verify that oil is not leaked from the cylinder. Refer to following illustration for check points.
Figure 4. Oil Leakage Check -
Verify that all of the parts and the screws are installed.
-
Verify that there is no wound or dirt on the Table, Cradle, Pad, and Patient Strap.
INSPECTION AFTER PATIENT TABLE CASTERS REPLACEMENT
-
Verify that Caster can be locked.
-
Measure the height from floor to top of aluminum support casting. Verify that the height is within be 11.0 inches ± 0.250 inches (280 mm ± 6.35 mm).
Figure 5. Height from floor to top of aluminum support casting 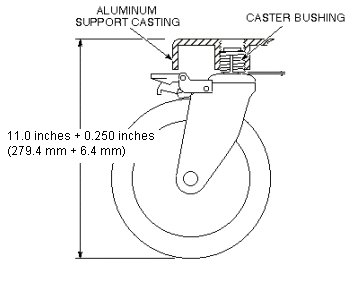
-
Dock the Table and move the Table to the up limit position. Verify that the Table and Bridge are horizontally aligned and there is no height difference of Table and Bridge at right and left position.
-
Place the 80Kg Load evenly on the Cradle. If using the phantom, refer to the following illustration.
Figure 6. 80Kg Load 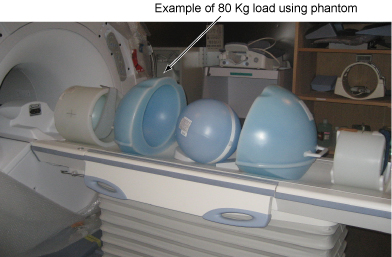
-
Verify that Table moves up and down fully and smoothly using the pedal of Table.
-
Verify that Table moves up and down fully and smoothly using the pedal of Dock.
-
Verify that Cradle moves in and out fully and smoothly.
-
Verify that all of the parts and the screws are installed.
-
Verify that there is no wound or dirt on the Table, Cradle, Pad, and Patient Strap.
INSPECTION AFTER DOCK HOOK REPLACEMENT
-
Verify that stepping force of the Table dock pedal is appropriate. (not too hard and not too soft).
-
Verify that Table can dock and undock smoothly.
-
Place the 80Kg Load evenly on the Cradle. If using the phantom, refer to the following illustration.
Figure 7. 80Kg Load -
Verify that Table moves up and down fully and smoothly using the pedal of Table.
-
Verify that Table moves up and down fully and smoothly using the pedal of Dock.
-
Verify that Cradle moves in and out fully and smoothly.
-
Verify that all of the parts and the screws are installed.
-
Verify that there is no wound or dirt on the Table, Cradle, Pad, and Patient Strap.
INSPECTION AFTER TABLE UP LIMIT CABLE REPLACEMENT
-
Verify that tension of up limit cable is appropriate (not too tight and not too loose). Refer to illustration.
Figure 8. Up limit cable 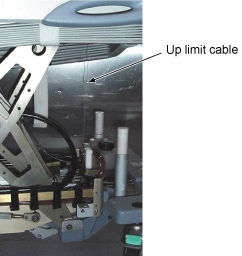
-
Verify that there is no part caught by wire or any movable module.
-
Verify that LPCA is withdrawn to catch the cradle when Table is docked and moved to up Limit position. Verify that LPCA is released to the bore when Table is Down or Undocked.
-
Place the 80Kg Load evenly on the Cradle. If using the phantom, refer to the following illustration.
Figure 9. 80Kg Load -
Verify that Table moves up and down fully and smoothly using the pedal of Table.
-
Verify that Table moves up and down fully and smoothly using the pedal of Dock.
-
Verify that all of the parts and the screws are installed.
-
Verify that there is no wound or dirt on the Table, Cradle, Pad, and Patient Strap.
INSPECTION AFTER SECONDARY CRADLE LATCH ACTUATING CABLE REPLACEMENT
-
Move the cradle into the magnet entirely. Hold the flipper on the Table and undock the Table. Verify that the stopper is stuck out. Refer to illustration.
Figure 10. Stopper check 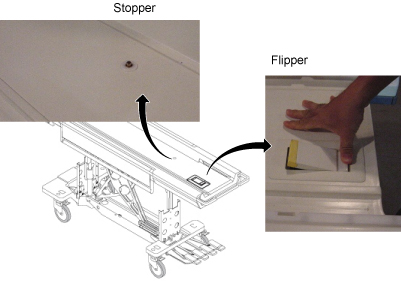
-
Verify that Table can dock and undock smoothly.
-
Verify that there is no part caught by wire or any movable module.
-
Place the 80Kg Load evenly on the Cradle. If using the phantom, refer to the following illustration.
Figure 11. 80Kg Load -
Verify that Cradle moves in and out fully and smoothly.
-
Verify that all of the parts and the screws are installed.
-
Verify that there is no wound or dirt on the Table, Cradle, Pad, and Patient Strap.
INSPECTION AFTER CRADLE INTERLOCK CABLE REPLACEMENT
-
While cradle is not at home position, verify that Table cannot move down and undock.
-
While Cradle is at home position, verify that Table can move down/up, and undock.
-
Verify that Table can dock.
-
Verify that there is no part caught by wire or any movable module.
-
Place the 80Kg Load evenly on the Cradle. If using the phantom, refer to the following illustration.
Figure 12. 80Kg Load -
Verify that Cradle moves in and out fully and smoothly.
-
Verify that all of the parts and the screws are installed.
-
Verify that there is no wound or dirt on the Table, Cradle, Pad, and Patient Strap.
INSPECTION AFTER FLIPPER DOCK/UNDOCK CABLE REPLACEMENT
-
While cradle is not at home position, verify that Table cannot move down and undock.
-
While Cradle is at home position, verify that Table can move down/up, and undock.
-
Verify that Table can dock.
-
Verify that there is no part caught by wire or any movable module.
-
Place the 80Kg Load evenly on the Cradle. If using the phantom, refer to the following illustration.
Figure 13. 80Kg Load -
Verify that Cradle moves in and out fully and smoothly.
-
Verify that all of the parts and the screws are installed.
-
Verify that there is no wound or dirt on the Table, Cradle, Pad, and Patient Strap.
INSPECTION AFTER PRIMARY CRADLE LATCH CABLE REPLACEMENT
-
Move the cradle into the magnet entirely. Hold the flipper on the Table and undock the Table. Verify that the stopper is stuck out. Refer to illustration.
Figure 14. Stopper Check -
Verify that Table can dock and undock smoothly.
-
Verify that there is no part caught by wire or any movable module.
-
Place the 80Kg Load evenly on the Cradle. If using the phantom, refer to the following illustration.
Figure 15. 80Kg Load -
Verify that Cradle moves in and out fully and smoothly.
-
Verify that Cradle moves in and out fully and smoothly.
-
Verify that there is no wound or dirt on the Table, Cradle, Pad, and Patient Strap.
INSPECTION AFTER HYDRAULIC FILTER REPLACEMENT
-
Dock the Table and move the Table to the up limit position. Verify that the Table and Bridge are horizontally aligned and there is no height difference of Table and Bridge at right and left position.
-
Verify that there is no part caught by wire or any movable module.
-
Place the 159Kg Load evenly on the Cradle. If using the phantom, refer to the following illustration.
Figure 16. 159Kg Load -
Verify that Table moves up and down fully and smoothly using the pedal of Table.
-
Verify that Table moves up and down fully and smoothly using the pedal of Dock.
-
Verify that Cradle moves in and out fully and smoothly.
-
Verify that the amount of oil is properly filled.
-
Verify that oil is not leaked from the cylinder. Refer to following illustration for check points.
-
Verify that all of the parts and the screws are installed.
-
Verify that there is no wound or dirt on the Table, Cradle, Pad, and Patient Strap.
INSPECTION AFTER DOWN RELEASE CABLE REPLACEMENT
-
Verify that there is no part caught by wire or any movable module.
-
Place the 80Kg Load evenly on the Cradle. If using the phantom, refer to the following illustration.
Figure 17. 80Kg Load -
Verify that Table moves up and down fully and smoothly using the pedal of Table.
-
Verify that Table moves up and down fully and smoothly using the pedal of Dock.
-
Verify that all of the parts and the screws are installed.
-
Verify that there is no wound or dirt on the Table, Cradle, Pad, and Patient Strap.
INSPECTION AFTER REPLACEMENT OF HYDRAULIC CYLINDER IN CASE OF FAILURE IN
-
Dock the Table and move the Table to the up limit position. Verify that the Table and Bridge are horizontally aligned and there is no height difference of Table and Bridge at right and left position.
-
Verify that there is no part caught by wire or any movable module.
-
Place the 159Kg Load evenly on the Cradle. If using the phantom, refer to the following illustration.
Figure 18. 159 Kg Load -
Verify that Table moves up and down fully and smoothly using the pedal of Table.
-
Verify that Table moves up and down fully and smoothly using the pedal of Dock.
-
Verify that Cradle moves in and out fully and smoothly.
-
Verify that the amount of oil is properly filled.
-
Verify that oil is not leaked from the cylinder. Refer to following illustration for check points.
Figure 19. Oil Leakage Check Point -
Verify that all of the parts and the screws are installed.
-
Verify that there is no wound or dirt on the Table, Cradle, Pad, and Patient Strap.
INSPECTION AFTER BELLOWS REPLACEMENT
-
Dock the Table and move the Table to the up limit position. Verify that the Table and Bridge are horizontally aligned and there is no height difference of Table and Bridge at right and left position.
-
Verify that there is no part caught by wire or any movable module.
-
Place the 159Kg Load evenly on the Cradle. If using the phantom, refer to the following illustration.
Figure 20. 159Kg Load -
Verify that Table moves up and down fully and smoothly using the pedal of Table.
-
Verify that Table moves up and down fully and smoothly using the pedal of Dock.
-
Verify that Cradle moves in and out fully and smoothly.
-
Verify that the amount of oil is properly filled.
-
Verify that oil is not leaked from the cylinder. Refer to following illustration for check points.
Figure 21. Oil Leakage Check -
Verify that all of the parts and the screws are installed.
-
Verify that there is no wound or dirt on the Table, Cradle, Pad, and Patient Strap.
INSPECTION AFTER PUMP LINK REPLACEMENT
-
Verify that Table can dock and undock smoothly.
-
Verify that there is no part caught by wire or any movable module.
-
Place the 80Kg Load evenly on the Cradle. If using the phantom, refer to the following illustration.
Figure 22. 80Kg Load -
Verify that Cradle moves in and out fully and smoothly.
-
Verify that all of the parts and the screws are installed.
-
Verify that there is no wound or dirt on the Table, Cradle, Pad, and Patient Strap.
INSPECTION AFTER SPRING BOOSTER REPLACEMENT
-
Verify that there is no part caught by wire or any movable module.
-
Place the 159Kg Load evenly on the Cradle. If using the phantom, refer to the following illustration.
Figure 23. 59Kg Load -
Verify that Table moves up and down fully and smoothly using the pedal of Table.
-
Verify that Table moves up and down fully and smoothly using the pedal of Dock.
-
Verify that all of the parts and the screws are installed.
-
Verify that there is no wound or dirt on the Table, Cradle, Pad, and Patient Strap.
INSPECTION AFTER CRADLE SIDE LOCK ADJUSTMENT
-
Verify that there is no part caught by wire or any movable module.
-
Place the 80Kg Load evenly on the Cradle. If using the phantom, refer to the following illustration.
Figure 24. 80Kg Load -
Verify that Cradle moves in and out fully and smoothly.
-
Verify that all of the parts and the screws are installed.
-
Verify that there is no wound or dirt on the Table, Cradle, Pad, and Patient Strap.
INSPECTION AFTER VERTICAL DRIVE SCISSOR ASSEMBLY REPLACEMENT
-
Dock the Table and move the Table to the up limit position. Verify that the Table and Bridge are horizontally aligned and there is no height difference of Table and Bridge at right and left position.
-
Verify that there is no part caught by wire or any movable module.
-
Place the 159Kg Load evenly on the Cradle. If using the phantom, refer to the following illustration.
Figure 25. 159Kg Load -
Verify that Table moves up and down fully and smoothly using the pedal of Table.
-
Verify that Table moves up and down fully and smoothly using the pedal of Dock.
-
Verify that Cradle moves in and out fully and smoothly.
-
Verify that the amount of oil is properly filled.
-
Verify that oil is not leaked from the cylinder. Refer to following illustration for check points.
Figure 26. Oil Leakage Check -
Verify that all of the parts and the screws are installed.
-
Verify that there is no wound or dirt on the Table, Cradle, Pad, and Patient Strap.
INSPECTION AFTER CRADLE RELEASE FROM PATIENT TRANSPORT ADJUSTMENT
-
Verify that the cradle can be released using cradle handle.
-
Verify that there is no part caught by wire or any movable module.
-
Place the 80Kg Load evenly on the Cradle. If using the phantom, refer to the following illustration.
Figure 27. 80Kg Load -
Verify that Cradle moves in and out fully and smoothly.
-
Verify that all of the parts and the screws are installed.
-
Verify that there is no wound or dirt on the Table, Cradle, Pad, and Patient Strap.
INSPECTION AFTER PLACEMENT OF NEW DEAD STOPPER ASSEMBLY
-
Dock the Table and move the Table to the up limit position. Verify that the Table and Bridge are horizontally aligned and there is no height difference of Table and Bridge at right and left position.
-
Verify that there is no part caught by wire or any movable module.
-
Verify that LPCA is withdrew to catch the cradle when Table is docked and moved to up Limit position. Verify that LPCA is released to the bore when Table is Down or Undocked.
-
Place the 80Kg Load evenly on the Cradle. If using the phantom, refer to the following illustration.
Figure 28. 80Kg Load -
Verify that Table moves up and down fully and smoothly using the pedal of Table.
-
Verify that Table moves up and down fully and smoothly using the pedal of Table.
-
Verify that Cradle moves in and out fully and smoothly.
-
Verify that all of the parts and the screws are installed.
-
Verify that there is no wound or dirt on the Table, Cradle, Pad, and Patient Strap.
INSPECTION AFTER REPLACEMENT OF PINCHGUARDS AND ARM BOARD BUMPERS
-
Verify that Arm Board moves safely.
-
Verify that all of the parts and the screws are installed.
-
Verify that there is no wound or dirt on the Table, Cradle, Pad, and Patient Strap.
INSPECTION AFTER REPLACEMENT OF DOCK LINK ASSEMBLY
-
Verify that Table can dock and undock smoothly.
-
Verify that there is no part caught by wire or any movable module.
-
Verify that all of the parts and the screws are installed.
-
Verify that there is no wound or dirt on the Table, Cradle, Pad, and Patient Strap.
INSPECTION AFTER REPLACEMENT OF CRADLE HANDLE
-
Verify that the cradle can be released using cradle handle.
-
Place the 80Kg Load evenly on the Cradle. If using the phantom, refer to the following illustration.
Figure 29. 80Kg Load -
Verify that Cradle moves in and out fully and smoothly.
-
Verify that Cradle moves in and out fully and smoothly.
-
Verify that there is no wound or dirt on the Table, Cradle, Pad, and Patient Strap.