- id_12373767
- Version: 1.4
- Date: Jul 5, 2019 10:03:33 PM
ICN Hard Drive/SSD Replacement (Dell R620 and R630)
Prerequisites
| Required persons | Preliminary requirements | Procedure | Finalization |
|---|---|---|---|
| 1 | 10 minutes | 30 minutes | 30 minutes |
| Item | Quantity | Effectivity | Part number | Manufacturer |
|---|---|---|---|---|
| ICN Hard Drive | 1 | Dell R620 |
See FRU manual. |
- |
| ICN SSD | 1 | Dell R630 |
See FRU manual. |
- |
|

Overview
This procedure documents the processes for the following:
-
Replacing the hard drive in the Dell R620 ICN
-
Replacing the SSD in the Dell R630 ICN
| ICN Type | Part Number Series |
| R620 (Gen 5) | 5921000x |
| R630 (Gen 6) | 5931000x |
Procedure
- notice
- notice
- From the Common Service Desktop, turn off the ICN. See ICN On/Off Procedure.
- Do not remove the replacement drive from its static sensitive packaging until it is needed.
- Press the orange circle on the left front to release the front
lever. Pull on the front lever to eject the drive.
Figure 1.
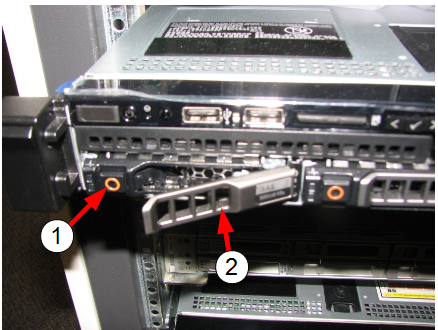
Item Description 1 (For R620 and R630) Orange circle (press to remove hard drive/SSD)
(For R620) The orange circle on the right opens the gate for access to the solid state device. Do not open during this procedure.
2 Front lever - Carefully pull out the drive.
- notice
- Remove the new drive from the static-sensitive packaging and insert into the ICN.
- Close the front lever to properly seat the drive.
- Perform a disk wipe on the old hard drive/SSD. See the latest revision of the Disk Management Tool Service Manual, PN 5500610-1EN available from the online documentation library.
 |
|
Finalization
- Turn on the ICN. See ICN On/Off Procedure.
note:
For the first three or four minutes, the LEDs illuminate only at the rear of the ICN, next to the power cables. After three to four minutes, the ICN fans are audible and the LED on the front of the ICN starts flashing.
- Configure the new hard drive/SSD, using VRE Reconfiguration.
- Perform Check Scan.