
- SIGNA™ Hero 3.0T Service Methods
- 5852800-8EN Revision 1.0
- 00000018WIA3060C230GYZ
- id_156671081.8
- Jul 13, 2021 4:27:37 PM
Gradient Cable ASM (PS to AMP) Replacement
Prerequisites
| Required persons | Preliminary requirements | Procedure | Finalization |
|---|---|---|---|
| 1 | Not Applicable | 60 minutes | 15 minutes |
| Item | Quantity | Effectivity | Part number | Manufacturer |
|---|---|---|---|---|
| Non Magnetic Tool Set | 1 | - | - | - |
| Digital volt meter (DVM) with alligator clip leads | 1 | - | - | - |
| Item | Quantity | Effectivity | Part number | Manufacturer |
|---|---|---|---|---|
| SSSD Power Panel Assy | 1 | - |
Refer to FRU Manual | - |
| ||||||||
Procedure
- Confirm that there is no input voltage at the terminal of SSSPS using DVM.
Figure 1. Voltage Check 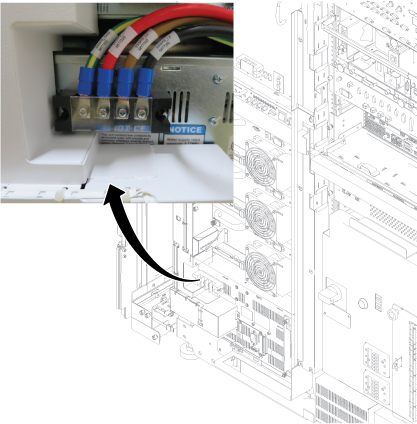
- Perform the following steps.
- Disconnect two connectors.
- Loosen six screws.
- Remove Leak sensor assy.
Figure 2. Remove Leak Sensor 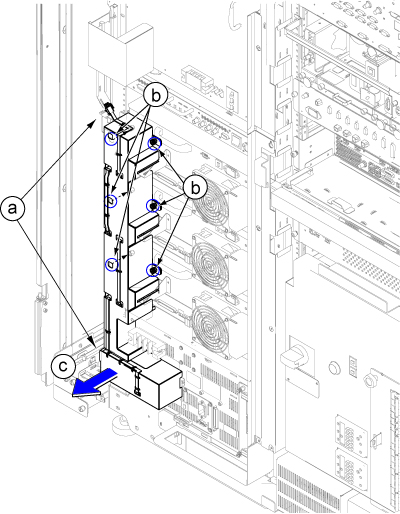
Perform the followings to disconnected from rear power panel. Do the same for the related SSSA and SSSPS.CAUTION 
- Loosen 4 screws
- Withdraw SSSA/SSS-PS.
Figure 3. SSSA and SSSPS 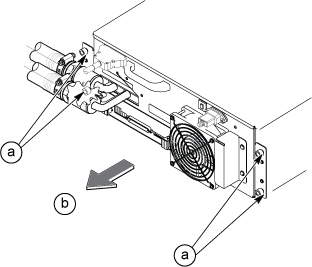
- Loosen fixing screws and remove ISC PW Cover by lifting up a little.Note: If furnished closet door prevents from removing, the PW cover can be separated in two pieces by removing 6 screws at center.
Figure 4. ISC PW Cover 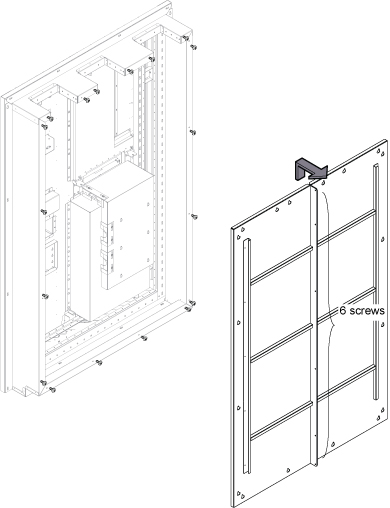
- Remove Gradient Cable Cover per following steps.
- Loosen 12 screws.
- Lift up a little and remove the Gradient Cable Cover.
Figure 5. Gradient Cable Cover 
- At Pen Wall side, remove cover for SSSD Power Panel Assy.
- Loosen screws for key holes shown in illustration below.
- Remove three screws at left bottom area and one screw at center joint area.
- Lift up the cover and remove it.
Figure 6. Cover for SSSD Power Panel Assy 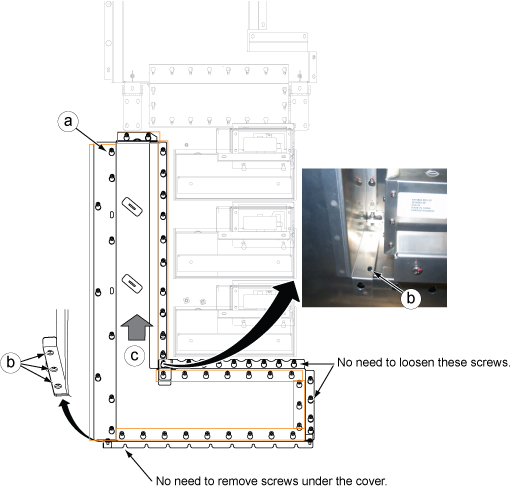
- Remove defective Power Panel Assy.
- Remove four screws and remove Gradient Cable Asm for defective axis.
- Remove two screws and remove defective Gradient Cable Asm for SSSPS.
Figure 7. Gradient Cable Asm PS to AMP 
Finalization
- Restore the Power. Refer to Removing LOTO - ISC.
- Perform check scan.