- id_12373871
- Version: 1.1
- Date: Jul 5, 2019 10:03:32 PM
SRPS Troubleshooting
SRPS Theory of Operation
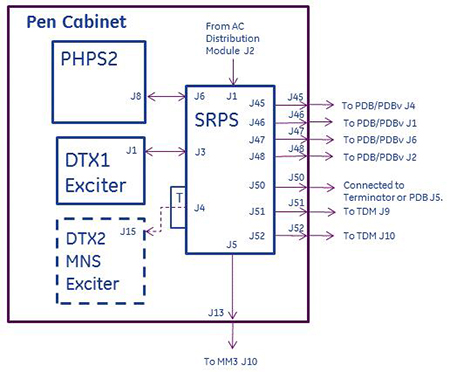
The Scan Room Power Supply (SRPS) is located inside the 1.5T and 3T Penetration Cabinets and supports both 16 and 32 channel systems. See Figure 1 for map of SRPS connections.
The SRPS receives 3-phase AC power at J1 from the AC Distribution module located in the bottom of the Penetration Cabinet.The SRPS converts the AC voltage to provide DC voltages to these components:
-
PDB in RF Hub, slot 12: +/-16.85V, +/-11.6V, +/-8.5V
-
PDBv in RF Hub, slot 12: +/-16.85V, +/-11.6V, +8.5V
-
TDM on magnet: +6.85V, -6.85V, +6.85V, +3.16V, +5.05V, +5.05V.
-
DTX1 NB Exciter: +15.8V, +12.64V, +/-7.4V, 5.3V
-
Optional DTX2 BB Exciter: +15.8V, +12.64V, +/-7.4V, +5.3V
-
Magnet Monitor: +5.3V
-
PHPS2: 1-Wire communication only; not a power connection.
Figure 1. Pen Cabinet SRPS Connections
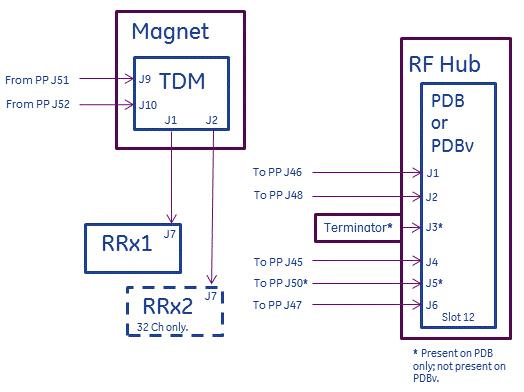
See Figure 2 for diagram showing connections from SRPS to magnet room components.
Figure 2. Magnet Room Connections from SRPS
Failures internal to SRPS are reported on the 1-Wire Network (see 1-Wire Network Troubleshooting for Discovery & Optima for example reports). Depending on the severity of the fault, faulted power supplies internal to the SRPS can be reset by the Host PC from the 1-Wire Network.
SRPS J4 is terminated with a terminating adapter when Multi-Nuclear Spectroscopy (MNS) hardware is not installed. Failure to properly terminate J4 when MNS not installed will result in loss of power to DTX1 Exciter.
Older SRPS units contain a phase relay module with green and yellow LEDS visible from the front of the SRPS. The green indicator is lit when L1, L2, and L3 voltage present at the relay and within limits (+10% and -15%). The relay knob should be set to 160V. The yellow indicator is lit when phase sequence of incoming L1, L2, and L3 power lines are all correct. When the yellow LED is dark then relay opens, interrupting power to the 3 green phase indicators visible from the front of the SRPS. 3 green phase indicators show incoming L1, L2, and L3 AC line voltages present. Later SRPS units do not have a phase relay module and are insensitive to phase sequence.
The SRPS Control Board is visible and removable from the front of the SRPS. It is responsible for:
-
Monitoring supplies inside the SRPS and reporting over and under voltage fault conditions.
-
Monitoring supplies inside the SRPS and reporting over and under current fault conditions.
-
Disabling internal SRPS power supplies upon fault detection.
-
Monitoring confidence loops inside external cables connected to SRPS and reporting disconnected or poorly connected cables.
-
Monitoring SRPS fan tachometers for correct fan rotation speed.
-
Managing fault reporting, communication, and reset of any power supplies due to reset signal on 1-Wire Network.
Labeled test points suitable for connecting voltmeter leads are accessible from front of SRPS Control Board. These permit measurement of voltages generated by the SRPS.
-
+8.5V Supplied to PDB/PDBv in RF Hub
-
-8.5V Supplied to PDB only in RF Hub (PDBv only: dongle must be attached to SRPS or PP J50)
-
+11.6V Supplied to PDB/PDBv in RF Hub
-
-11.6V Supplied to PDB/PDBv in RF Hub
-
+16.85V Supplied to PDB/PDBv in RF Hub
-
-16.85V Supplied to PDB/PDBv in RF Hub
-
+3.16V Supplied to TDM & RRx on magnet
-
+5.05VA Analog – supplied to TDM & RRx on magnet
-
+6.85VD Digital – supplied to TDM & RRx on magnet
-
+5.05VD Digital – supplied to TDM & RRx on magnet
-
-6.85V Supplied to TDM & RRx on magnet
-
+5.3V Supplied to DTX1 & DTX2 Exciters
-
+7.4V Supplied to DTX1 & DTX2 Exciters
-
-7.4V Supplied to DTX1 & DTX2 Exciters
-
+12.64V Supplied to DTX1 & DTX2 Exciters
-
+15.8V Supplied to DTX1 & DTX2 Exciters
-
COM Common return connection for all test points
Voltages at test points will be missing if the SRPS Control Board disables these power supplies because:
-
PDB power switch is in down ‘OFF’ position.
-
SRPS cables are poorly connected or not connected, resulting in confidence loop in cable open.
-
Dongle adapters missing at PP J50 (PDBv only) or PDB J3.
-
Overcurrent condition at load.
-
Undervoltage condition.
-
SRPS internal fusible link for affected power supply, located at rear of SRPS, is open.
When multiple voltages are missing from the test points the problem often is not the SRPS. If the error log reports a component missing an SRPS voltage and component indicator LED supports this, but voltage present at test point at SRPS Control Board, then something further down the circuit opened (i.e. wire in grey power cable, SRPS fusible link, etc.) resulting in loss of voltage at component.
Directly below the test points is a FAULT LED. This LED is on for any of the fault conditions described earlier including low fan rotation speed. When this LED is on the failure may be external to the SRPS.
Fuses for the internal power supplies are located on exterior of the SRPS at rear. When these open it is often the result of a failure of a non-serviceable part internal to the SRPS, requiring replacement of the SRPS.
PDB/PDBv Theory of Operation
Slot 12 of the RF Hub will contain either a Power Distribution Board (PDB) or cost-reduced Power Distribution Board (PDBv). Unlike the PDB, the cost-reduced PDBv does not provide J3 or J5 connectors or circuitry associated with those connectors. PDB or PDBv receive these voltages from SRPS:
-
PDB in RF Hub: +/-16.85V on PDB J4, +11.6V on PDB J1, -11.6V on PDB J6, +8.5V on PDB J2, -8.5V on PDB J5.
-
PDBv in RF Hub: +/-16.85V on PDBv J4, +11.6V on PDBv J1, -11.6V on PDBv J6, +8.5V on PDBv J2.
A terminator must be attached to PDB J3 for systems equipped with 32 or 16 channels. This terminator must be connected in order for the RF Hub to receive power. Sites with PDB have a cable interconnecting PP J50 to PDB J5. Since PDBv does not require -8.5V from SPRS it does not have a J5 connector. A terminating dongle is instead attached to PP J50 (or SRPS J50). PDB and PDBv generate voltages from onboard linear regulators. See block diagram for PDB in Figure 3. See block diagram for PDBv in Figure 4. As voltages are derived from onboard linear regulators sense wires for voltage drop compensation exist in cables between SRPS and PDB or PDBv. PDB and PDBv supply voltages from linear regulators to these components:
-
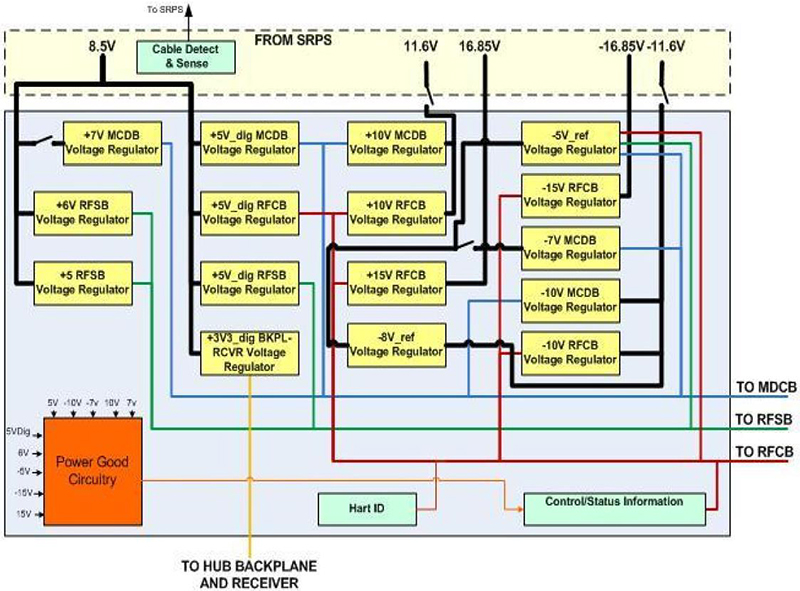
RFSB1,2 receive +5V_RFSB, +6V_RFSB, +5V_dig_RFSB, -5V_ref.
-
RFCB receives +15V_RFCB, -15V_RFCB, +10V_RFCB, -10V_RFCB, +5V_dig_RFCB, -5V_ref.
-
MCDB1,2 receive +10V_MCDB, -10V_MCDB, +7V_MCDB, -7V_MCDB, +5V_dig_MCDB, -5V_ref.
-
RF Hub Backplane & RRx1,2 receive +3.3V_dig_BKPL_RRx.
Figure 3. PDB Block Diagram
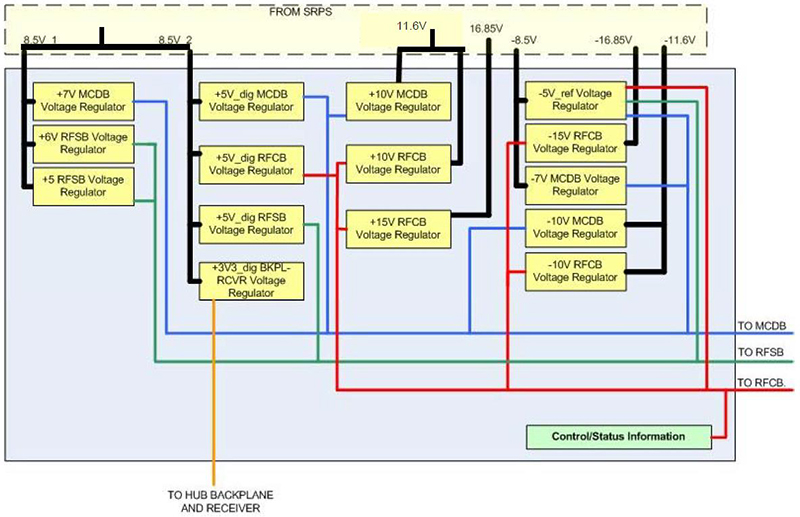
Figure 4. PDBv Block Diagram
A front panel POWER rocker switch located on the front of the PDB and PDBv is normally in “I (ON)” position. In this position it completes the loop for the RF Hub On/Off +5V signal that originated in the SRPS, permitting the SRPS to output power to the PDB or PDBv. In the “O (OFF)” position this switch opens the loop, interrupting the RF Hub On/Off signal, resulting in the SRPS removing power from the PDB or PDBv. The PDB or PDBv must be installed in slot 12 of the RF Hub to receive power from the SPRS as the RF Hub On/Off signal path is through a set of loopback connectors in the RF Hub backplane.
4 status LEDs are visible from the front panel of PDB or PDBv:
-
+16V – Power good indicator for +16.85V provided on J4 PDB/PDBv from SRPS.
-
-16V Power good indicator for -16.85V provided on J4 PDB/PDBv from SRPS.
-
+11V Power good indicator for +11.6V provided on J1 PDB/PDBv from SRPS.
-
-11V Power good indicator for -11.6V provided on J6 PDB/PDBv from SRPS.
-
+8V Power good indicator for +8.5V provided on J2 PDB/PDBv from SRPS.
-
-8V PDB only: Power good indicator for -8.5V provided on J5 PDB from SRPS. PDBv only: Power good indicator for regulated -8.5V generated from voltage regulator on PDBv and -11.6V from SRPS.
-
+5V_CB Power good indicator for voltage from voltage regulator on PDB/PDBv.
-
+3V3 Power good indicator for voltage from voltage regulator on PDB/PDBv for 1-Wire Network.
Troubleshooting
Remove power from SRPS before removing or connecting any cables.
-
Green indicators on front of SRPS indicate incoming 3-phase AC lines active. SRPS with GE P/N 5231801 is insensitive to AC line phase connections.
-
Be aware that problems with SRPS, especially during installations and upgrades, are most often due to poor or missing cable connections.
-
Remove and reconnect all cable connections, starting at equipment in magnet room (Figure 2) and working back to Penetration Panel (Figure 1).
-
On occasion the interconnecting cables between SRPS and magnet room components become internally damaged. This is especially true for hidden cables such as those between SRPS and equipment room side of Penetration Panel (PP). Strategies for eliminating cables or isolating failures to cables include:
-
Remove the access panel on the PP and temporarily disconnect and route cable from magnet room side of PP through opening and directly to rear of SRPS, effectively bypassing the suspect damaged interconnecting short cable. This applies to cables at PP J45, J46, J47, J48, J50, J51, and J52.
-
Cables interconnecting PP J51 to TDM J9 and PP J52 to TDM J10 are identical wiring but with different labeling. Cable connectors at TDM J9 and J10 are angled differently but pin-to-pin connections identical. Cannot swap cables at one end but can swap cables at both ends. Cables at remaining connections (J45, J46, J47, J48, and J50) are not similar.
-
-
-
Be aware that power failures attributed in error log to TDM often result from RRx failure. Disconnect cable from failing RRx from TDM to see if failure report changes.
-
Install the Advanced or Restricted service key and review error messages and corresponding proprietary extended error messages from the Error Log viewer located in the Common Service Desktop.
-
Error log references to multiple RF Hub components usually indicate failure of something common to components but failure not with any component.
-
References to single RF Hub component may mean that component faulty; confirm indicator LEDs on RF Hub component per Tables 2 - 4.
-
-
Perform 1-Wire Network Diagnostic and review results and compare to Error Message contents to diagnose to bad cable connection or component. See Table 1 for example of normal output. If RF Hub missing power and 1-Wire Network Diagnostic appears normal then 1) make sure power switch ON at top of PDB/PDBv in slot 12 and 2) return to step 2 and recheck all cable connections, especially SRPS J46 and PDB/PDBv J1 and SRPS J48 and PDB/PDBv J2.
-
If necessary review state of status LEDs on front of PDB or PDBv to understand where to troubleshoot loss of power.
| SRPS PDB Board ID Detected |
| SRPS HS OT Not Faulted |
| SRPS Fan Run Not Faulted |
| SRPS Exc Board ID Detected |
| SRPS Exc I/O Detected |
| SRPS Main AC Input Voltage OK |
| SRPS +5.3V Under Voltage Sense OK |
| SRPS +5.3V Over Voltage Sense OK |
| SRPS Exciter Over Voltage Not Faulted |
| SRPS Exciter Over Current Not Faulted |
| SRPS HUB I/O Detected |
| SRPS Cable Detected +8.5V |
| SRPS Hub +8.5V Under Voltage Sense OK |
| SRPS Hub +8.5V Over Voltage Sense OK |
| SRPS Hub Over Voltage Not Faulted |
| SRPS Hub Over Current Not Faulted |
| SRPS TCB I/O Detected |
| SRPS +3.16V Under Voltage Sense OK |
| SRPS +3.16V Over Voltage Sense OK |
| SRPS +5.05V Under Voltage Sense OK |
| SRPS +5.05V Over Voltage Sense OK |
| SRPS TDM Over Voltage Not Faulted |
| SRPS TDM Over Current Not Faulted |
| SRPS Cable Detect I/O Detected |
| SRPS Exciter Cable Detected |
| SRPS RF Hub Cables Detected |
| SRPS TDM Cables Detected |
| SRPS Severe Fault Not Detected |
| SRPS TDM I/O Detected |
| TDM Board ID Detected |
| TDM I/O Detected |
| SRPS TDM Input Power OK |
| SRPS TDM Internal 3.3V Power OK |
| SRPS TDM Clock Input Present |
| SRPS TDM Clock Output Present |
| SRPS TDM Loop Antenna Present |
| Front Status LEDs | Status | LED Description |
| FAULT |
Dark – OK Red – fault |
|
| Front Status LEDs | Status | LED Description |
| +5D |
Green – OK Red – fault |
Power good status for voltage supplied by PDB or PDBv. |
| -5V | ||
| +5V | ||
| +6V |
| PWR GOOD LEDs | Status | LED Description |
| +5V | Green - OK | Power good status for voltage supplied by PDB or PDBv. |
| -5V | ||
| -7V | ||
| +7V | ||
| +10V | ||
| -10V | ||
| +3.3V | Power good status for voltage from onboard regulator. | |
| +1.2V | Power good status for voltage from onboard regulator. |
| Front Status LEDs | Status | LED Description |
| +5V | Green - OK | Power good status for voltage supplied by PDB or PDBv. |
| +3.3V | Power good status for voltage from onboard regulator. | |
| +1.2V | Power good status for voltage from onboard regulator. | |
| +10V | Power good status for voltage supplied by PDB or PDBv. | |
| -10V | ||
| +15V | ||
| -15V |