
- SIGNA MR355 / SIGNA MR360
- Service Manual
- 5856356-3EN Revision 5.0
- Basic Service Documentation. Copyright General Electric Company.
- 00000018WIA30441030GYZ
- id_131066141.7
- Aug 27, 2020 11:16:35 AM
Mobile Configuration
Prerequisites
| Required persons | Preliminary requirements | Procedure | Finalization |
|---|---|---|---|
| 1 | Not Applicable | 15 minutes | Not Applicable |
About this task
The Mobile Site Setup feature provides the ability to change a mobile's Hospital Name, Host Name, IP Address, Netmask and the Host or Network DICOM information on the Mobile Site Setup window. The IIP InSIte connection will work at each site, provided it was checked out and has its own System ID in the Online Center database.
Starting the Mobile Setup Tool
Procedure
- With Signa up and running in Scan mode, open the Service Desktop
by clicking the Service Desktop button on the
left side of the screen. (See Figure 1.)
Figure 1. Service Desktop Button 
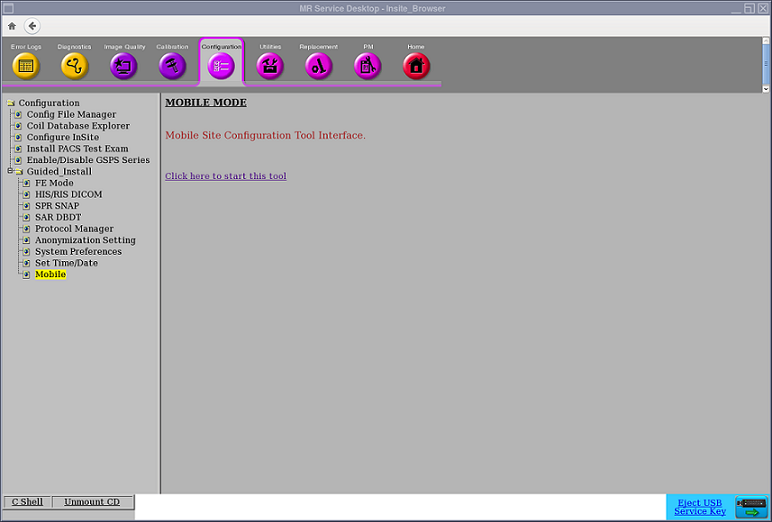
- On the Service Desktop, open the Common Service Browser if not
already running. Start the Mobile Tool as shown in Figure 2.
Figure 2. Guided Install Options 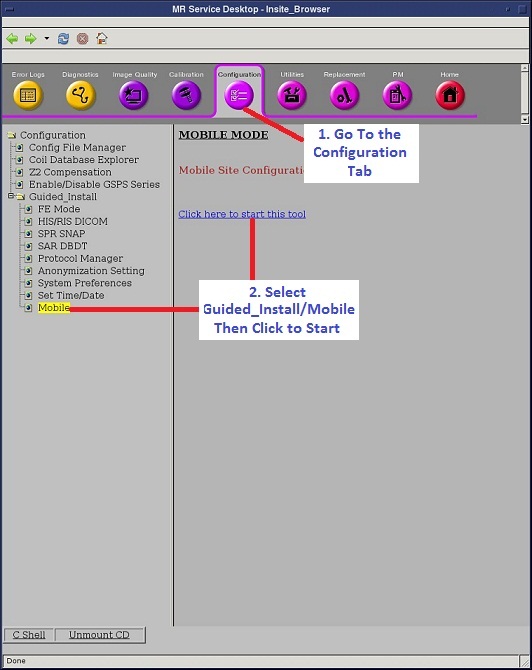
Mobile Site Setup Window Description
Procedure
- Refer to the Mobile Setup window in Figure 3 and Table 2 for a description
of each field on this window.
Figure 3. Mobile Setup Window 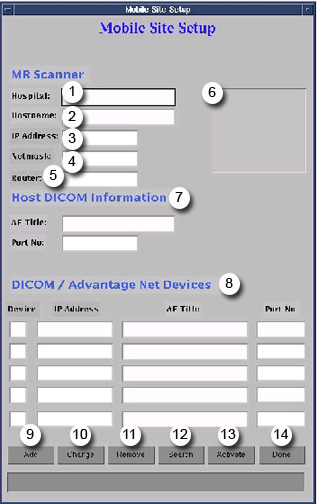
Table 2. Mobile Setup Field Descriptions Field Description (1) Hospital Name Enter the hospital name (up to 30 characters using A-Z, a-z, 0-9, & - only). (2) Host Name The system's host name can consist of up to 30 characters, and is stored in the configuration file. A GE Service Engineer enters the system's host name initially. (3) IP Address An IP address is four groups of integers with a dot between each group that uniquely identifies the computer on the network. Consult a GE Service Engineer for this information. (4) Netmask Netmask address should be a four groups of integers with a dot between each group that uniquely identifies the computer on the network. Consult a GE Service Engineer for this information. (5) Router This information will need to be provided by the site's network administrator. Typically, an IP Address will be provided (generally called Default Gateway). (6) List of Previously Entered Hospitals Select this key to choose a different hospital. (7) AE Title and Port No. Host DICOM information is optional for mobiles that interface with a Network DICOM device. Consult a GE Service Engineer for this information. (8) Network DICOM Devices Used to add up 5 network DICOM devices that interface with the mobile. Consult a GE Service Engineer for a list of IP addresses, AE Title and port number. (9) Add Select Add to add a hospital to the list. (10) Change Select Change to edit or modify previously stored hospital information. (11) Remove Select Remove to delete a hospital from the list. (12) Search Select Search to find a hospital on the list. Search options are executed by either Hospital or Host name. (13) Activate Select Activate to activate the selected hospital. (14) Done Select Done to exit the Mobile Site Setup window.
Mobile Site Activation Window Description
Procedure
- Note:Figure 4 displays the Mobile Site Activation window.Table 3 offers an description of each button.
Mobile Site Activation is opened by clicking (13) Activate.
Figure 4. Site Activation window 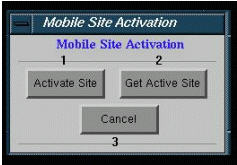
Table 3. Mobile Site Activation Field Descriptions Button Description (1) Activate Site Select this button to activate a different hospital. A reboot is required with this selection. (2) Get Active Site Select this button to use the currently active hospital and its network and DICOM information. A reboot is not required. (3) Cancel Select this button to cancel a selection and close the Mobile Site Activation window.
Applications and Considerations
About this task
The Applications feature is used to update the image annotation with the appropriate name for the hospital or outpatient facility.
Procedure
Selecting a Different Hospital
Procedure
- Select a hospital from the list on the Mobile Site
Setup window. (See Figure 5.)
Figure 5. Site List 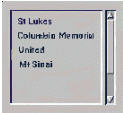
- Select Activate Site on the Mobile Site Activation menu. (See Figure 6.)
Figure 6. Site Activation Pop-Up Window 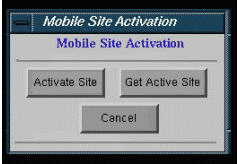
- Click Yes on the Exit Mobile
GUI dialog box. (See Figure 7.)
Figure 7. Exit Mobile GUI Dialog Box 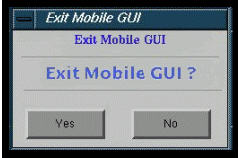
Adding a New Hospital Using Get Active Site
Procedure
Adding a New Hospital
Procedure
- With Signa up and running, access the Mobile Setup window. (SeeStarting the Mobile Setup Tool.)
- Select Add on the Mobile Site Setup window.
- At the minimum, enter the Hospital Name, Host Name, IP Address, Netmask and Router. Consult with a GE Service Engineer for this information if unknown.
- Click Add again.
- If the newly added hospital needs to be activated, proceeds as follows:
Finalization
Procedure
- Shut Signa down from the Service Desktop and restart.
- Perform a quick test scan. The system should now display the correct site information. If not, repeat the procedure in Starting the Mobile Setup Tool.