
- SIGNA MR355 / SIGNA MR360
- Service Manual
- 5856356-3EN Revision 5.0
- Basic Service Documentation. Copyright General Electric Company.
- 00000018WIA306C5E20GYZ
- id_131062863.0
- Aug 29, 2019 1:33:55 AM
DQA Tool II
Prerequisites
| Required persons | Preliminary requirements | Procedure | Finalization |
|---|---|---|---|
| 1 | Not Applicable | 30 minutes | Not Applicable |
| Item | Quantity | Effectivity | Part number | Manufacturer |
|---|---|---|---|---|
| DQA-III Phantom | 1 | - |
2321556 | - |
| Condition | Reference | Effectivity |
|---|---|---|
|
Laser Light Alignment completed. | - | - |
|
Rough Supercon Shim | - | - |
About this task
The DQA II tool will determine proper gradient polarity (positive to positive and negative to negative) and proper gradient wiring (X amp drives X coil, Y amp drives Y coil, Z amp drives Z coil) by scanning a series of Axial and Coronal images of the DQA III Phantom.
The tool will also verify that the proper phantom is being used. After proper Gradient orientation is confirmed, the tool will adjust for Z-ISO-Center and gradient calibration. If Z-ISO adjustments or gradient calibration adjustments are needed, the DQA-II tool will perform the appropriate iterations to complete. Therefore, the DQA II tool's completion time varies.
| Notice | |
|---|---|
| Notice | |
|---|---|
Procedure
- Landmark on the centerline of the DQA-III Phantom. Laser must
be in middle of black circumferential maker line.
Figure 1. Phantom Orientation, split top head coil 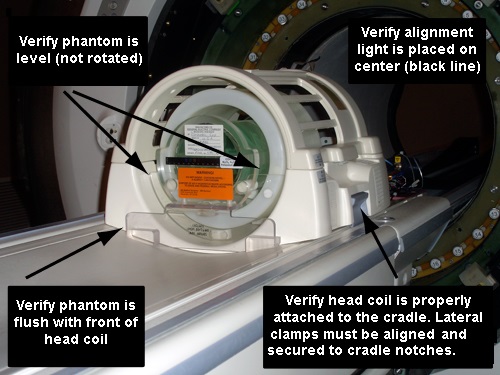
- A new window will appear (see Figure 2). Select Start to begin the DQA calibration.
Figure 2. DQA at Startup 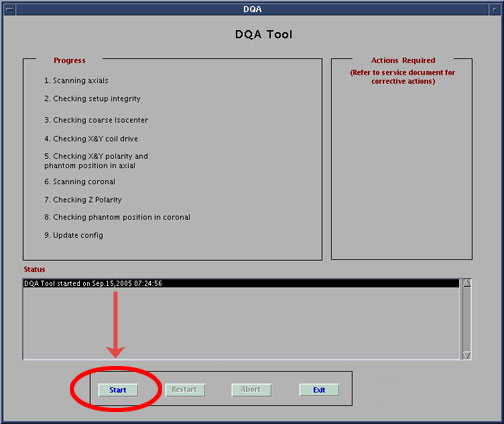 Note:
Note:All phantom images acquired during the DQA II tool can be viewed in the browser. You can view these images if problems occur.
To stop the DQA Tool without restarting it click Abort at any point.
- As the DQA tool progresses, the status appears in the Progress area. If problems are encountered, they will
appear in the Action Required section (see Figure 3).
Figure 3. DQA Screen with Actions Required 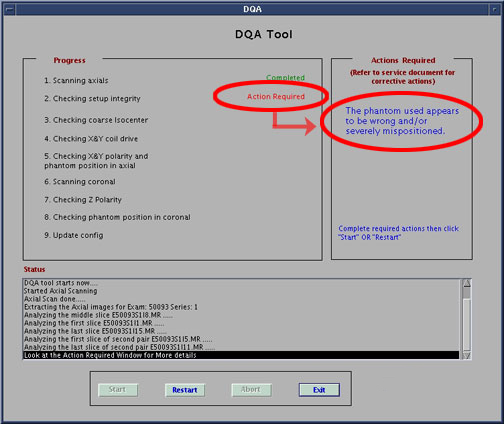 Note:
Note:Once you have addressed the issues indicated in the Action Required, click Restart. This will start the DQA Tool again from the beginning.
- The tool will indicate when it has completed successfully (see Figure 4).
Figure 4. Successful Test 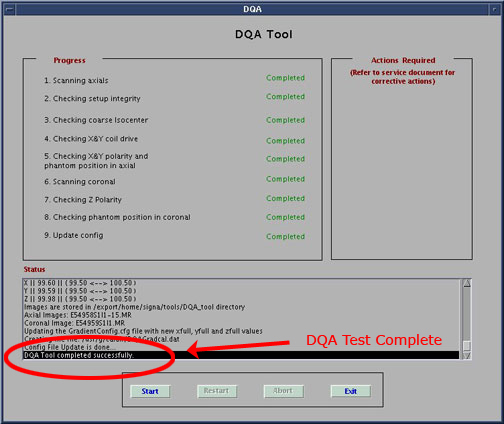 Note:
Note:To restart the DQA Tool at any point during the process click Restart. To stop the DQA Tool without restarting it click Abort.
Finalization
- Click Exit to exit the tool.