
- SIGNA MR355 / SIGNA MR360
- Service Manual
- 5856356-3EN Revision 5.0
- Basic Service Documentation. Copyright General Electric Company.
- 00000018WIA30D43640GYZ
- id_20143337.1
- Mar 23, 2021 2:27:44 AM
SV25.3 (USB load only)
Install the host system software for SV25.3 and later (USB load only).
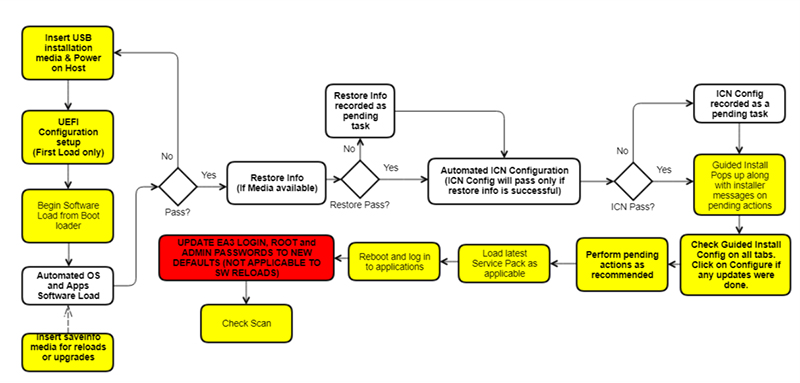
This flowchart shows the high-level summary of the USB host system software load workflow. Boxes shown in white are automated. All other actions must be completed manually. Note the important step of updating EA3 login, root, and admin passwords to new defaults (not applicable to SW reloads) in the red box. This has been mandated from the SV25.3 and later software release.
| Notice | |
|---|---|
| Loading software | |
|---|---|
| Step | Procedure for USB load only |
| Prerequisites | (For new installation only)
|
(For reinstallation only)
| |
|
Note: Refer to the MR Service Pack Software Matrix (DOC1667089), available from the online documentation library and make sure the necessary service pack media (if any) is available. Do not start the software load until this media is available.
| |
| Required media |
|
| (For reinstallation) Perform SaveInfo (Check Information instead if using an older SaveInfo media) | SAVE INFO. . |
| Load USB host system software | (For new installation only)
Loading USB host system software . Note: The Host OS Load, Applications Software Load, and ICN OS copy actions should complete automatically. The Configure ICN action may fail, which would be reported as a failure in the final report. If any failures occur prior to the Applications Software Load completion, restart the Software Load process. For a list of errors and possible actions during the software load procedure, see Troubleshooting the software load. |
| (For reinstallation only)
Reloading or upgrading USB host system software. Note: If a RestoreInfo media with all the required files is available, then Host OS load, Applications Software Load, ICN Configuration and SSA licenses, including restore of connectivity settings, are all automatically executed sequentially. In case any failures are observed, after the completion of applications software load, a dialog box appears showing all remaining tasks that need to be completed. To complete these tasks manually, see the procedures in this table. If any failures occur prior to the applications software load completion, restart the software load process. For a list of errors and possible actions during the software load process, see Troubleshooting the software load. | |
| System configuration | (For new installation only) Complete network configuration, Guided Install Site Configuration Options,Security levels configuration in Guided Install. Complete any other site configuration as needed in Guided Install. |
| Configure ICN (VRE) OS | Configuring the ICN - VRE. Note: This task is automated for software reinstallations and upgrades if the RestoreInfo action is successful. |
| Install SSA | The SSA license is restored during the RestoreInfo process. This step is not necessary for reinstallation unless the service license ID has been modified. If the service license ID has been modified, or if this is a new install, record the service license ID and contact OLE to generate a new license for the site. Note: With
SV25.3 and later software, the SSA 16-digit license code has been simplified to remove ambiguous character such as O and 0, and I and 1. Thus, first-time upgrades to
SV25.3 and later will cause the 16-digit license code to change, which means the SSA soft key license for the site must be regenerated after updating the 16-digit code in the SSA back office. See Service Licensing for information on how to record the service license ID, order the license and load the license. |
| Install options/option keys | .For the purchasable option keys, see OPTION KEY CATALOG MATRIX. Note: Signa Secure Advanced option: If the customer purchased this license, configure the security setting in Guided Install to Signa Secure Advanced. The system must be restarted to enable the highest security configuration in Guided Install. Note:
Option key strategy changed since SV25.2, Option keys of “Dwprep”, “Propt2”, “Propbody”, “Propt2flr”, “Propt1flr” were combined into option key “propdwi” and “prop” in M7000JA. Please ignore below message, when install option key M7000JA on system. 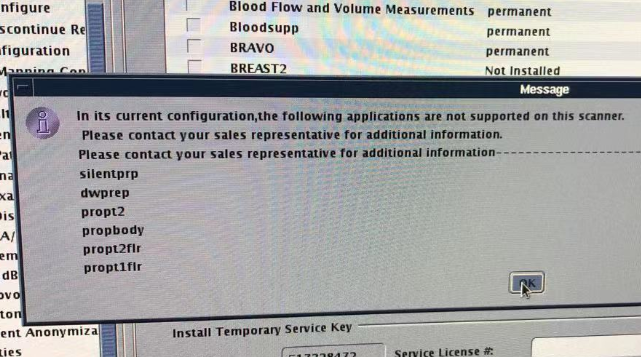 |
| Install operator manual | Load MR Operator Documentation. |
| Install latest service pack (if required) |
Installing Software Patches (General Guide). Note: Refer to the MR Service Pack Software Matrix (DOC1667089), available from the online documentation library and make sure the necessary service pack media (if any) is available. Do not start the software load until this media is available. |
| Close Guided Install | Closing Guided Install allows for the remainder of the USB installer actions including scantools (default) option keys install and upgrade mode checks for ICW. This step is critical for successful completion of software load, thus do not reboot the system without closing Guided Install. |
| Reboot | Reboot and and click Start to log in to applications. Note: The first boot after a software upgrade will take a long time due to extended TPS Reset.  |
| Setup EA3 login password | Note: This step is applicable to new installations AND UPGRADE FROM sv20 AND SV23 SOFTWARE. Software upgrades from SOFTWARE VERSION OF SV25.0 AND ABOVE or re-LFCs with good SaveInfo media will transfer older passwords and will not need to change the passwords on initial login. Warning: You must accurately follow the Changing passwords procedure. See Changing passwords. If you do not follow the procedure, it may lead to a situation where the system is locked up and not accessible for service and/or clinical use. The only option for recovering from forgotten passwords is to reload the software without using the RestoreInfo and completing all system calibrations. Software versions
SV25.3 and later
enforce a mandatory change of the login password on first boot. Use the initial default password for sdc user adw2.0adw2.0 to log in. At the prompt to change passwords, provide new default password adw2.02.0Note: adw2.02.0 will now be set as the new default password for
SV25.3 and Later
-based software revisions. Inform the customer about the new default login password. 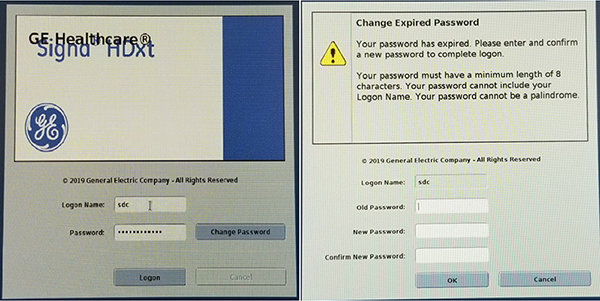 |
| Installation and calibration | (For new installation only) Continue with the next steps in the Installation and Calibration Wizard. Refer to Installation and calibration wizard (ICW) Installation mode for your product. |
| (For reinstallation only) Launch Installation and Calibration Wizard and complete any necessary calibration procedures. Refer to Installation and calibration wizard (ICW) Upgrade mode for your product. | |
| Configure About MR Scanner | If not completed during previous steps, run the About MR Scanner tool. See About MR Scanner. |
| Do a check scan | Doing a check scan. |
| Setup EA3 admin and root passwords | Note: This step is applicable to new installations AND UPGRADE FROM sv20 AND SV23 SOFTWARE. Software upgrades from SOFTWARE VERSION OF SV25.0 AND ABOVE or re-LFCs with good SaveInfo media will transfer older passwords and will not need to change the passwords on initial login. Warning: You must accurately follow the Changing passwords procedure. See Changing passwords. If you do not follow the procedure as indicated, the system could lock up and become inaccessible for service and/or clinical use. The only option for recovering from forgotten passwords is to reload the software without using RestoreInfo and complete all system calibrations. Software versions
SV25.3 and later enforce a mandatory change of the EA3 accounts on first use. Change the EA3 root user password from operator to operator2.0, and EA3 admin user password from installinstall to install2.0Note: Failing to make this change could lead the customer to changing their passwords without notification to service. This could lead to system lockout if passwords are forgotten. For more information on how to change EA3 passwords, see Data privacy. |