- id_13107521
- Version: 3.0
- Date: Aug 29, 2019 2:01:00 AM
LVShim Procedures
Prerequisites
| Required persons | Preliminary requirements | Procedure | Finalization |
|---|---|---|---|
| Not Applicable | 30 minutes | 10 minutes |
|

| Condition | Reference | Effectivity |
|---|---|---|
|
No required conditions. |
- | - |
Three different shimming procedures are described in this document.
LVShim - Rough (performed at new site installations only):
-
The objective is to improve the homogeneity to a point where Grafidy and other calibrations can be performed. Use the three-piece LVShim phantom. The Rough LVShim process is performed with the sampling diameter of 45 cm DSV and a bandwidth higher than Fine Shim and Gradient Shim.
-
Rough LVShim is usually required at new sites that were never previously shimmed. For a new magnet installation, the magnet ATR shim currents are used for Rough LVShim.
LVShim - Fine
The objective is to further improve and tune the homogeneity as compared to Rough LVShim. Use the three-piece LVShim phantom. The Fine LVShim process is performed with a sampling diameter of 45 cm DSV and a bandwidth lower than Rough Shim.
LVShim - Rough and Fine use the Supercon shim power supply to dial correction currents into superconductive correction coils.
LVShim - Gradshim
The objective is to perform fine tuning of the homogeneity of the magnet by using gradients only. The Gradshim process is performed with a sampling diameter of 22 cm DSV and the same bandwidth as Fine LVShim, which depends on the quality (good/bad) of the fine tuning. Once the scan passes and all harmonics are within specification, the magnetic field is reanalyzed in Test mode automatically at 45 DSV for customer acceptance.
The Gradshim process includes LVShim - Test. The objective of this test is to analyze completed scans at 45 DSV without calculating currents.
For DV systems 22.x and earlier, 1.5T LVShim uses green phantoms and 3.0T LVShim uses pink phantoms.
For DV systems 23.x and later, 1.5T LVShim uses green phantoms and 3.0T LVShim uses either green or pink phantoms.
During LVShim procedures, the system performs a SNR check to verify system integrity. If the SNR check fails, troubleshoot the SNR issue (in particular, check the I and Q drive cable connections) before continuing with LVShim.
Preparing for LVShim Procedure
Procedure
- Remove all coils from the cradle and phantoms from the bore.
- notice
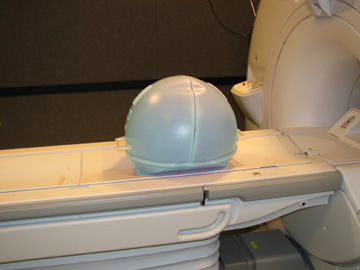
- Set up and align the LVShim phantom. Align the phantom so that:
-
The phantom’s seam is oriented perpendicular to the table.
-
The phantom’s z-axis is along the length of the cradle.
-
The phantom is centered left to right with respect to the cradle top.
Figure 1. Placing LVShim Phantom on Patient Table
-
- Landmark on the LVShim phantom crosshairs.
- Press the Advance to Scan button.
- Perform a phantom centering check scan and center frequency check using manual prescan, and then click Save Frequency.
- Perform a phantom centering check scan.
- Start the LVShim tool from the Common Service Desktop, on the
Calibration tab.
Click Calibration > LVShim, and then click Click here to start this tool.
 |
Rough LVShim Procedure
This procedure is required for new sites that were never shimmed. To set up the phantoms and system, follow the procedures in the Magnet and Cryogens Subsystem Manual. The setup procedure to perform Supercon Shim - Rough and Supercon Shim - Fine are the same, but the specifications for each mode are different. The LVShim tool scans at different bandwidths and is analyzed at 45 cm DSV.
-
The bandwidth for Supercon Shim - Rough is 1,000 Hz and automatically selected.
-
The bandwidth for Supercon Shim is 200 Hz.
Procedure
 danger
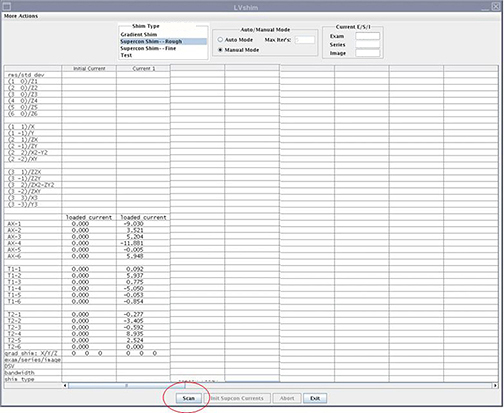
- After launching the LVShim tool, select Supercon Shim–Rough. (The Manual Mode option is automatically selected.)
Figure 2. Selecting Shim Type

- Verify that the Gradshim values are set to zero.
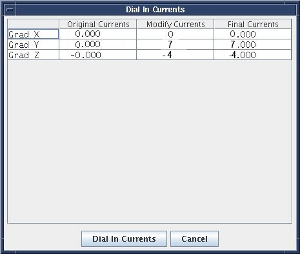
- If performing Supercon Shim–Rough for the first time, add original currents from the magnet manufacturing plant by clicking Init Supercon Currents.
- When a Dial In Currents window is displayed,
enter the original manufacturing plant currents one by one in the Modify Currents column, pressing Enter after each entry to move to the next line. After the entire column
is modified, click Dial in Currents.
Figure 3. Adding Original Manufacturing Plant Currents (Examples)
- On the LVShim user interface, click Scan.note:
To abort the scan, click Abort or press the Stop Scan button on the control panel.
note:During LVShim procedures, the system performs a SNR check to verify system integrity. If the SNR check fails, troubleshoot the SNR issue (in particular, check the I and Q drive cable connections) before continuing with LVShim.
Figure 4. Starting Scan
After the scan is completed, the tool calculates the harmonics and compares them with the specifications.
-
Green cell = Passed specification
-
Red cell = Failed specification
Figure 5. Harmonics and Specifications Comparison
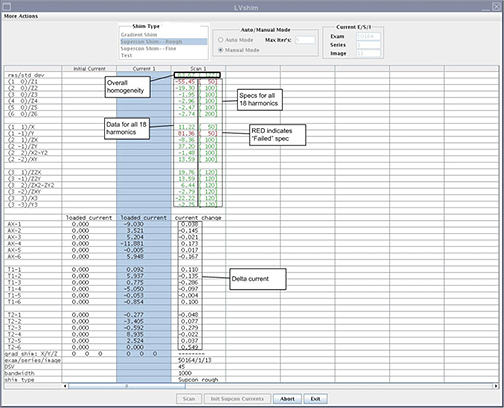
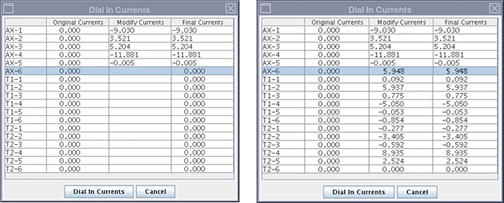
The tool calculates the delta currents and the new currents, and displays currents in a popup window.
Figure 6. Currents Displayed in Dial In Currents Popup Window
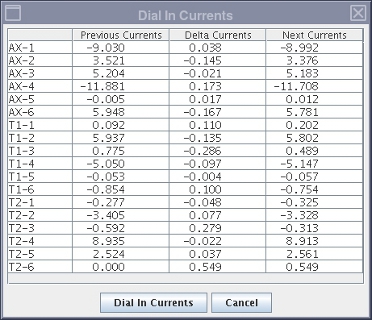
-
- To accept or decline the new currents:
- If all harmonics data cells are green, decline the new currents by clicking Cancel.
- If any harmonics data cells are red,
click Dial in Currents to accept the new currents.
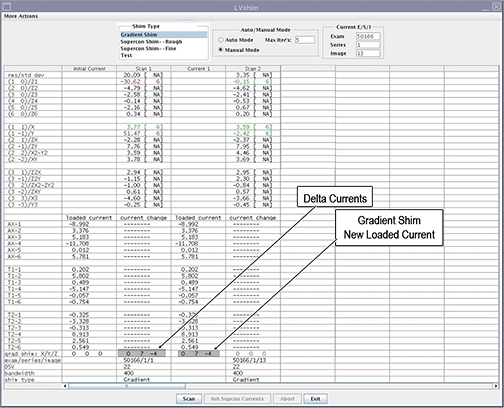
The new currents will be displayed in a new column in this window.
Dial in the currents from the new Loaded Current column using the Supercon Shim power supply. See the applicable Magnet and Cryogens Subsystem Manual for information about
dialing in the currents.
Figure 7. Second Iteration of LVShim
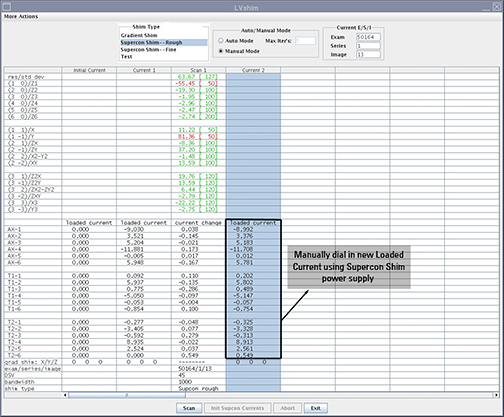 note:
note:The delta currents in the LVShim user interface will change to purple if the current is not accepted, and the new Loaded Current column does not display.
- After all harmonics are within specification, click Exit.
- Perform Setting up grafidy hardware before proceeding to Fine LVShim.
Fine LVShim Procedure
To set up the phantoms and system, follow the procedures in the Magnet and Cryogens Subsystem Manual. The LVShim tool scans at different bandwidths and is analyzed at 45 cm DSV.
Procedure
- danger
- On the LVShim tool, select Supercon Shim–Fine. (The Manual Mode option is automatically selected.)
- On the LVShim tool, click Scan.note:
During LVShim procedures, the system performs a SNR check to verify system integrity. If the SNR check fails, troubleshoot the SNR issue (in particular, check the I and Q drive cable connections) before continuing with LVShim.
note:To abort the scan, click Abort or press the Stop Scan button on the control panel.
After the scan is completed, the tool calculates the harmonics and compares with the specifications shown in Figure 5.
-
Green cell = Passed specification
-
Red cell = Failed specification
The tool calculates the delta currents and the new currents and displays currents in a popup window (see Figure 6).
-
- To accept or decline the new currents:
- If all harmonics data cells are green, click Cancel to decline the new currents.
- If any harmonics data cells are red,
click Dial in Currents to accept the new currents.
The new currents are displayed in a new column in this window. Dial in the currents from the new Loaded Current column using the Supercon Shim power supply. See the applicable Magnet and Cryogens Subsystem Manual for information about dialing in the currents.
note:If the current is not accepted, the delta currents in the LVShim user interface change to purple, and the new Loaded Current column is not displayed.
If the harmonics are not within specifications, perform another iteration using Expert Mode to scan with different parameters or reanalyze any image with different parameters. See LVShim Expert Features.
Gradshim LVShim Procedure
By default, Gradshim is performed in Auto mode, although Manual mode is also available. Both modes are described below.
Auto Mode
In Auto mode, gradient currents are automatically calculated after you click Scan to fine tune the homogeneity of the magnet. In this mode, the tool stops after the X, Y, and Z harmonics are within specification. In Test mode, the image from the last scan is automatically reanalyzed.
Procedure
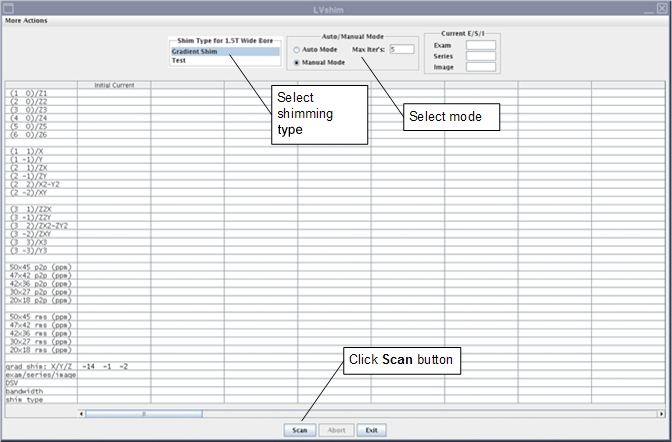
- note:Verify that the Auto Mode radio button is selected. If it is not, select it.
During LVShim procedures, the system performs a SNR check to verify system integrity. If the SNR check fails, troubleshoot the SNR issue (in particular, check the I and Q drive cable connections) before continuing with LVShim.
- Select Gradient Shim, and then click Scan.
Figure 8. Gradient Shim – Auto Mode
In Auto mode, the tool does the following:
-
Sets up the protocol and collects image data
-
Calculates the harmonics and compares it with the specification
-
Calculates the delta currents and the new currents based on the harmonics
-
Completes multiple iterations (maximum of 5) until harmonics meets the specification
-
Shows the reanalysis of the last iteration in the final column in Test mode (customer acceptance specification)
-
Manual Mode
Procedure
- Prepare the phantom for the LVShim procedure as described above.
- Select Gradient Shim and Manual
Mode, then click Scan.
Figure 9. Gradient Shim – Manual Mode
After the scan is complete, the tool calculates all the harmonics, but only X, Y, and Z harmonics are compared to specifications. For other harmonics and rms/std dev, the specification is NA.
-
Green cell = Passed specification
-
Red cell = Failed specification
Figure 10. Gradient Harmonics and Gradient Bits
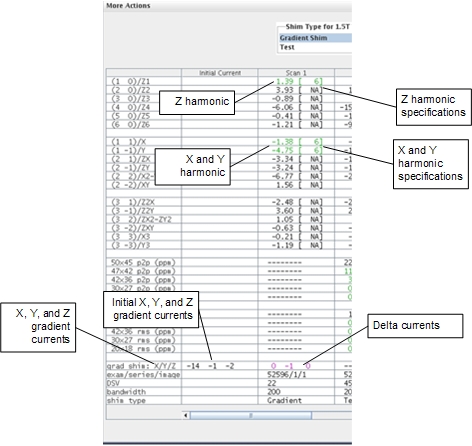
The tool calculates the X, Y, and Z gradient delta currents (for gradient bits only) and displays the new currents based on the harmonics in another window.
Figure 11. Original Delta and New Currents (Examples)
-
- To accept or decline the new currents:
- If X/Y/Z harmonics data cells are green, click Cancel to decline the new currents. Ignore cells with the specification NA.
- If any harmonics data cells are red, click Dial In Currents to accept the new currents. The new currents will load in a new column in the LVShim user interface as shown in Figure 10. Repeat Step 2.
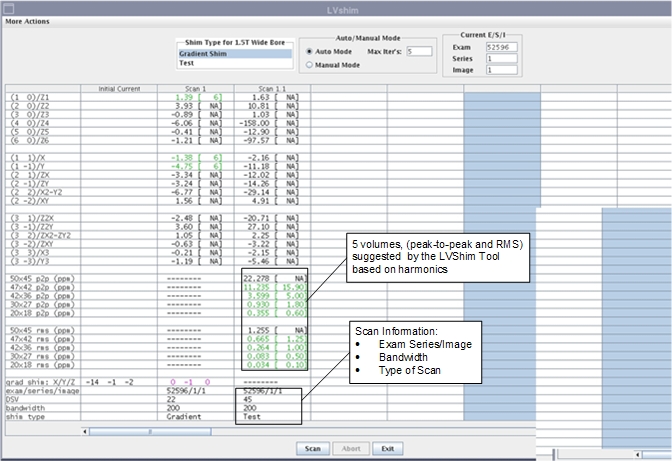
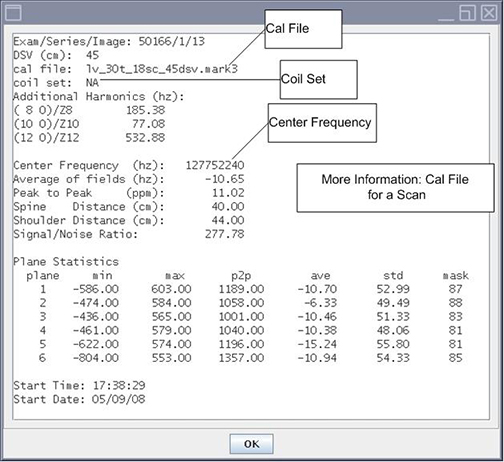
Figure 12. Harmonics and Specifications Information
- For more detail on the cal file name, center frequency, or coil
set used for scanning:
- Click the Scan column for which more information is required.
- Select More Actions > More Info.
Figure 13. More Information on Scan
- When all iterations are complete and all harmonics are within
specification, click Exit on the LVShim window.
If any harmonics fail in Gradshim, re-run Grafidy 3 Eddy Current Calibration.
If this also fails, run Fine LVShim Procedure.
Finalization
Procedure
- For Rough shim, continue with the calibration flow.
- For Fine shim, perform:
-
Gradshim
-
DQAII
-
- Remove any phantoms and/or tools used.
- Perform a Doing a check scan before turning the unit over to the customer.