Installs the Image Compute Node (ICN) into the cabinet.
Prerequisites
Personnel requirements
Required persons
Preliminary requirements
Procedure
Finalization
1
-
40 minutes
-
Replacement parts
Item
Quantity
Part number
Manufacturer
Dell R630 (Gen6) Performance ICN with Dolphin 1 Interface Card(For software version DV26.0 (ICE) and later)
1
5931000-3
-
Dell R630 (Gen6) Advanced ICN with Dolphin 1 Interface Card(For software version DV26.0 (ICE) and later)
1
5931000-5
-
Dell R640 (Gen7)Performance with Dolphin 1 Card(For software version DV29.1 and later)
1
5941000-3
-
Dell R640 (Gen7-DL) PerformanceICN with Dolphin 1 Interface Card and GPU Card(For software version DV29.1 and later)
1
5941000-9
-
Dell R640 (Gen7-DL) Performance ICN with Dolphin 2 Interface Card and GPU Card(For DV29.1_R02 with SP01 and later)
1
5941000-10
-
ICN PCIe Transition Cable X4-X8 for Dolphin 1 ICN (system with ICE)
1
5725719
-
PCIe Cable for Dolphin 2 ICN
1
5887762
-
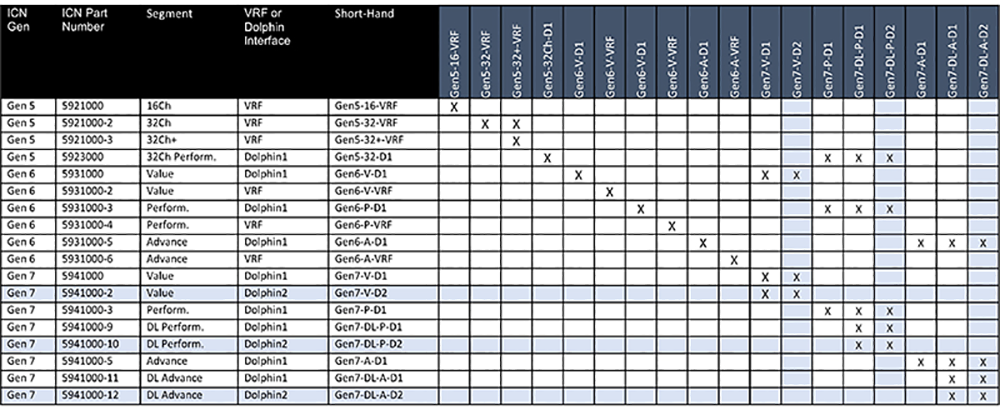
Note: This table represents the possible replacement ICNs for each model. Find the installed model on the left and see what models can be used to replace it. Make sure you have the proper software level to support all possible options as well as PCIe cable if changing dolphin board types.Figure 1. Compatibility matrix
Safety
Before working in any GE Healthcare MR suite or performing any GE Healthcare service procedure, you must:
Have read and understood all hazard conditions and safety requirements in the latest revision of the GE Healthcare MR Service Safety Manual (5452735).
Have successfully completed all relevant GE Healthcare Environmental Health and Safety (EHS) courses (or for non-GE employees, equivalent workplace training courses).
Comply with all site-specific training and workplace safety requirements.
If you have any safety concerns at any time, do not begin work or immediately stop work and move to a safe location. Immediately contact your supervisor or site safety officer for instructions on how to proceed.
Procedure
With the slide rails out, install the new ICN, lining up the studs on the ICN with the slots on the rails.
Connect all other cables that were previously removed to the rear of the new ICN.
Note: If changing between ICN styles (units with the Dolphin 1 interface with units with the Dolphin 2 interface) make sure the associated PICe cable is available. Some cabinets will contain both cables. Save the alternate cable with the cabinet for future use.
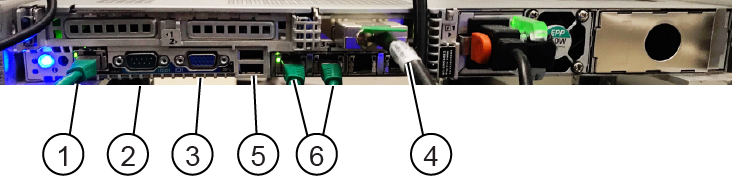
Figure 3. ICN cable connections (Gen 7 and Gen 7-DL, Dell R640)
1
PCIe port (Dolphin 1 card), or PCIe P1 port (Dolphin 2 card)
2
iDRAC (management controller for ICN)
3
Raw data server (RDS) - optional, only for research sites
4
Main switch (port 4), only 1 network cable is needed for GEN 7 and Gen 7-DL ICN
5
Power
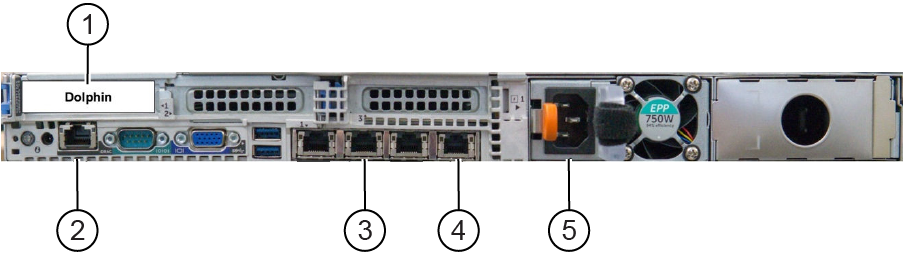
Figure 4. PCIe cable connection - Dolphin 2 card
Note:
Ethernet ports 1 & 3 are NOT used. Ethernet port 2 is used ONLY when the system is connected to a Raw Data Server (external to the MR System), it should be left free in all other cases. Not following this configuration may lead to VRE configuration failures and/or boot-up/TPS failures.
Push the two release tabs down and move the ICN all the way into the PGR cabinet until it locks in place.

 Note:
Note: