
- SIGNA MR355 / SIGNA MR360
- Service Manual
- 5856356-3EN Revision 5.0
- Basic Service Documentation. Copyright General Electric Company.
- 00000018WIA30FB2F20GYZ
- id_131073903.0
- Aug 29, 2019 1:55:19 AM
CRADLE GUIDE RAIL LATCH ADJUSTMENT
Prerequisites
| Required persons | Preliminary requirements | Procedure | Finalization |
|---|---|---|---|
| 1 | 0 minutes | 60 minutes | 0 minutes |
| Item | Quantity | Effectivity | Part number | Manufacturer |
|---|---|---|---|---|
| Standard Tool (Non Magnetic) | 1 | - | - | - |
| ||||
About this task
The cradle is locked in home position on the Fixed Table by a latch in the cradle, which engages a notch in the cradle guide strip near the end of the Fixed table. The cradle should be able to just engage this notch, without extra force, when pushed to home position on the table top, yet it must engage it tight enough so the table top (cradle) will not move on the Patient table freely when it is not engaged with LPCA.
Cradle Guide Rail Latch Adjustment when Table is docked to Gantry
Procedure
- Loosen five screw securing guide rail.
- Move Guide rail up or down as required to create clearance for cradle movement.
- Move Guide rail forward or back word as required for cradle locking.
Figure 1. Adjustment of Delrin Guide 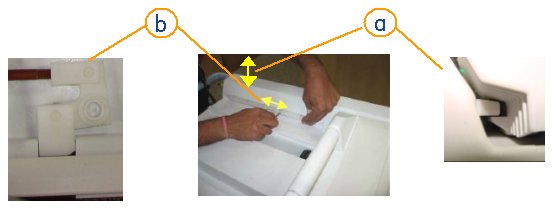
- Ensure that the cradle latches to the delrin guide and also
check for the Cradle Play, by moving the Cradle. If adjustment is
not good, readjust the guide following the same steps.
Figure 2. Checking Cradle latch adjustment 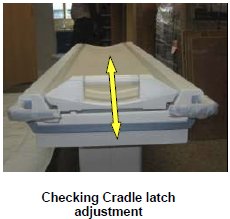
Cradle Guide Rail Latch Adjustment when Table is not docked to Gantry
Procedure
- Loosen five screw securing guide rail.
- Move Guide rail up or down as required to create clearance for cradle movement.
- Move Guide rail forward or back word as required for cradle locking.
Figure 3. Adjustment of Delrin Guide - Take back the cradle to home position. Ensure that the cradle
latches to the delrin guide and also check for the Cradle Play, by
moving the Cradle. If adjustment is not good, readjust the guide following
the same steps.
Figure 4. Checking Cradle latch adjustment
Finalization
No finalization steps.