- id_12373890
- Version: 1.4
- Date: Jul 5, 2019 10:03:33 PM
fMRI QA Tool
Prerequisites
| Required persons | Preliminary requirements | Procedure | Finalization |
|---|---|---|---|
| 1 | 5 minutes | 15 minutes | Not Applicable |
| Item | Quantity | Effectivity | Part number | Manufacturer |
|---|---|---|---|---|
| Head TLT sphere (for 1.5T) | 1 | - |
46-265826G6 |
- |
| Head loader shell (for 1.5T) | 1 | - |
46-287899G1 |
- |
| Head loader positioner | 1 | - |
5110241 |
- |
| MRS sphere | 1 | - |
2152220 |
- |
| AGAR phantom | 1 | - |
Site specific; no GE part number |
- |
| 3.0T GEM QHNU coil | 1 | - |
5445051 |
- |
| 1.5T HD 8-channel high resolution brain array coil | 1 | - |
5146634-2 |
- |
|

| Condition | Reference | Effectivity |
|---|---|---|
|
To ensure consistent results, the patient fan must be ON whenever you run this tool. |
- | - |
Overview
This tool and procedure is available in DV24 and later.
The fMRI Quality Assurance (QA) Tool assesses the stability of the MR system. The tool measures, analyzes, plots, and reports data about long-term image temporal stability of the scanner in conformance with the fBIRN consortium. It also displays background noise, peak-to-peak stability, signal drift, mean ghost, mean ghost drift, signal-to-noise ratio (SNR), signal-to-fluctuation-noise ratio (SFNR), and mean including Weiskoff stability.
The tool runs the procedure on a 17 cm spherical phantom (TLT head, MRS, or agar) for an extended period and calculates statistics from the resulting images. These statistics provide an assessment of the system’s stability. When the stability is poor, the statistics can be used to locate the root cause. The tool can also be run routinely to monitor system stability. There are no pass/fail criteria or specifications for this test. Work with the site to determine if the results are within their tolerances.
The fMRI QA Tool can be run in 2 modes: Basic and Expert. Basic mode performs automatic acquisition using fBIRN protocol, analyzes the images, reports results, and archives the results without user intervention. Expert mode provides more user interaction, where the user can load an fMRI QA protocol matching the system configuration (wide or non-wide), load and view images, perform customizable stability and ghosting analysis, archive data, and view protocol details. Both modes are outlined below.
Scan Setup
There is no need to run a 3-plane localizer before scanning, because the tool automatically performs a phantom centering check. The tool also has a built in wait time to allow the phantom to settle before scanning.
Procedure
- note:Place the head TLT, MRS, or agar phantom in the center of the foam positioner in the head coil.
The agar phantom is recommended if it is available. If not, use the MRS or head TLT phantom. Set the foam positioner in the center of the head coil to hold the phantom in place.
- Landmark on the center of the phantom and advance to scan.
- Turn the patient fan ON.
Basic Mode
Procedure
- Follow the instructions above to set up for scanning.
- From the Service Desktop, open the Image Quality tab, and select ImageQuality > fMRI QA Tool > Click here
to start this tool.
The tool starts in basic mode by default.
Figure 1. fMRI QA Tool (Basic Mode)
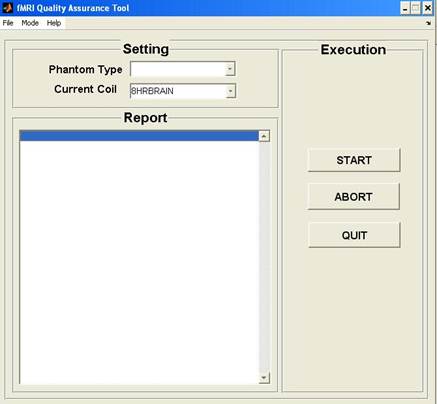
- For Phantom Type, select the type of phantom
you are using.
If you see a warning that the setting you have chosen is not recommended, click Yes and continue. (This will appear for head TLT and MRS phantoms, because the tool prefers the agar phantom.)
- The Current Coil is auto-populated with the connected coil.
- Click START.
- When the tool is finished, the status is updated in the fMRI
QA Tool window.
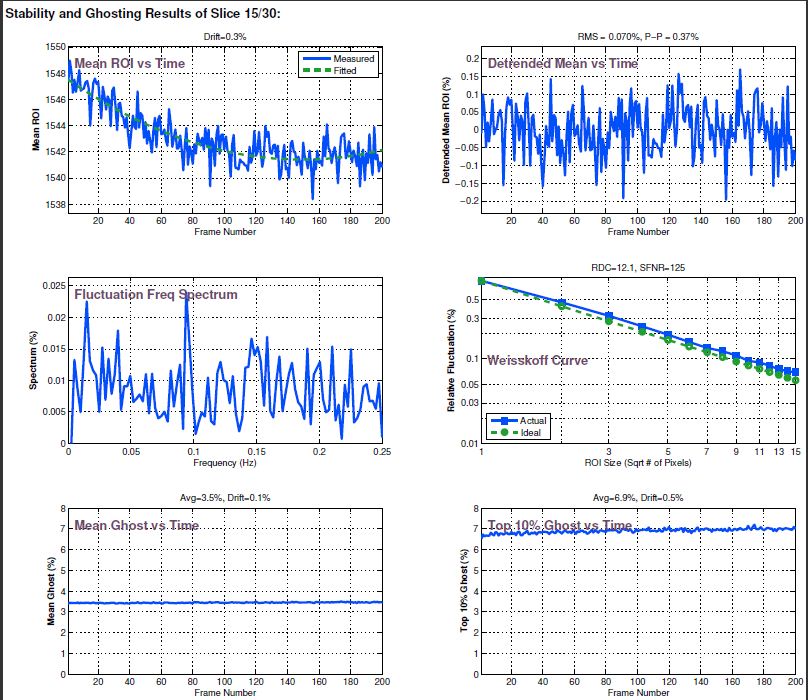
Results include mean ROI vs. time, detrended mean vs. time, fluctuation frequency spectrum, Weisskoff curve, mean ghost vs. time, and top 10% ghost vs. time.
- Results are provided in a PDF file that summarizes QA scan time
and analysis mode; stability and ghosting summary with reported variables;
scan protocol; ROIs used to calculate reported variables and plots;
stability and ghosting plots; temporal average; SFNR map; comparison
of odd and even images; and noise vs time.
PDF reports are found in the /export/home/signa/tools/fMRI_QA_tool directory. The file name will begin with fMRIQAReport.
Figure 2. Example fMRI Stability Report, Stability Section

Figure 3. Example fMRI Stability Report, Plots
Expert Mode
Procedure
- Follow the instructions above to set up for scanning.
- From the Service Desktop, open the Image Quality tab, and select ImageQuality > fMRI QA Tool > Click here to start this tool.
- From the Mode menu, select Expert.
Figure 4. fMRI QA Tool (Expert Mode)
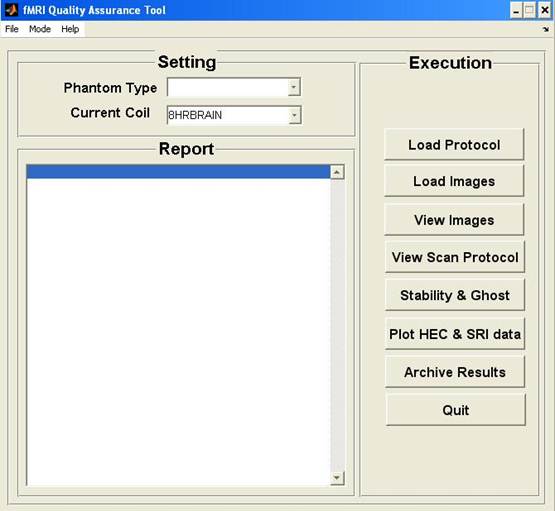
- For Phantom Type, select the phantom you are using.
- The Current Coil is auto-populated with the connected coil.
- Click Load Protocol, and select the desired
protocol from the resulting list.
Run the scan manually from the Scan desktop. Images are saved to the image database.
- Click Load Images, and select the exam number and series number, to load images from the image database for analysis.
- Click View Images to see the loaded images in a VI window.
- To see the scan protocol parameters used to scan loaded images,
click View Scan Protocol.
The scan protocol information is shown in a text file.
- To select a slice to analyze, total number of slices, polynomial
fit order, and noise ROI, click Stability & Ghost.
Results appear in a Stability and Ghosting Results plot window.
- To select the number of data points to analyze, click Plot HEC and SRI data.
Select the parameters to plot and the data time range. Results appear in a multi-plot window.
- Click Archive Results and select the
files to archive.
You can archive image data, QA reports, P-file (if present), user-defined files, and HEC and SRI data files. Files are saved to a compressed archive folder.