- 00000018WIA3061AA50GYZ
- id_20268511.1
- Jun 22, 2020 11:41:03 AM
Replacing the reciprocating pump assembly
Removes the reciprocating pump assembly from the dockable patient table and installs a replacement reciprocating pump assembly.
Prerequisites
| Personnel requirements | |||
|---|---|---|---|
| Required persons | Preliminary requirements | Procedure | Finalization |
| 1 | - | 60 minutes | - |
| Tools and test equipment | |||
|---|---|---|---|
| Item | Quantity | Part number | Manufacturer |
| Clamp | 1 | - | - |
| 3/4 inch Open-End Wrench | 1 | - | - |
| Needle-Nose Pliers | 1 | - | - |
| Consumables | |||
|---|---|---|---|
| Item | Quantity | Part number | Manufacturer |
| Absorbent Towels | As needed | - | - |
| Replacement parts | |||
|---|---|---|---|
| Item | Quantity | Part number | Manufacturer |
| Reciprocating Pump Assembly | 1 |
See FRU manual. | - |
| High Pressure Reciprocating Pump Assembly | 1 |
See FRU manual. | - |
| Safety |
|---|
|
Before working in any GE Healthcare MR suite or performing any GE Healthcare service procedure, you must:
If you have any safety concerns at any time, do not begin work or immediately stop work and move to a safe location. Immediately contact your supervisor or site safety officer for instructions on how to proceed. |
Removing the reciprocating pump assembly
About this task
There are two types of Reciprocating Pump Assemblies depending on the weight rating of the table. The GEM flat table requires the High Pressure Reciprocating Pump, while all curved tables use the Standard Reciprocating Pump.
Procedure
Lower the table lock safety bar.Warning 
Figure 1. Table lock safety bar 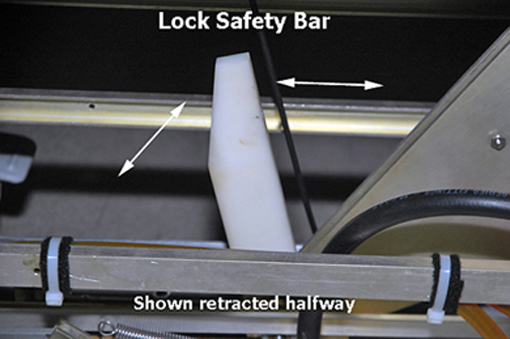
- Use a 3/4 inch open-end wrench to disconnect the hydraulic oil hose connection from the pump.
- With the open-end wrench, disconnect both black high-pressure hoses from the top and side of the pump.
Figure 2. Left side view of lower table chassis 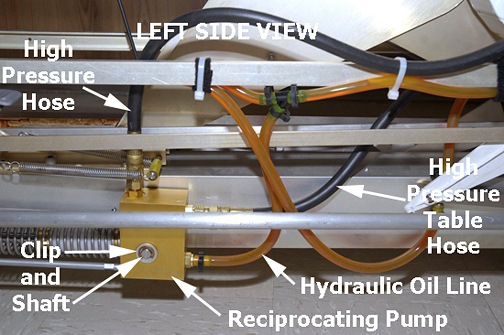
- With the open-end wrench, disconnect both black high-pressure hoses from the top and side of the pump.
- Slide pump assembly away from the table chassis and remove it.
Figure 3. Front and rear clips, pin and shaft 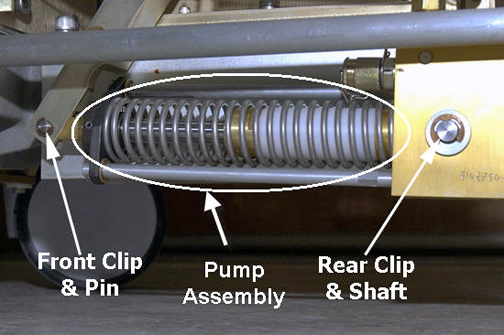
Installing the reciprocating pump assembly
Procedure
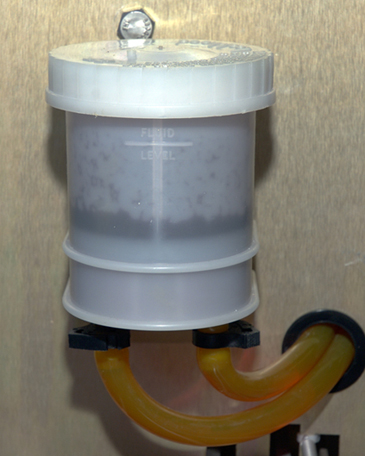
- If necessary, add hydraulic oil to the reservoir so it is 1/4 to 1/2 in. (6.5 to 12.5 mm) above the fluid level line (shown below) when the table is at its lowest position.
Figure 4. Hydraulic fluid reservoir