• SIGNA MR355 / SIGNA MR360
  • Service Manual
  • 5856356-3EN Revision 5.0
  • Basic Service Documentation. Copyright General Electric Company.
  • Object ID: 00000018WIA3029CF20GYZ
  • Topic ID: id_13106834 Version: 1.2
  • Date: Jul 5, 2019 10:25:11 PM

Signal To Noise Check-Body Scan

Prerequisites

Table 1. Personnel requirements
Required personsPreliminary requirementsProcedureFinalization
1 - - -
Table 2. Tools and test equipment
ItemQuantityEffectivityPart numberManufacturer
· Body SNR Sphere1-

46-265635G4

-
· SPT Body Loader or Long Body Loader--

2135652-2

46-287902G1

-
Table 3. Safety
Table 4. Required conditions
ConditionReferenceEffectivity

No image artifacts

--

System Gain Calibration complete

--

System Gain Calibration complete

--

About this task

Note:

The Body SNR Sphere Phantom, 46-265635G4, is not provided with the System. If the Body SNR sphere is needed, the customer must order it. A Body Loader is provided with the system.

Procedure

  1. Click on New Pt and enter the following:
    1. Id: geservice
    2. Name: snr check
    3. Weight (lb.): 111
    Note:

    On the Patient Information screen, up to 32 characters can be typed in the Exam Description field as comments. On the Patient Position screen, up to 29 characters can be typed in the Series Description field as comments. (The comments are displayed on the Report Header Info screen.)

    Note:

    Possible equipment damage. Completely remove the Quad Head Coil from the cradle before performing any body scans. Failure to do so may damage the Head Coil T/R Network.

  2. Remove the head coil, if present, from the cradle.
  3. Load the phantom on the table based on the loader you are using:
    1. Setup using SPT Loader: Position the SPT body loader and body SNR sphere on the table and landmark per Illustration 2-1A. Check the temperature indicator on the SNR sphere. Make sure that the temperature is 22° C ± 2° C before starting the procedure. See Figure 1
      Figure 1. SPT BODY LOADER AND BODY SNR SPHERE PHANTOM SETUP
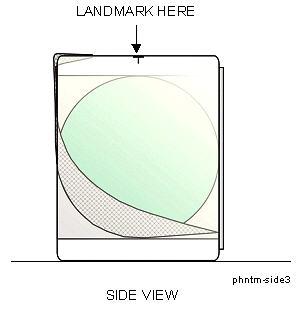
    2. Setup using Long Body Loader: Position the body SNR sphere in the center of the long body loader and landmark per Illustration 2-1B. Check the temperature indicator on SNR sphere. Make sure that the temperature is 22° C ± 2° C before starting the procedure. See Figure 2.
      Figure 2. LONG BODY LOADER AND BODY SNR SPHERE PHANTOM SETUP
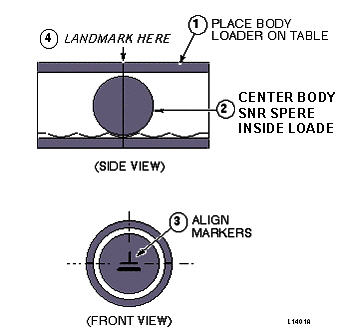
  4. At the operator workspace, prepare the system for an SNR Check (Body, Axial) scan using the scan protocol shown in the "Service Protocols" procedure service methods CD-ROM.
  5. Press MOVE TO SCAN. Allow phantom solution to settle for 20 minutes before starting scan.
    Note:

    SNR scans are particularly susceptible to flow artifacts. Artifacts appear as ovals or swirls in phantom image on subtracted image. They will cause excessively high noise measurements. If a problem exists, allow the phantom to settle for an additional 15-20 minutes and rescan using the same settings.

  6. Click on Autoview, just below the Autoview image display screen; your images will be displayed automatically.
  7. Click on Save Series.
  8. Click on Auto Prescan. After prescan, check the R1 value. R1 must equal 11 to get valid results. Record R1, R2, TG, and system frequency values in the Data Sheet at the end of this document, Body SNR Data. If R1 does not equal 11, some of the items to check are the following:
    1. Check for proper cable length to preamp.
    2. Ensure that GRADCAL has been performed.
    3. Ensure that slice thickness is within specification.
    4. Download TPS again, then on the Service Desktop click on Reset TPS. Repeat steps Step 1 through 10.
  9. Click on Scan. After scan #1 is complete, click on Scan again (two back-to-back scans).
  10. After the series #1 back-to-back scans are complete, click on New Series.
  11. At the operator workspace, prepare the system for an SNR Check (Body, Sagittal) scan using the scan protocol shown in the "Service Protocols" procedure.
  12. Click on Save Series, then Prepare to Scan.
  13. Auto Prescan. After prescan, check the R1 value. If R1 does not equal 11, refer to step 11 for items to check. Record R1, R2, TG, and system frequency values in Data Sheet.
  14. Click on Scan. After the first scan of series #2 is complete, click on Scan again (two back-to-back scans).
  15. After the series #2 back-to-back scans are complete, click on New Series.
  16. At the operator workspace, prepare the system for an SNR Check (Body, Coronal) scan using the scan protocol shown in the "Service Protocols" procedure on the service methods CD-ROM.
  17. Enter the anterior offset for Scanning Range start/end location. Find the offset as follows:
    1. Click the Image Browser icon. When the browser is displayed, click Viewer.
    2. Click Measure, then select the rectangular cursor tool. Rotate the cursor box 90 degrees clockwise by dragging the rotation handle until the handle marker is placed on the display's right side. See Figure 3.
      Figure 3. FINDING CENTER OF IMAGE - ROTATED BOX CURSOR
    3. Adjust the rectangular cursor size, dragging the size/shape handle, so that all four corners touch the edge of the image.
      Note:

      A horizontal rectangle provides more accuracy in the horizontal direction.

    4. Click [Measure], then select the (report cursor) tool. Click the rectangle created in step c, then place the report cursor on top of the rotation handle of the rectangular cursor box. Read the A/P location. See Figure 4.
      Figure 4. FINDING CENTER OF IMAGE - REPORT CURSOR
    5. Click the Scan icon. In the SCANNING RANGE area, enter that value for the A/P Start and End values (anterior offset) of the coronal scan.
  18. Click on Save Series, then Prepare to Scan.
  19. Click on Auto Prescan. After prescan, check the R1 value. If R1 does not equal 11, refer to step 11 for items to check. Record R1, R2, TG, and system frequency values in Data Sheet 1.
  20. Click on Scan. After the first scan of series #3 is complete, click on Scan again (two back-to-back scans).
  21. For analysis, see SNR Image Analysis.
  22. Return to the main menu.

Finalization

No finalization steps.