
- SIGNA MR355 / SIGNA MR360
- Service Manual
- 5856356-3EN Revision 5.0
- Basic Service Documentation. Copyright General Electric Company.
- 00000018WIA3049CF20GYZ
- id_131068371.2
- Jul 5, 2019 10:46:04 PM
SNR Image Analysis
Prerequisites
| Required persons | Preliminary requirements | Procedure | Finalization |
|---|---|---|---|
| 1 | - | - | - |
About this task
The SNR tool retrieves two operator-selected images. Signal value is computed as the mean pixel value in an ROI covering 80% of the image. The image is analyzed to determine the center of the image for positioning the ROI. Subtracting the second image from the first creates a difference image and the same ROI is used to calculate noise from the subtracted image. The signal value, noise value, and signal-to-noise ratio are reported. There is an option to save the difference image with the results annotated.
Procedure
- On the Service Desktop Manager, click the Service Browser button.
Follow the instructions on Figure 1, below.
Figure 1. OPENING THE IMAGE QUALITY NEMA TOOL FROM THE COMMON SERVICE DESKTOP 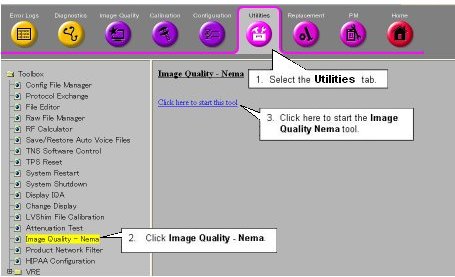
- A NEMA Image Quality window will appear on the desktop. Type 1 and press Enter for the Signal
to Noise Check. See Figure 2.
Figure 2. NEMA IMAGE QUALITY MENU 
- Refer to Illustration 5-3 for the next steps.
Figure 3. NEMA IMAGE SELECTION MENU 
- Type X to run the procedure.
The analysis then begins. The final values are displayed on the screen, as shown in Figure 4.
Figure 4. SNR RESULTS SCREEN 
Finalization
No finalization steps.