
- Discovery MR750 3.0T System Service Methods
- 5690009-2EN Revision 4
- 00000018WIA3005BE20GYZ
- id_131072522.6
- Jan 26, 2022 10:55:01 AM
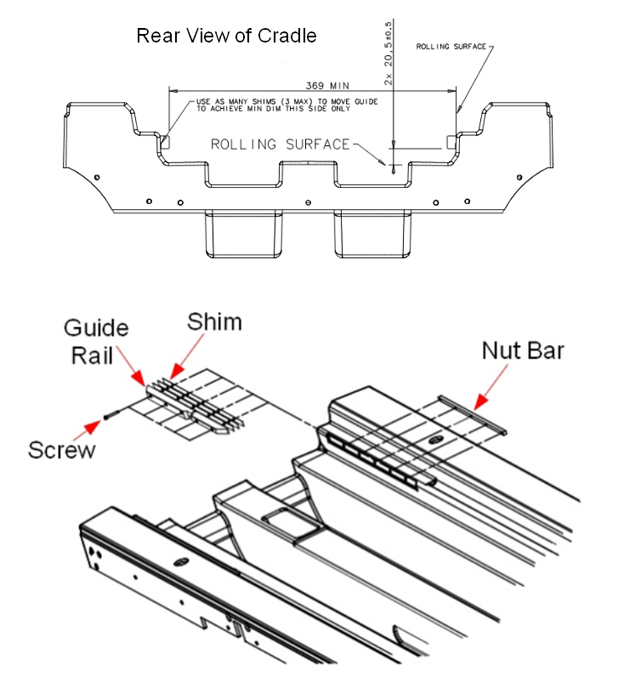
Replacing the cradle guide rail
Replace the cradle guide rail, which is locked in the home position with a latch on the patient table bridge. The latch engages a notch on the cradle guide rail at the rear of the table.
Prerequisites
| Personnel requirements | |||
|---|---|---|---|
| Required persons | Preliminary requirements | Procedure | Finalization |
| 1 | - | 30 minutes | - |
| Tools and test equipment | ||||
|---|---|---|---|---|
| Item | Quantity | Effectivity | Part number | Manufacturer |
| Nonmagnetic Tool Kit | 1 | - |
5112581 | - |
| Replacement parts | ||||
|---|---|---|---|---|
| Item | Quantity | Effectivity | Part number | Manufacturer |
| LH Guide Rail | 1 | - | - | - |
| RH Guide Rail | 1 | - | - | - |
| Guide Rail Shim | 1 to 3 | - | - | - |
Overview
About this task
This procedure describes how to replace the cradle guide rail. The cradle is locked in the home position with a latch on the patient table bridge. The latch engages a notch on the cradle guide rail at the rear of the table. The latch on the cradle should engage this notch just enough (without extra force) so when the cradle is pushed to the home position, it tightly engages the notch to prevent the table top from moving when the patient table is undocked. In certain situations, it may be necessary to add up to a maximum of 3 shims to achieve a minimum distance of 369 mm.
Removing the guide rail
Procedure
- Note:See the illustration below. To obtain access to the guide rail, move the cradle back (into the magnet).
Two guide rails (LH and RH) are used to guide the cradle when moving the cradle forward and backward on the table top. Fives screws secure each guide rail to the table top. Each screw mounts through the guide rail and table top to the nut bar. The nut bar is NOT secured to the table top.
To prevent the nut bar from dropping into the table top, always have two screws mounted. Carefully follow each step in this procedure to make sure the nut bar does not drop into the table top during removal or installation. If nut bar drops into table top, the bottom panel of the table top must be removed to retrieve the nut bar.
Figure 2. Moving cradle back 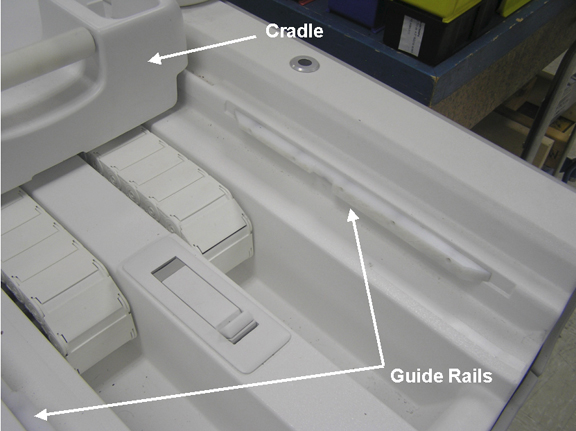 Note:
Note:Two screws in the narrow part of the guide rail should remain installed.
- Using a 7/64 inch Allen wrench, loosen each of the three screws (as shown below), and remove them from the wide part of the guide rail.
Figure 3. Removing screw from guide rail 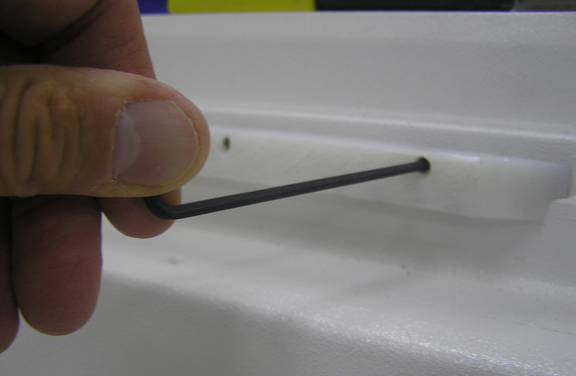 Note:
Note:The nut bar is not secured to the table top. Always keep at least two screws mounted into the nut bar. If nut bar drops into the table top, the bottom panel of the table top must be removed to retrieve the nut bar.
- Lift up the guide rail and install the screw (approximately 3 or 4 turns) into the first screw hole of the nut bar as shown.
Figure 4. Screw installed in first hole of nut bar 
- Remove the fourth screw (shown below) from the narrow part of the guide rail.
Figure 5. Location of fourth screw 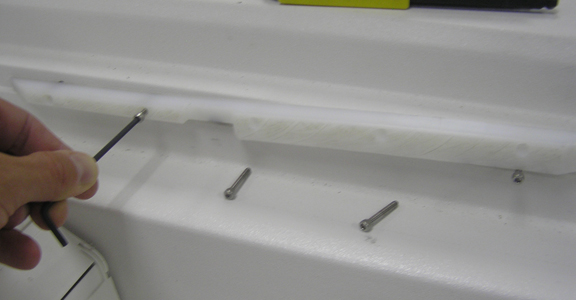
- Note:Lift up the guide rail and install the screw (approximately 3 or 4 turns) into the fourth screw hole of the nut bar. (See Figure 6.)
The nut bar is not secured to the table top. Always keep at least two screws mounted into the nut bar. If nut bar drops into table top, the bottom panel of the table top must be removed to retrieve the nut bar.
Figure 6. Location of fourth hole of nut bar 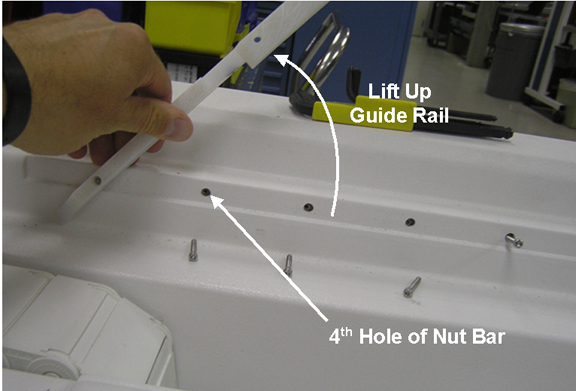
- Remove the fifth screw from the guide rail, and remove the guide rail from the table top.Note:
The nut bar will tilt down with the two screws installed (shown below).
Figure 7. Nut bar with two screws installed 
Installing the guide rail
About this task
Two guide rails (LH and RH) are used to guide the cradle when moving the cradle forward and backward on the table top. Fives screws secure each guide rail to the table top. Each screw mounts through the guide rail and table top to the nut bar. The nut bar is not secured to the table top. To prevent the nut bar from dropping into the table top, always have two screws mounted. Carefully follow each step in this procedure to make sure the nut bar does not drop into the table top during removal or installation. If nut bar drops into the table top, the bottom panel of the table top must be removed to retrieve the nut bar.
Procedure
- Remove the screw from fourth hole of the nut bar as shown below.
Figure 8. Removing holding screw 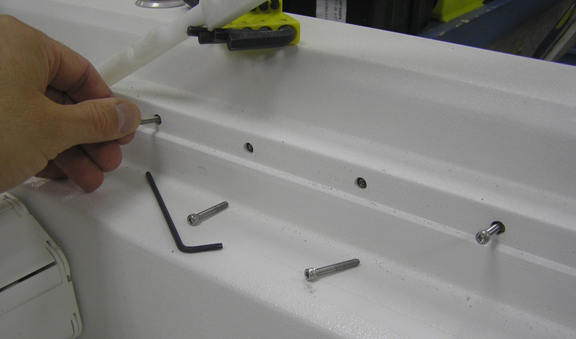
- Aligning the fourth of the guide rail with the fourth of the nut bar, install the screw through the guide rail and into the nut bar. Do not tighten the screw at this time.
Figure 9. Installing screw in fourth hold of nut bar - Using a 7/64 inch Allen wrench, tighten the five screws shown below.Note:
To apply the proper torque to these screws, insert the long end of the Allen wrench into the head of the screw and tighten only using your fingers. Reverse the Allen wrench (short end into the head of the screw) and tighten 1/2 turn using your fingers.
Figure 10. Tightening screws to secure guide rail 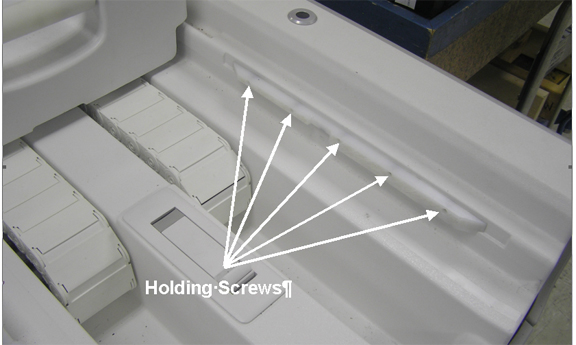
Finalization
Finalization
No finalization steps.