Basic Service Documentation. Copyright General Electric Company.
Object ID: 00000018WIA30086950GYZ
Topic ID: id_2025818 Version: 1.9
Date: Nov 3, 2020 12:14:12 PM
Generating self-signed certificates
Generate a self-signed certificate on the MR scanner.
Prerequisites
Personnel requirements
Required persons
Preliminary requirements
Procedure
Finalization
1
-
5 minutes
-
About this task
This is the least-preferred option. You should always use certificates provided by the customer, because self-signed certificates are not as secure as the CA signed certificates that customers can provide. Use this only as a last-resort solution.
Procedure
Click C Shell... on the Service Desktop manager.
Note: The Shell window can only be launched when the EA3 user is included in the authorized EA3 group. Users not in this EA3 group will not have access to launch the Shell window. If you are not logged in as the proper logon user, log out and then log back on as the correct EA3 user with the authorized permissions.
Log in as a root user. If you do not log in as a root user, the certificate will not be configured correctly.
Type su - and press Enter.
Type the root password and press Enter.
Execute the following command: cd /export/home/
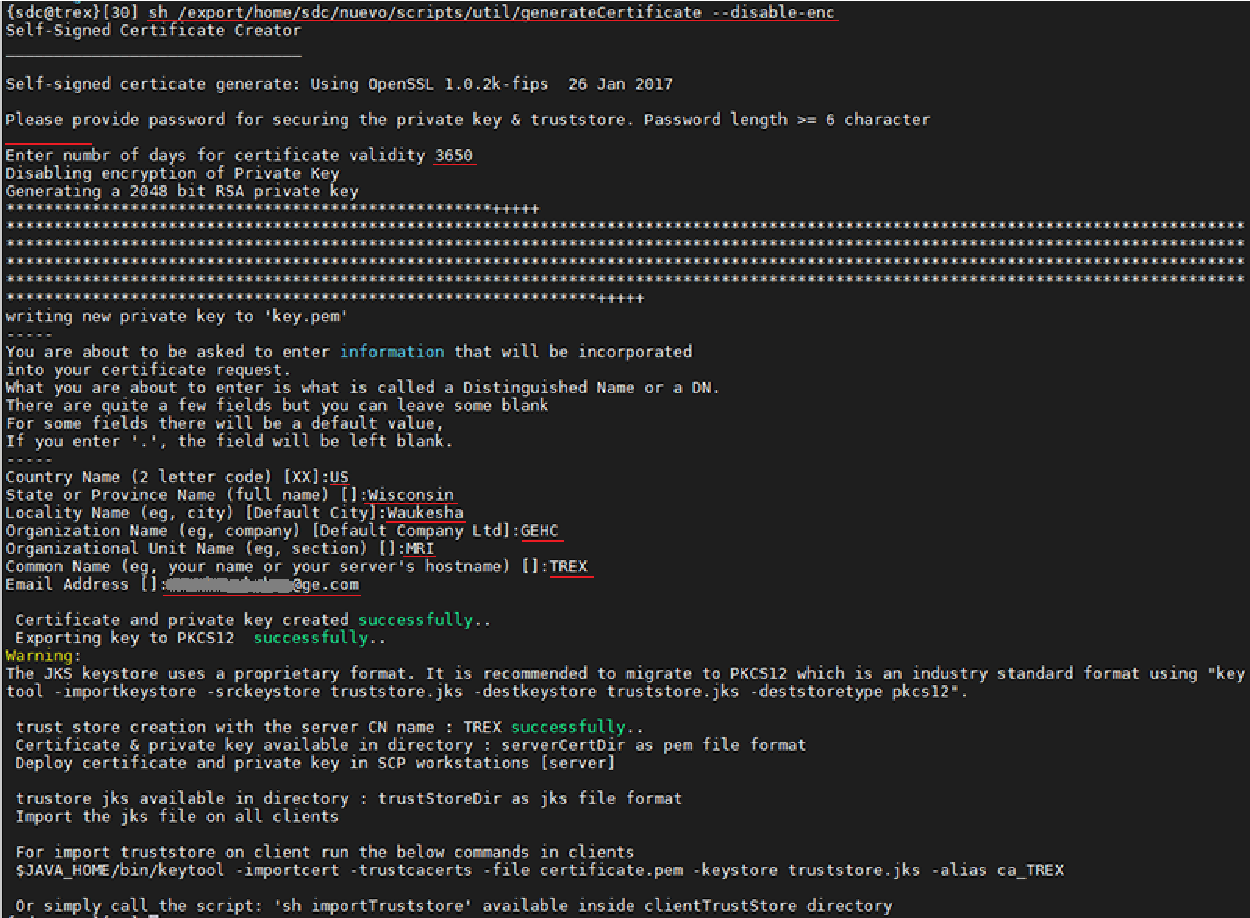
Execute the following command: sh /export/home/sdc/nuevo/scripts/util/generateCertificate --disable-enc
Provide the relevant information requested.
Figure 1. Certificate information
Length of certificate validity (in number of days)
Country (two-letter code)
State/province
Locality (city)
Organization (company)
Organizational unit (section)
Common name (your name or server name)
Email address (optional)
To log out as root user, execute the following command: exit
Plug the USB drive into the Global Operating Cabinet (GOC).
Execute the following command: nautilus&
Go to /export/home/serverCerts/ and move both the key.pem and certificate.pem to the USB drive. The key.pem file has the host key and the certificate.pem file has the host certificate. Both should be imported and configured in host (server).
Note: Some files can be created in a folder only accessible while logged on as root user.
Refer to the Common Field Service Tasks procedure to transfer this file onto a USB in order to install these certificates on this host system.
After the host (server) certificate is imported and configured in the TLS utility, you must export this certificate from the server using the download function and import it in the client as a third- party certificate. See Exporting private keys for a third-party client.