Discovery MR750w and SIGNA™ Architect T 3.0T System Service Methods
5690002-2EN
Revision
4
Object ID: 00000018WIA30CFE030GYZ
Topic ID: id_12374942 Version: 1.3
Date: Jul 5, 2019 10:03:33 PM
LED Power Supply Replacement
Prerequisites
Table 1. Personnel requirements
Required persons
Preliminary requirements
Procedure
Finalization
1
Not Applicable
20 minutes
Not Applicable
Table 2. Replacement parts
Item
Quantity
Effectivity
Part number
Manufacturer
LED Power Supply
(see FRU manual)
1
-
-
-
Table 3. Safety
Warning
Electrocution hazard!
Dangerous or fatal voltages are present in the energized
cabinet.
Follow loto procedures to disable and verify safe voltage
levels. See the MR Service Safety Manual, PN 5452735.
Procedure
Perform LOTO on the PEN cabinet. See the MR Service
Safety Manual, PN 5452735.
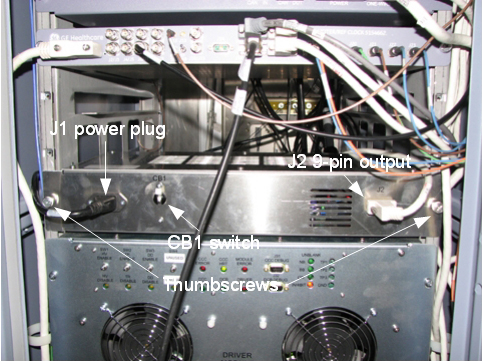
Figure 1. LED Power Supply
Confirm that the CB1 rocker switch is turned OFF (down).
Remove the power plug (J1).
Remove the 9 pin output cable (J2).
Loosen and remove the two thumbscrews that secure the power
supply in the PEN cabinet.
Carefully slide out and remove the unit from the PEN cabinet.
Note:
There are no cables or connections on the back of the
power supply that need to be removed. There are cables from other
devices in the cabinet that hang in front of the LED power supply.
You can safely remove the LED power supply without disturbing or disconnecting
any of these cables.
Carefully slide the new LED power supply into the rack in the
PEN cabinet.
Attach the two thumbscrews and hand-tighten securely.
Attach the 9 pin output cable (J2).
Attach the power plug (J1).
Remove LOTO from the PEN cabinet. See the MR Service
Safety Manual, PN 5452735.
Turn the CB1 rocker switch to ON.
Finalization
Turn on the new LED power supply and verify that the magnet
LED lighting is illuminated.