
- SIGNA MR355 / SIGNA MR360
- Service Manual
- 5856356-3EN Revision 5.0
- Basic Service Documentation. Copyright General Electric Company.
- 00000018WIA30820030GYZ
- id_131076381.3
- Jul 5, 2019 11:18:59 PM
Rear End Bell Replacement
Prerequisites
| Required persons | Preliminary requirements | Procedure | Finalization |
|---|---|---|---|
| 4 minumum | - | - | - |
| Item | Quantity | Effectivity | Part number | Manufacturer |
|---|---|---|---|---|
| 12-inch length of 1/2-inch I.D. hose | 1 | - | - | - |
| 2 hose clamps for 1-inch O.D. hose | 1 | - | - | - |
| 4-inch-long piece of copper tubing, 1/2-inch O.D. | 1 | - | - | - |
| Roll of paper toweling | 1 | - | - | - |
| Pair of latex gloves | (optional) | - | - | - |
| Non-magnetic torpedo level or similar | 1 | - | - | - |
| Epoxy-filled Gradient Coil cart (2134810), cradle (2134810-2), and accessory kit (2134810-4). | 1 | - |
2144093 | - |
| Class 1 electric rider lift truck, 4-wheel, rated at 6000 lbs (in case the coil, cart, and cradle must all be lifted together— a necessity in mobiles); with forks a minimum of 56 inches long; with side shifter for easy width adjustment and lateral movement of forks. | 1 | - |
n/a | - |
| Non-magnetic tool kit | 1 | - |
46-320273G1, G2, G3, or G4 | - |
| Condition | Reference | Effectivity |
|---|---|---|
|
Verify that the Epoxy-filled Gradient Coil accessory kit contains all the parts listed in Kit Contents. | - | - |
Procedure
- Replace Rear End BellNote:
After end bell is replaced, a good seal is required to prevent air leaks. Any air leaks between RF body coil and end bell can cause a loud humming noise during patient scanning. If possible, conduct an air leakage test prior to bridge installation. This requires connecting power to the blower box and connecting a 6-inch blower hose from the blower box to the bulkhead.
Figure 1. REPLACE REAR END BELL 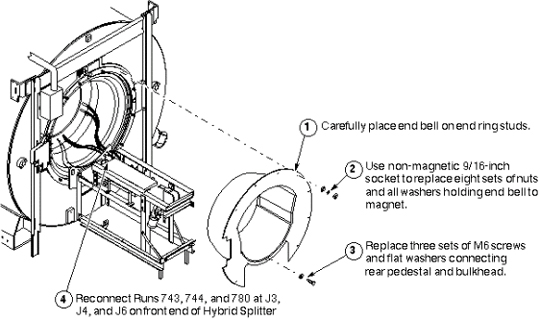
- Reconnect gradient leads.
Figure 2. RECONNECT GRADIENT LEADS 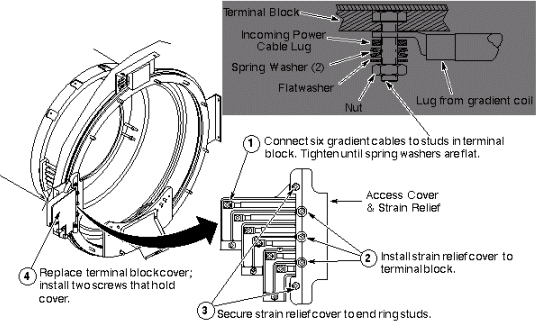 Note:
Note:Reconnecting six gradient leads - When replacing the six gradient cables from the coil on the terminal block, be sure that they go on the stud first, followed by the incoming power cables, washers, and nuts.
- Replace rear comfort items
Figure 3. REPLACE REAR COMFORT ITEMS 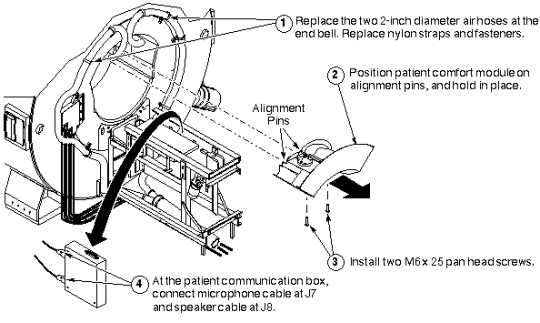
Finalization
No finalization steps.