
- SIGNA MR355 / SIGNA MR360
- Service Manual
- 5856356-3EN Revision 5.0
- Basic Service Documentation. Copyright General Electric Company.
- 00000018WIA30B67E20GYZ
- id_131067873.0
- Aug 29, 2019 1:36:43 AM
Gradient Calibration (GradCal) - Auto Mode
Prerequisites
| Required persons | Preliminary requirements | Procedure | Finalization |
|---|---|---|---|
| 1 | Not Applicable | 30 minutes | Not Applicable |
| Item | Quantity | Effectivity | Part number | Manufacturer |
|---|---|---|---|---|
| DQA Phantom W Head Loader | 1 | - |
2371512 | - |
| 1.5T DQA Phantom With Head Loader | 1 | - |
2322997-2 | - |
| 1.5T Split Head Coil | 1 | - |
2341973 | - |
| ||||||||
| Condition | Reference | Effectivity |
|---|---|---|
|
Signa Software operational | - | - |
|
First image obtained | - | - |
|
Alignment lights have been physically aligned | - | - |
|
Table has been calibrated per “Longitudinal Drive System” calibration procedure | - | - |
About this task
| Last Update | 03/28/2006 |
Preparation for Scan
About this task
In this procedure, the strength of the gradient fields are calibrated by modifying the control variables cfxfull, cfyfull, and cfzfull. A separate scan will be taken to calibrate each of the three gradient fields (x, y, and z). For TwinSpeed, the whole procedure must be repeated for each gradient mode (GradMode) separately, Whole-Body (WB) and Zoom (ZM) gradients.
Procedure
- Place head coil on cradle and plug coil in.
- Place the DQA phantom in head coil.
- Turn on alignment lights.
- Move the cradle to center the phantom with the alignment light.
- With laser light on center of phantom, press the Landmark button.
- Press Move to Scan. (Head Coil should automatically move to the center of the magnet.
- Go back to the GOC and resume scan setup.
Start the DQA Analysis Tool- Prepare for DQA Analysis (GradCal)
About this task
The Daily Quality tool analyzes the DQA image to determine if the image is skewed in the x direction (x-y planes). Analysis performed on an image with a few degrees of skew will still give an accurate GradCal value.
Procedure
- Select Utilities Desktop. Refer to Figure 1
Figure 1. Utilities Desktop 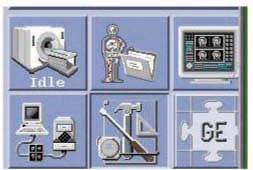
- Select Start the DQA Calibration by clicking on the Click here to start this tool. Refer to Figure 2.
Figure 2. Starting Gradient Calibration 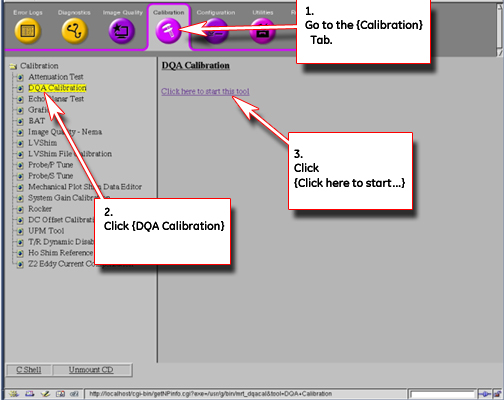 Note:
Note:The Daily Quality Assurance Test tool should appear. Refer See Figure 3.
- Select Test Mode Option: Type 2 [2= Auto
Mode], Enter.
Figure 3. DQA Calibration Tool 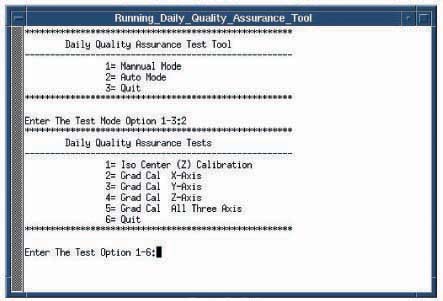
- The Calibration tool will begin and pause requiring that you
to make a gradient coil choice. Refer to Figure 4.
Figure 4. DQA Calibration Tool 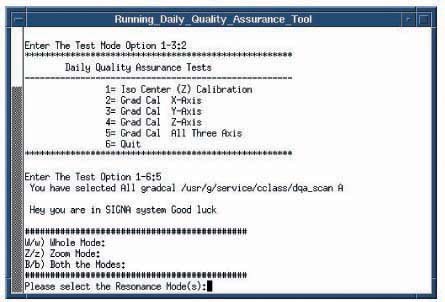
- Select appropriate mode for Twin Speed Systems (recommend to
use option B = Both the Modes). The tool will scan and adjust in the
following order: X-Whole; X-Zoom; Y-Whole; Y-Zoom; Z-Whole; Z-Zoom.
The system will start scanning. The sequence of events is prescan, then scan. The system will re scan if adjustments are necessary. Select Y to update GradientConfig.cfg. See Figure 5.
Figure 5. DQA Calibration Tool 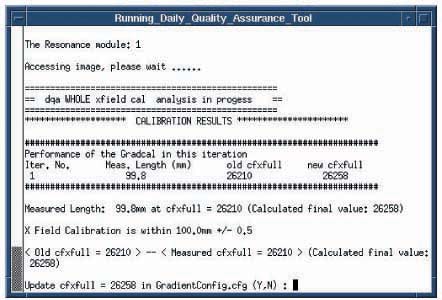
- You must select Y to perform the final
test scan. See Figure 6.
Figure 6. DQA Calibration Tool 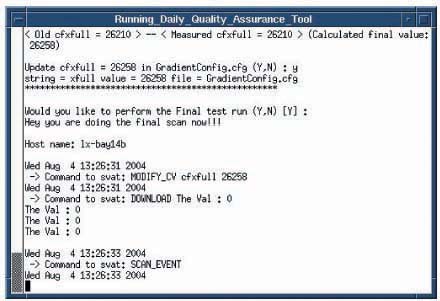
- When complete, you will see the main menu. Type 6 to select option [6=Quit], Enter. Then press Enter at the prompt press Enter to quit ->. See Figure 7.
Figure 7. DQA Calibration Tool 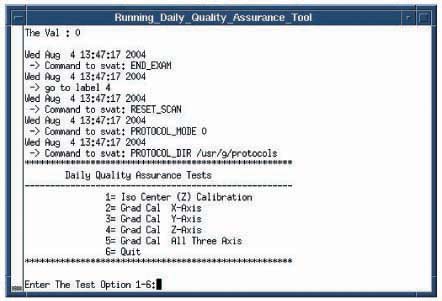
Finalization
Procedure
- Remove all phantoms and coils from the magnet
- Return the scanner to normal operation