• SIGNA MR355 / SIGNA MR360
  • Service Manual
  • 5856356-3EN Revision 5.0
  • Basic Service Documentation. Copyright General Electric Company.
  • Object ID: 00000018WIA303E6E20GYZ
  • Topic ID: id_13106959 Version: 3.0
  • Date: Aug 29, 2019 1:36:00 AM

First Image

Prerequisites

Table 1. Personnel requirements
Required personsPreliminary requirementsProcedureFinalization
1Not Applicable15 minutesNot Applicable
Table 2. Tools and test equipment
ItemQuantityEffectivityPart numberManufacturer
DQA Phantom1-

2131027-2

-
Table 3. Safety
Table 4. Required conditions
ConditionReferenceEffectivity

Signa software fully operational

--

Magnet mechanically shimmed

--

About this task

Procedure for obtaining the first image after the system installation.

Last Update09/28/2004

Procedure

  1. Place the DQA phantom in the head coil. Positioning the fill plugs up and toward the rear of the magnet. See Figure 1.
    Figure 1. DQA PHANTOM POSITIONING
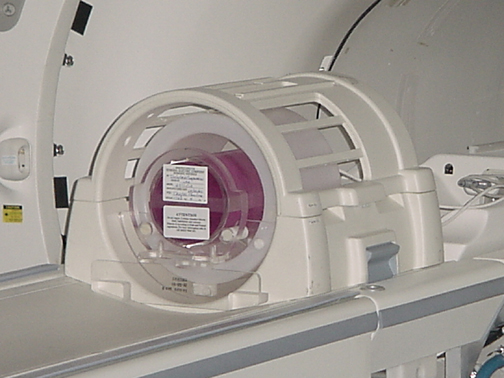
  2. Landmark at the landmark lines of the phantom.
  3. At the keypad on the front of the magnet enclosure, press LANDMARK and MOVE TO SCAN.
    Note:

    Exact location of isocenter will be found in a later procedure. The DQA should now be approximately centered longitudinally in body coil assembly. A good first estimate is about 32 inches behind front edge of body coil assembly.

  4. At the operator work space, prepare the system for a “First Image” scan using the scan protocol shown in the Service Protocols procedure located on the service methods CD-ROM, or for the alternate proprietary procedure, see Table 5.
    Table 5. FIRST IMAGE PROTOCOL
    Note: This is the alternate proprietary procedure available for GE use, and to sites with a valid Advanced Service Package Limited License.

    (If you have not already done so:)

    • Click on New Pt, and Enter

    • Patient Id: geserviceEnter

    • Patient Name: first imageEnter

    • Weight (Lb): 111Enter

    • Set Patient Protocols to Service.

    2. In the Protocol field, type o.20.1 (o=Other, 1=series number), or select the corresponding “first image” protocol from the Service list.

    3. For TwinSpeed, select GradMode=WHOLE

    Save Series, then Download.

  5. Select Scan (system Auto Prescans first).
  6. For TwinSpeed, repeat Step 4 and Step 5 with GradMode=ZOOM.
  7. DISPLAY IMAGE

    Verify that the images on the monitor correspond with Figure 2. Do not be concerned with image quality at this time; it will be addressed during the Performance Checks.

    Figure 2. DQA PHANTOM GEOMETRY FOR "FIRST IMAGE"
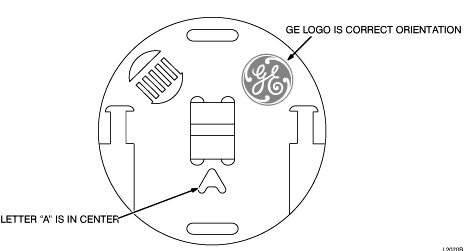
Finalization

No finalization steps.