
- SIGNA MR355 / SIGNA MR360
- Service Manual
- 5856356-3EN Revision 5.0
- Basic Service Documentation. Copyright General Electric Company.
- 00000018WIA30F92F20GYZ
- id_131071103.0
- Aug 29, 2019 1:55:09 AM
Express Coil: Posterior Array Coil Identification Label Pasting Procedure
Prerequisites
| Required persons | Preliminary requirements | Procedure | Finalization |
|---|---|---|---|
| 1 | 0 minutes | 10 minutes | 0 minutes |
| Item | Quantity | Effectivity | Part number | Manufacturer |
|---|---|---|---|---|
| Measuring Tape (Capable of measuring minimum of 1mm and maximum of 600mm) Note : Not required for Type 2 SV fixed tables | 1 | - |
nil | - |
| Cotton waste (Suitable to clean the tabletop surface) | As required | - |
nil | - |
| Item | Quantity | Effectivity | Part number | Manufacturer |
|---|---|---|---|---|
| Item: Appropriate Cleaning agent (Suitable to clean the tabletop surface) Example : Iso propylene Alcohol, Hydrogen peroxide, etc | As required | - | - | - |
| Item | Quantity | Effectivity | Part number | Manufacturer |
|---|---|---|---|---|
| RH-LABEL SV SIDE RAIL | 1 | - |
5380742 | - |
| LH-LABEL SV SIDE RAIL | 1 | - |
5380743 | - |
| ||||
About this task
This instruction provides procedure for pasting Posterior Array (PA) Coil Identification Label on the SV fixed table of below types:
-
Type 1 SV Fixed Table - Label pasting procedure for tabletops without paint masking with Side rails slots (Refer Illustration A)

-
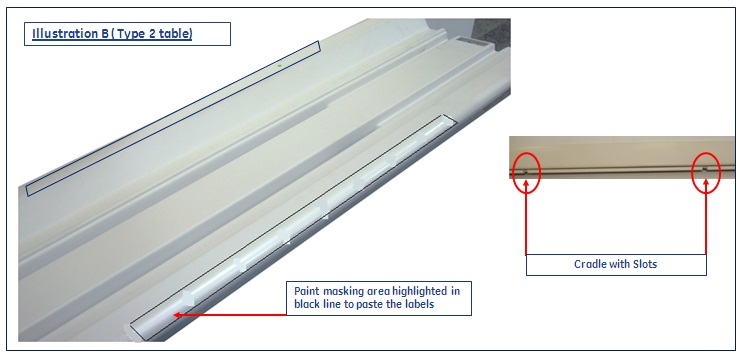
Type 2 SV Fixed Table - Label pasting procedure for tabletops with paint masking area with Side rails slots (Refer Illustration B)
-
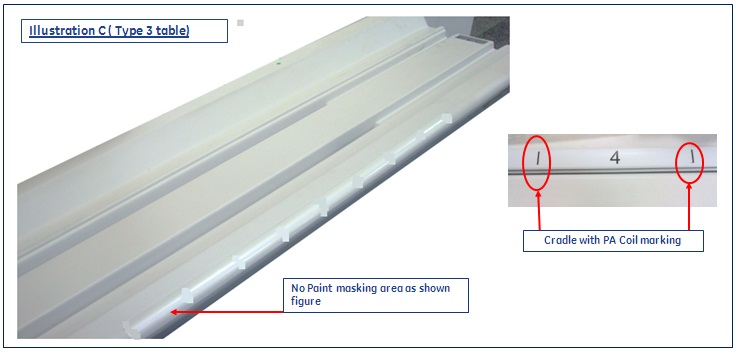
Type 3 SV Fixed Table - Label pasting procedure for tabletops with Position array (PA) coil marking on cradle (no Side rails slots). Refer Illustration C
Preparation of surface to paste the labels on Tabletop:
About this task
Using cotton waste clean the tabletop surface with appropriate cleaning agent and ensure the label pasting area is free from dirt's or Oil or Greases. Note: This need to be performed for all the 3 types of tables as mentioned above.
Type1 Table - Label pasting procedure for Tabletops without paint masking area with Side rails slots
Procedure
- Paste the RH Label (5380742) in the right side of tabletop as
shown in Figure 1 at a distance of 555+/- 2(mm) from magnet end of table refer Figure 1 and 6+/-1(mm)
above the side bumper as show in Figure 2, now drag it
/ at the same time press it using the finger (use normal hand pressure)
from the fixed end of the label, this will avoid air gaps between
label and tabletop surface as shown in Figure 4. Do ensure
uniform gap is maintained along the length of the label & side
bumper.
Figure 1. 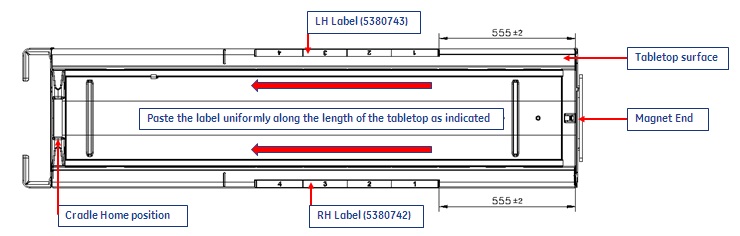
Figure 2. 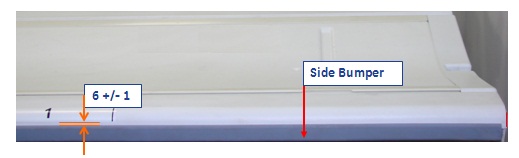
Figure 3. 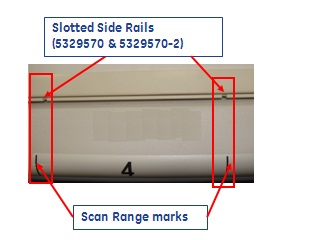
Figure 4. 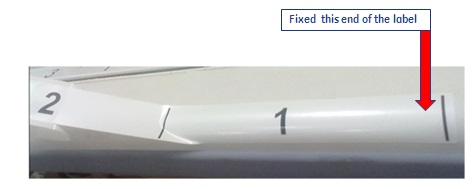
Type 2 SV Fixed Table - Label pasting procedure for tabletops with paint masking area with Side rails slots
About this task
Procedure
- Paste the RH Label (5380742) in the right side of tabletop within paint masking area (refer illustration B) along the length of the table as shown in Figure 1, now drag it / at the same time press it using the finger (use normal hand pressure) from the fixed end of the label, this will avoid air gaps between label and tabletop surface as shown in Figure 4
- Follow the same procedure for pasting the LH Label (5380743) in the Left side of tabletop paint masking area.
- After pasting the labels, at cradle home position(if not move the cradle to home position) visually check the cradle side rails slots as shown in Figure 3 matching with the label scan range marks.
Type 3 SV Fixed Table - Label pasting procedure for tabletops with Position array (PA) coil marking on cradle (without side rails slots)
Procedure
- After pasting the labels, at cradle home position visually check
the cradle Position array (PA) coil marking aligning with the label
Position array (PA) coil marking as shown in Figure 6
Figure 5. 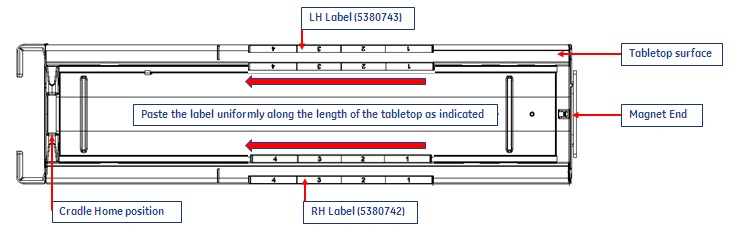
Figure 6. 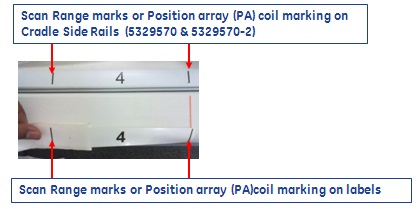
Finalization
Procedure
- Turn On the System Power. Refer to Lockout / Tagout for System Cabinet PDU Main Breaker.
- Perform Express Coil MCQA Test .