- id_12374202
- Version: 1.6
- Date: Jul 5, 2019 10:03:32 PM
Imaging Protocol Manager
Prerequisites
| Required persons | Preliminary requirements | Procedure | Finalization |
|---|---|---|---|
| - | - | - |
Overview
Imaging Protocol Manager (IPM) is a cloud-based protocol management software solution that helps to maintain and standardize CT, MR and X-Ray protocols at a centralized location by creating protocol libraries, standardizing imaging workflow, identifying protocol variation, improving adherence to protocol compliance set up by the clinical practice to meet regulatory requirement, and achieving improved quality of care, operational efficiency and optimized patient experience.
There are 2 parts to the service documentation for this feature. One deals with the Imaging Protocol Manager application which resides on the cloud and the other part which deals with configuring the MR System to connect to this application. This manual covers the procedures needed to connect the MR System to the IPM application on the cloud. For any details regarding the IPM application on the cloud, look for Imaging Protocol Manager Service documentation on the SIMS Content Viewer.
Only DV26.0_R02 software supports IPM Application on MR. Support on other software revisions is being worked on and will be communicated once released.
Figure 1. Connectivity Architecture Scanner to Cloud – Typical Hospital Network

Protocol Import/Export Criteria:
Procedure
- Only Site Protocols are available to be exported or imported via the IPM Application.
- The whole protocol (directory) is considered as a unit and is transferred during the PULL/PUSH operation. Embedded images in protocol notes are also transferred during the PULL/PUSH operation.
- There will be a compatibility checker both on the cloud and the device side which will check equality for fields like grad coil, field strength etc. before pushing and committing the protocol.
- A unique identifier is created using the timestamp and MAC of the device for each new protocol on the device being pulled to the cloud. Each protocol coming from the cloud will have also have a unique identifier.
- The scanner must be InSite checked out to enable registering with the cloud.
General IPM Workflow
Procedure
- Register: Registers scanners into the organization registry.
- PULL: Imports protocols to the cloud library from multi-modality scanners (CT, MR, Xray) and allow basic editing.
- PUBLISH: Views protocol(s) and publishes them as Published Protocol for the fleet of same scanners.
- DISTRIBUTE: Distributes protocols to scanners throughout the hospitals within the organization.
Pre-Requisites
Procedure
- MR System InSite checked out with correct model type – FE & OLC
- MR System should have been registered in IPM Cloud – Healthcare Cloud Admin
- Customer should have the IPM Credentials : User ID, Password and IPM Configuration URL
- Proxy IP address/port# to connect to internet - customer IT support
- Domain Name Service (DNS) Server IP addresses if applicable – customer IT support
Device Registration Process
Procedure
- 1. Healthcare Cloud Admin registers the device in GE HealthCloud by providing SystemID.
- The device gets added to HCM and generates a globally unique IPM DeviceID for the system. Device Status is READY (Device gets added to the device pool of the registering cloud admin).
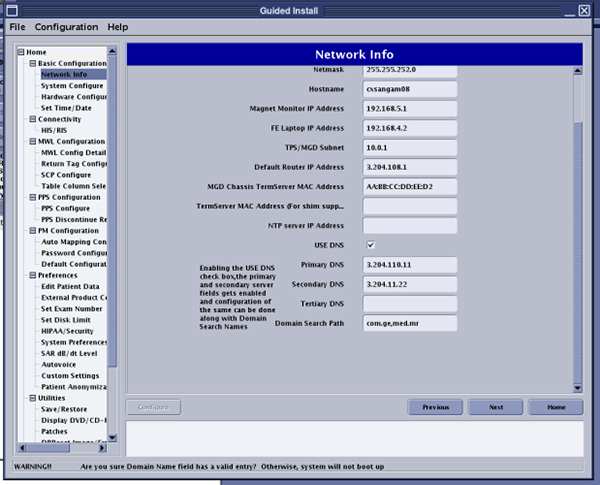
-
If the site is using DNS, then enable Use DNS and key in the DNS information into the Network Info tab of the Guided Install screen on the MR
System.
Figure 2. Guided Install Screen
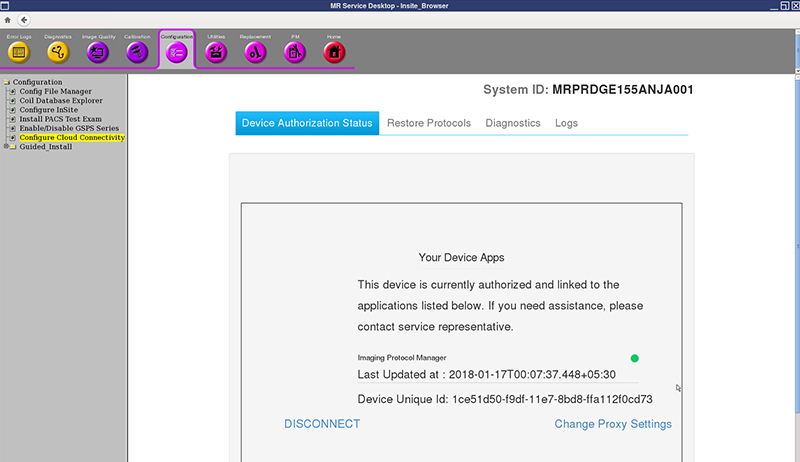
- Launch CSD.
- Click on the Configuration tab.
- Click Configure Cloud Connectivity on
the left side menu.
Figure 3. Configuration Tab
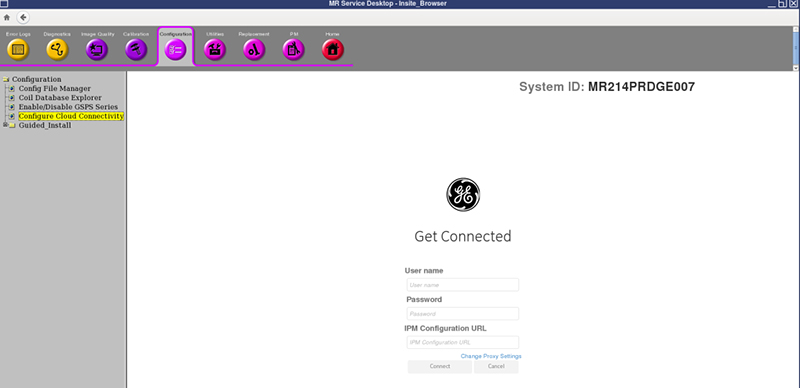
- The IPM Registration Page is displayed.
- Enter the following details (Have the customer key in these
details on the system).
- User name.
- Password.
- Static URL.
- Click on Proxy Settings and update as needed for the site.
- Click Connect. The Device Authorization
process begins.
Figure 4. Device Authorization
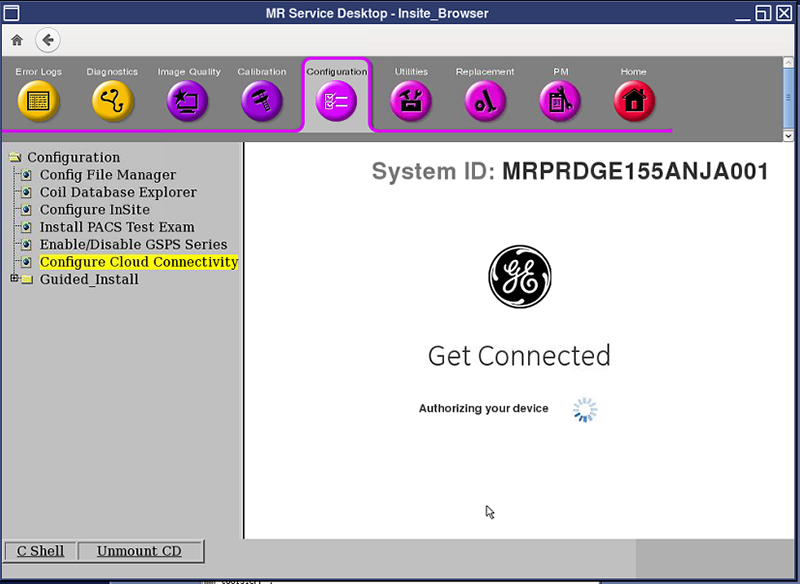
- If all of the credentials are correct, the device is authorized and enrolled.
- Device credentials/security keys are generated and stored on the system.
- MR system configuration data is then uploaded to the Cloud.
- Device Status is activated when the following screen appears.
Figure 5. Device Activated
- Perform a Save Info to retain connectivity information.
- The Protocol Manger can now start Import/Exporting protocols to and from this system.
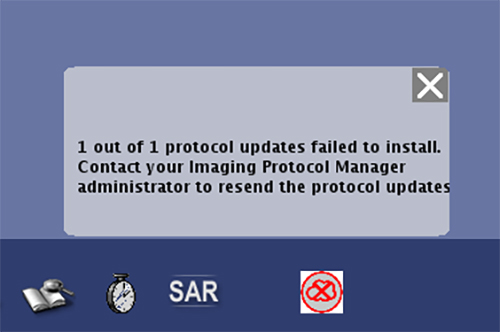
Protocol Import/Export status
Figure 6. Download Complete
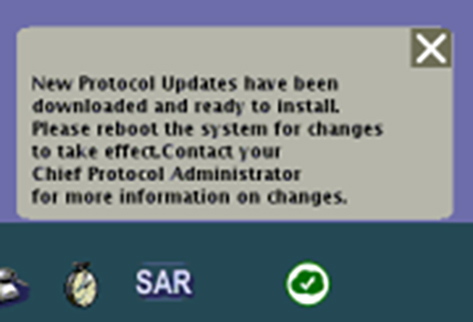
Figure 7. Protocol Update Success
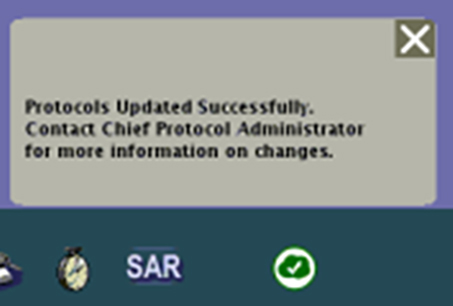
Figure 8. Protocol Update Failure
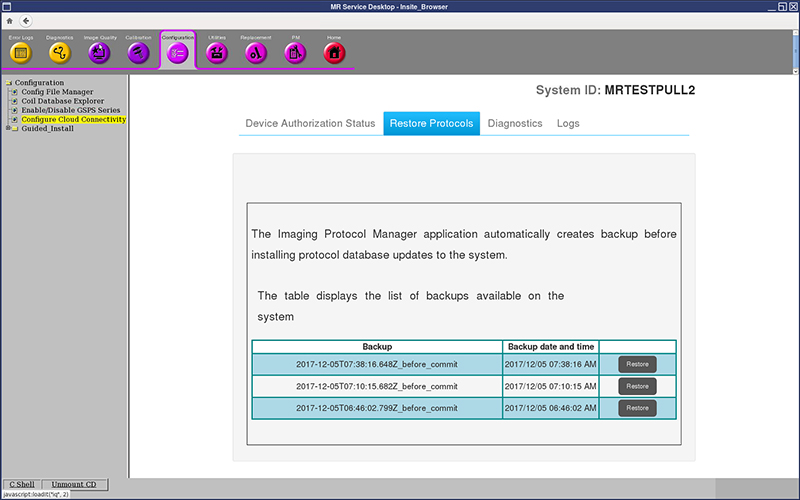
Restore Protocols from the Device (MR System)
Procedure
- The IPM application in the scanner takes a backup of protocols
before committing the new protocols to the site library. Restore is
a scanner based action to restore the backed-up protocols to the site
folder. The scanner initiates restoring the system’s site protocol
to the selected state on receiving the User command.
-
Launch CSD.
-
Click on the Configuration tab.
-
Click Configure Cloud Connectivity on the left side menu.
-
Click Restore Protocols tab.
-
- Choose the protocol set to restore. There will be at maximum
3 protocol sets backed up for each system. Any protocol content issue
should be handled by the Protocol Admin. The Admin can always restore
an older revision.
Figure 9. Restore Protocols Screen
Diagnostics
The Diagnostics tab allows you to check the status of the Imaging Protocol Manager application.
-
It shows the application connectivity status and the status of protocols sent, received, and committed along with its last updated time.
-
It also provides an option to run Diagnostics which performs pre-defined diagnostic tests including the proxy connection test, the internet connection test, the polling test, and heartbeat tests and others.
Procedure
- To perform diagnostics, launch CSD
- Click the Configuration tab.
- Click Configure Cloud Connectivity.
- Click Diagnostics tab.
Figure 10. Diagnostics Screen
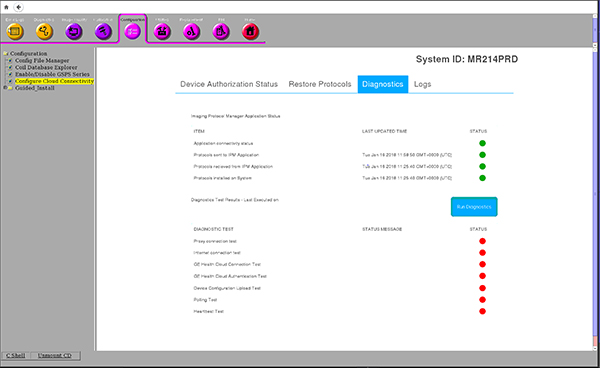
- Click on Run Diagnostics to run the predefined
tests. The screen showing the in-progress tests will be shown.
Figure 11. Run Diagnostics
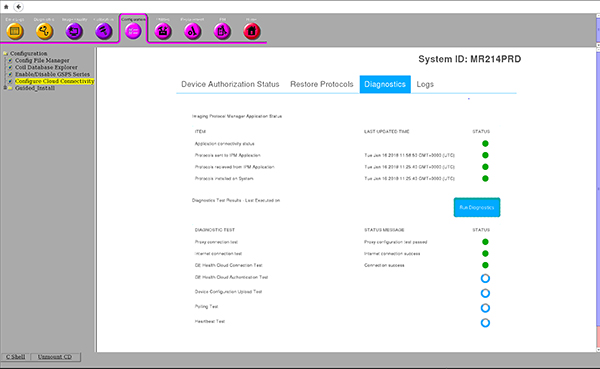
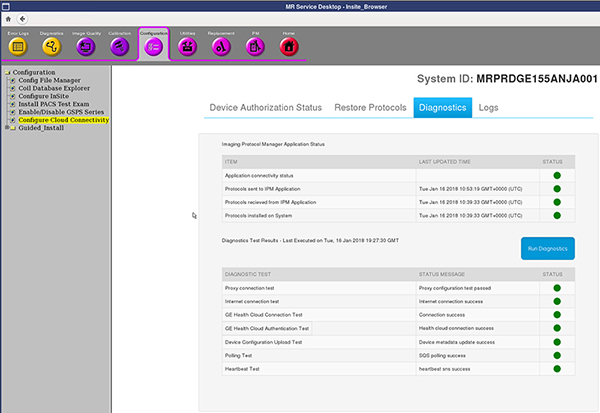
- Once the diagnostics run is completed, it updates the status
with either green (done) or red (not done) icons against each test.
Figure 12. Diagnostic Test Status
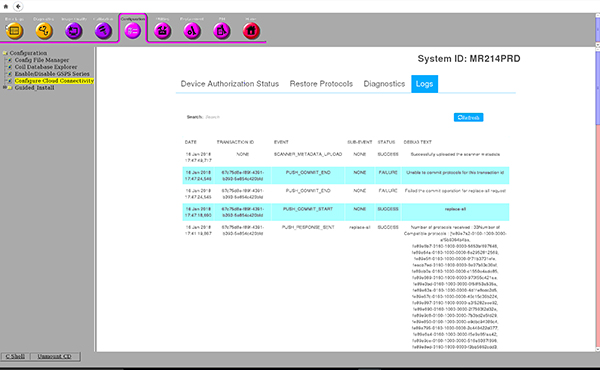
Logs
The user has an option to check the operations that have occurred in IPM along with its statuses from the Logs tab.
Procedure
- To view logs, Launch CSD
- Click the Configuration tab.
- Click Configure Cloud Connectivity.
- Click Logs tab. The screen will be displayed
showing the status of the transactions and the corresponding log details
Figure 13. Logs Tab