
- Discovery MR750 3.0T System Service Methods
- 5690009-2EN Revision 4
- 00000018WIA3024EB40GYZ
- id_20169603.1
- Nov 12, 2021 1:58:55 PM
Calibrate NEC P241w and NEC P242w monitor
Procedure
- Refer to the illustration and table below for information on the control locations and functions.
Figure 1. Monitor components and connections 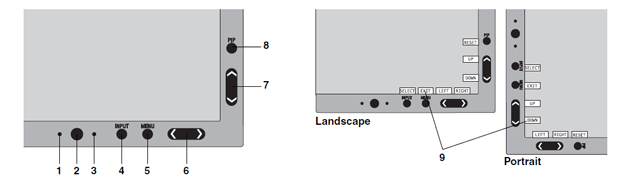
Table 1. Item Component Description 1 Auto Dimming Sensor Detects the level of ambient lighting, allowing the monitor to adjust to various settings for more comfortable viewing. Do not cover the sensor. 2 Power Turns the monitor on and off. 3 Power Indicator LED Indicates that the power is on. Can be changed between blue and green in the Advanced OSD menu. 4 Input/Select Enters the OSD Control menu. Enters OSD sub-menus. Changes the input source when not in the OSD Control menu. Hold the button to show USB selection menu when not in the OSD Control menu. Note: This USB selection returns to the current setting by OSD menu when you change input signal or turn off the monitor.5 Menu/Exit Accesses OSD menu. Exits the OSD sub-menus. Exits the OSD Control menu. 6 Left/Right Navigates to the left or right through the OSD Control menu. You can adjust the brightness directly, while the OSD menu is off.
The Left/Right and Up/Down button functionally is interchangeable depending on the OSD orientation (landscape or portrait).
When the HotKey function is OFF, this function is disabled.
7 Up/Down Navigates up or down through the OSD Control menu. Shows Picture Mode menu when not in the OSD Control menu.
The Left/Right and Up/Down button functionally is interchangeable depending on the OSD orientation (landscape or portrait).
8 Reset/PIP Resets the OSD back to factory settings in the OSD control menu. PIP can be selected when the OSD is not showing. Hold the button to show ECO Mode menu while the OSD menu is off.
Picture Mode menu. Press the Up/Down button to select Picture Mode. In PIP or Picture in Picture mode, Picture mode can be selected for main and sub-window independently by pressing Left/Right button.
9 Key Guide The Key Guide appears on screen when the OSD Control menu is accessed. The Key Guide rotates when the OSD Control menu is rotated. - Set Picture Mode to FULL (4) using the following key entries:
-
Menu
-
Right arrow
-
Right arrow
-
Down arrow
-
Left/right arrow to set to FULL (4)
Figure 2. Setting picture mode to FULL 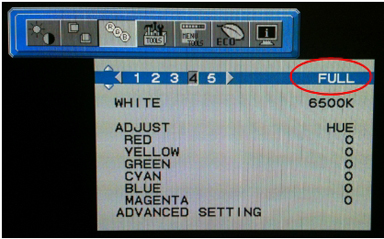
Press MENU to exit.
-
- Set WHITE to the correct value for the system.
System Value DV/HDx/HDxt 6000K Use the following key entries to access and change the value.
-
Menu
-
Right arrow
-
Right arrow
-
Down arrow
-
Down arrow
-
Left/right arrow to set the value for the system.
Figure 3. Setting WHITE to correct temperature 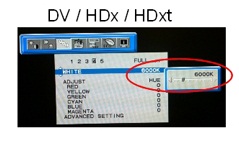
Press MENU to exit.
-
- Use the table below to set brightness to the correct value for the system.
Monitor System Value NEC P241w DV/HDx/HDxt 220 cd/m2 NEC P242w DV/HDx/HDxt 60% Use the following key entries to access and change the value.
-
Menu
-
Down arrow
-
Left/right arrow to set the value for the system
Figure 4. Set brightness for monitor NEC P241w 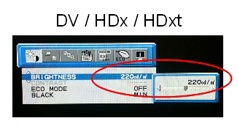
Figure 5. Set brightness for monitor NEC P242w 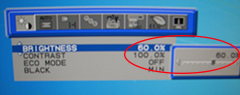
Press MENU to exit.
-
Finalization
Procedure
- To save adjustments, press the 1 button.
- To exit the menu, press the 1 button again.
- Return to LCD Monitor Installation to complete finalization steps.