
- Optima MR450w BASE 1.5T System Service Methods
- 5690012-2EN Revision 3
- 00000018WIA3098B950GYZ
- id_20260562.0
- Feb 22, 2021 1:44:40 AM
Filling the coolant
Procedure
- All shutoff valves must be open before the tanks can be filled with coolant. See Figure 1 for valve locations.
-
A shutoff valve is open when the valve handle is parallel to the hose as shown in Figure 1.
-
A shutoff valve is closed when the valve handle is perpendicular to the hose.
-
The gate valve beneath each tank in the HEC needs to be fully open (handle rotated counterclockwise until it stops).
Figure 1. Shutoff (Ball) Valves 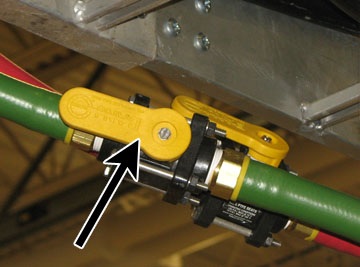 Note: The shutoff valves in this illustration are shown open (handle parallel to hose). When the handle is perpendicular to the hose, the valve is closed.
 -
- Insert the tank funnel extension and funnel into the opening on top of the tank.
Figure 2. One Coolant Gallon  Note: The coolant fluid is dyed for easy detection of leaks. This also helps distinguish between a leak and any normal condensation on the hoses.
 - Pour the coolant into the funnel to fill the tank. Fill the tank slightly more than 6 inches above the warning sensor. Watch the PE or GC display on the HEC controller to see when the tank is full.
Figure 3. Filling Coolant Tank 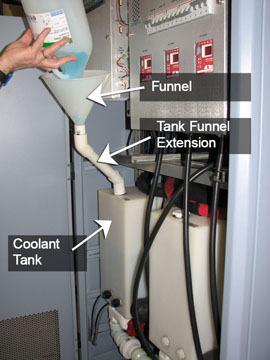
Figure 4. Coolant Level 
ITEM DESCRIPTION 1 6 inches from top coolant level sensor 2 Level of top coolant level sensor There are two sensors on the right side of each tank. The top sensor is a warning level sensor that notifies the operator when the coolant is low. The lower sensor on the right of the tank is a low level alarm that signals the operator when the coolant reaches a dangerously low level and the system will stop scanning.
Figure 5. Coolant Sensors 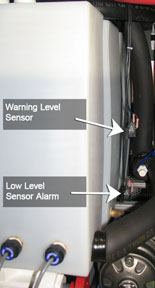
For each tank, press and hold the up arrow ▲, while pressing the appropriate function key (shown in the table) on the HEC pump control panel. (This sequence activates the pump to fill the hoses with coolant and turns the pump on and off.)Notice Table 1. Pump Control Panel Key Sequence Tank Key Sequence Gradient coil ▲ F2 Power electronics ▲ F3 These key sequence turn on the respective pumps. The variable frequency drives ramp the pumps up to operating speed slowly. Air is displaced in the system during initial pump power-on, so the level of the coolant is expected to go down. If the pump shuts itself off, the air escaping the system may have falsely tripped a level sensor. Continue pressing the respective key sequence and adding coolant until the pump reaches a stable operating speed and remains running.
Figure 6. HEC Control Panel 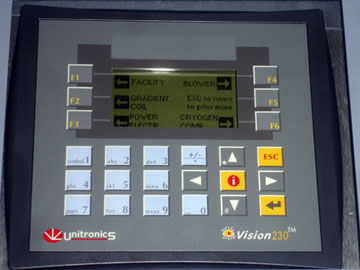
Finalization
- When finished filling the tanks with coolant, place the funnel and tank funnel extension at the bottom of the HEC.
- Keep any unused coolant for future use.
- After the procedure is completed, view the hose connections closely to check for any leaks.