
- Optima MR450w BASE 1.5T System Service Methods
- 5690012-2EN Revision 3
- 00000018WIA3033EB40GYZ
- id_20169403.0
- Feb 21, 2021 9:02:55 PM
Calibrate NEC monitor (for LCD2490WUXi and LCD2490WUXi2)
Procedure
- Refer to the illustrations below for control locations and functions.
Figure 1. NEC on/view controls 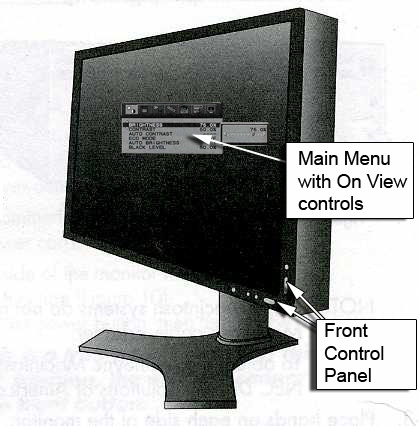
Figure 2. Control panel 
Name Description 1 Ambi-Bright Sensor Detects the level of ambient lighting, allowing the monitor to adjust to various settings for more comfortable viewing. Do not cover this sensor.
2 Power Turns the monitor on and off. 3 LED Indicates the power is on. Can be changed between blue and green in the Advanced On-Screen Manager (OSM) Control menu.
4 Input/Select Enters the OSM Control menu and OSM sub-menus. Changes the input source when not in the OSM Control menu.
5 Exit Exits the OSM Control menu and sub-menu. 6 Left/Right* Navigates to the left or right through the OSM Control menu. 7 Up/Down* Navigates up or down through the OSM Control menu. 8 Reset/Rotate OSM Resets the OSM back to factory settings. Pressing this button when the OSM is not displaying rotates the OSM Control menu between portrait and landscape mode.
9 Key Guide Displays on the screen when the OSM Control menu is accessed. The Key Guide rotates when the OSM Control menu is rotated.
* The Left/Right and Up/Down button functionality is interchangeable depending on the OSM orientation (landscape or portrait).
- To display the Main Menu, press 5, 6, or 7.
Figure 3. Main menu 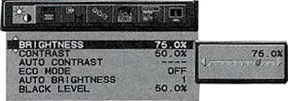
- Refer to the table below for monitor settings.
Table 1. Monitor settings Monitor settings 
LCD2490WUXi LCD2490WUXi2 Brightness: 50% (or the allowable maximum value that is less than 50%) 72.1% (or the allowable maximum value that is less than 72.1%) Contrast: 40.3% 50.5% Black Level: 50% 50% ECO Mode: Off Off Auto Brightness: Off Off RGB <TAB> Color Temp: Native Native
Finalization
Procedure
- To save adjustments, press the 1 button.
- To exit the menu, press the 1 button again.
- Return to LCD Monitor Installation to complete finalization steps.