HP z420 Computer Replacement
Prerequisites
Overview
This procedure provides instruction to replace the HP z420 host computer with another HP z420.
1 Prepare the Workstation for Host Computer Removal
Procedure
- Ask the customer to archive all images to an external storage device such as a PACS or DVDs.
- Perform a Save Info.
- Shut down the host computer.
- Perform LOTO on the GOC/operator workspace. See Lockout/Tagout of the GOC.
2 Remove Host Computer from GOC
Procedure
- Remove the two screws that secure the left side panel of the
GOC.note:
The side panel has a short ground lead connecting it to the main chassis. When removing the side panel, do not strain this ground lead.
Figure 1. Left Side Panel Ground Lead
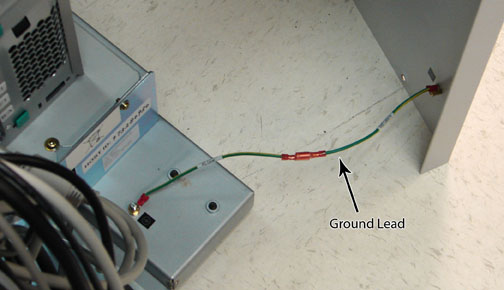
- Disconnect the short ground lead that connects the side panel to the GOC main chassis at the center of the lead.
- Remove the left side panel and set it is a safe place.
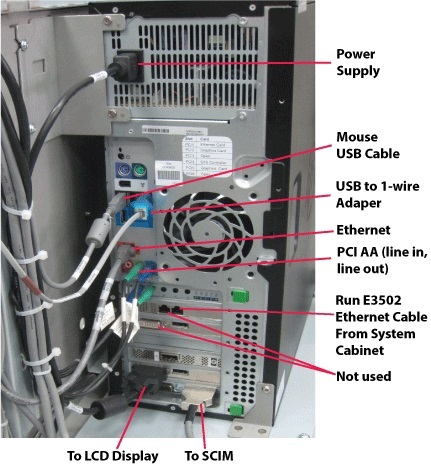
- Remove all the cables connected to the host computer.
Confirm that the cables are properly labeled. Note their locations for reattachment.
Figure 2. HP z420 Cable Configuration
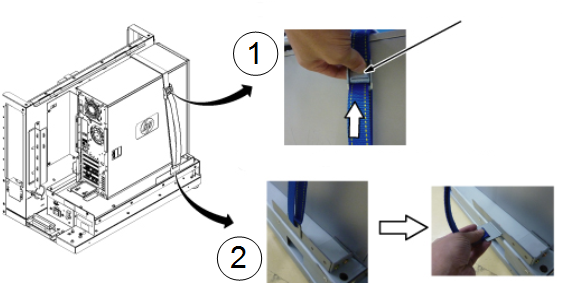
- Loosen the strap and remove the hook.
Figure 3. Removing Strap
- Remove adhesive tape.
- Remove the host computer from the GOC.
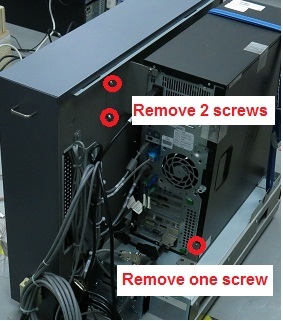
- Remove the two screws securing the back bracket to the GOC.
- Remove the one screw on the side plate.
Figure 4. Removing HP z420 Computer from GOC
- Carefully remove the computer using the back brackets, and install the bracket to new computer.
- Remove the PCI AA from the defective PC and install it in the new PC, see PCI AA Replacement).
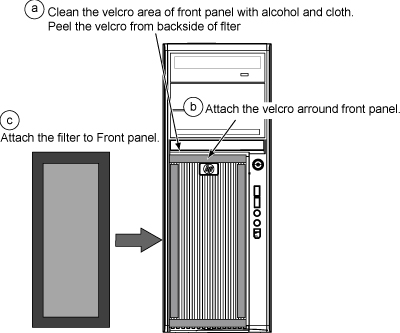
- Remove the dust filter from the old computer. Remove the Velcro
strips from the inside of the front cover of the old machine and the
dust filter. Attach them to the inside of the new machine’s
cover. Attach the Velcro strips to the dust filter. Install the dust
filter. If the old filter is not reusable, install a new one.
Figure 5. Attaching Dust Filter
- Install the new PC by performing the steps above in reverse order.
3 Finalization
Procedure
- Remove LOTO from the GOC to return power. If needed, reconnect the twist-n-lock main power cable to the rear of the console. See Lockout / Tagout for GOC .
- Power up host computer.
- Verify that the host computer front panel power LED is illuminated
as a steady blue signal.
- Load software and applications onto the operating system.
See Loading Host System Software.
note:Load From Cold (LFC) must be performed to properly transfer customer options.
- Power up the GOC System Startup and Shutdown.
If present, reconnect the optional UPS and ensure power is restored.
- From Guided Install, select RestoreInfo.
- Update the eLicense with the new Host ID. See Software Option Installation with eLicense Generated Keys.
- Perform Check Scan to confirm the system and applications are working properly.
- Confirm that all customer functions are operational (auto voice, filming, network, archive).
- Repackage the defective PC for return.