- id_2001637
- Version: 8.1
- Date: Nov 21, 2019 3:39:07 PM
Doing the Multi-Coil Quality Assurance (MCQA) check
Prerequisites
| Personnel requirements | |||
|---|---|---|---|
| Required persons | Preliminary requirements | Procedure | Finalization |
| 1 | - | - | - |
| Tools and test equipment | |||
|---|---|---|---|
| Item | Quantity | Part number | Manufacturer |
| Coils and phantoms to be tested | As required | - | - |
| Required conditions |
|---|
|
| Safety |
|---|
|
Before working in any GE Healthcare MR suite or performing any GE Healthcare service procedure, you must:
If you have any safety concerns at any time, do not begin work or immediately stop work and move to a safe location. Immediately contact your supervisor or site safety officer for instructions on how to proceed. |
Figure 1. ISNR Formula
The graphical user interface (GUI) for the MCQA tool is updated to include provisions that support the unified phantoms for coils.
DV26 software introduces the Noise Test feature for coils that have Noise Test data in their config file.
Procedure
- note: If the MCRv test has not been executed or returns missing or failed results, the MCQA tool will detect them and a message will show asking to continue. Click Yes to continue with the MCQA scan.From the CSD, go to and click Click here to start this tool.The MCQA tool shows.note: All images contained in this document are a representation. Actual system images may vary.
Figure 2. MCQA tool
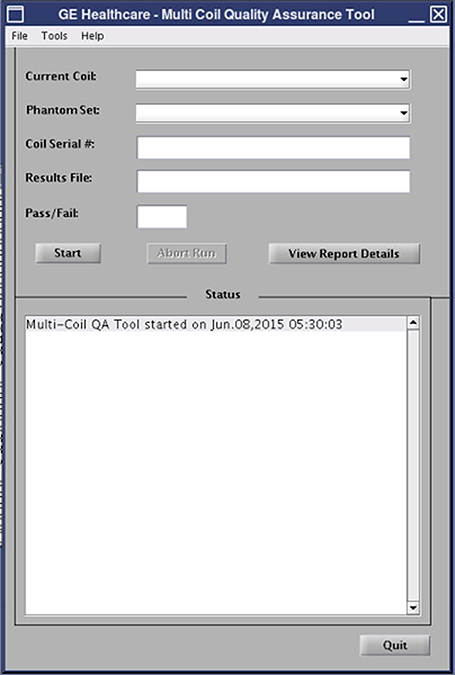 During startup, the MCQA tool tries to identify the coil connected to the system. The Current Coil field shows the current coil mode being tested.
Figure 3. MCQA tool for DV26 software with noise test ()
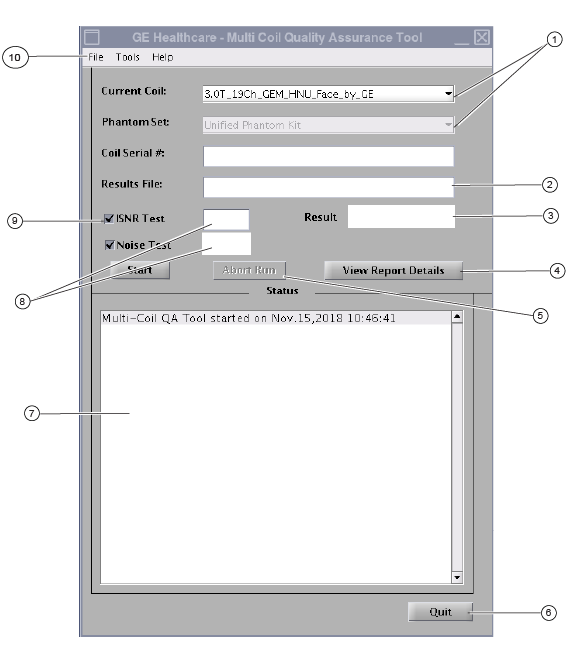
1 Shows all connected coil/coil serial numbers 2 Results file would show the name of the .mcqa file generated during ISNR test or .noisetest file during noise test 3 Shows combined result when both tests are selected 4 Launches mcqa_viewer for ISNR test, noise_viewer for noise test, and both the viewers when both tests are selected 5 Aborts the current run, enabled only during scanning 6 Close all of the GUIs and exit 7 Status box shows step by step working of the tool and displays final analysis 8 Shows results for respective tests 9 Three workflow options: - ISNR Test: completes SNR test
- Noise Test: completes sub-clustering analysis
- ISNR Test and Noise Test: complete both analyses
10 Menu to select result file (ISNR or .noise test) for offline analysis - If successful, the tool automatically lists the connected coil in the Current Coil field.
- The names listed are the physical coil names and specific to the coil connector.
- If the coil is not recognized, a message displays indicating the coil must be configured.
- Legacy coils should not reference the connector.
- Any new coil with the bendix connector will have an HDx/HDe identifier in the coil name.
- If the tool detects an incorrect coil selection during the download, an error message displays. You must manually select the correct coil from the Current Coil field.
- The Current Coil field is blank when more than one supported coil is connected. This field provides an active list. Select the appropriate coil based on which QA test to complete.
- Enter the coil serial number in the Coil Serial # field.
- If a recognized coil can use either a legacy phantom set or a unified phantom set, a dialog box appears prompting you to make the correct selection. Click OK.The Phantom Set field varies depending on the coil that is plugged into the system:
- If the Phantom Set field provides an active list, select the phantom choice based on the phantoms used during setup for the MCQA test as described in the Coil Vendor Manuals.
- If the Phantom Set field is unavailable (grayed out), the tool has automatically selected the phantom set based on the coil that is connected.
- Position the coil and phantoms according to the QA test in the coil vendor manual. Refer to Coil Vendor Manuals.
- In the MCQA tool window, click Start to begin the test.A confirmation dialog box appears, asking you to continue with the selected phantom set.
- Click Yes.A warning dialog appears, asking you to verify the coil/phantom setup and position.
- Make sure the phantom and coil setup is correct and click Yes to continue.The status window of the MCQA tool continuously updates to give information about what the tool does. A time bar also shows the approximate total test time, elapsed time, and percent complete. After the test is completed, the test results file name shows in the Results File field, and the Pass/Fail field shows the overall test result.
- If the test fails, see Table 1 (Interpretation of test results) below for additional actions required based on the results of the test(s) you ran. In some cases, the Recommended Action column will direct you to the test result viewers
page.The MCQA tool may have a Fail test result for reasons including, but not limited to the following:
- Bad coil element(s)
- Incorrect phantom used for testing
- Incorrect positioning/placement of phantom
The MCQA tool may display Act Req in the Noise Test and/or Result windows if the variation among the noise groupings is such that it is necessary for the FE to perform additional inspection steps, as described in case no. 2 and 5, in order to understand the final test result status.
Table 1 Interpretation of test results Case No. SNR reporting status Noise reporting status Combined reporting status Recommended action 1 PASS PASS PASS None 2 PASS Act Req Act Req For initial coil installation testing or staging testing (EST) Interpret as follows:- noise reported as: PASS
- combined reporting status: PASS
No further action is required.
For coil troubleshooting post installation Check % SNR variance on the MCQA viewer status.
Act Req displayed in both Noise Test and Result windows indicates the FE must manually review the data to understand the final result. Select View Report Details from the MCQA tool menu. In the MCQA Viewer window, scroll down to the bottom of the Results display (located at the left of the window) and inspect the polarity of reported % SNR variance (displayed as %SNRvar) values.
If all reported % SNR variance values are positive and none shown are negative, the test passed and no further action is required.
If all of the following are true, the coil may be faulty:- the value is negative and
- the absolute value is > 15%. For example, in MCQA viewer showing %SNR variance, the absolute value of the number shown in the red box is greater than 15% and
- IQ complaint exists from the customer
Review the history of the coil and its type to determine if it previously had better performance.
Review the results with someone familiar with OnWatch prescan noise data analysis, such as an online center engineer, before replacing the coil.
3 PASS FAIL FAIL SNR reported PASS and Noise reported FAIL. Check the setup and review the results with an online engineer before you replace hardware. 4 FAIL FAIL FAIL The coil/element is likely the cause of the failure. 5 FAIL Act Req FAIL For Act Req, make sure the phantom selection and positioning is correct. If the setup is correct, review the results with an online engineer prior to replacing hardware. 6 FAIL PASS FAIL Please make sure that the phantom selection and positioning is correct. If the setup is correct, review the results with an online engineer before you replace hardware. - Click Quit to exit the MCQA tool. Remove the coil and phantom from the system.