- id_13105867
- Version: 3.1
- Date: Dec 3, 2019 12:32:07 PM
1.5T HD 8-Channel Foot Ankle Coil MCQA Test Setup
Prerequisites
| Required persons | Preliminary requirements | Procedure | Finalization |
|---|---|---|---|
| 1 | Not Applicable | 15 minutes | Not Applicable |
| Item | Quantity | Effectivity | Part number | Manufacturer |
|---|---|---|---|---|
| HD 8-Channel Foot Ankle Legacy Phantom Assembly | 1 | Legacy Phantom Set |
5273235-5 |
- |
| Small, Cylindrical Unified Phantom | 1 | Unified Phantom Set |
5342680 |
- |
| Cubical Unified Phantom | 1 | Unified Phantom Set |
5342681 |
- |
| Condition | Reference | Effectivity |
|---|---|---|
|
This coil configuration name must be installed to run the SNR Test Tool: HD Foot Ankle. |
- | - |
|
All RF Coil-related tests must be run on a system that is well calibrated and passes all system tests. The system should have passed Install in Spec (IIS), especially White Pixel, Correlated Noise, and Multi-Coil Receive (MCR) Tool. |
- | - |
Coils do not ship with phantoms. Phantoms come in a Unified Phantom Set with the MR system.
Legacy Phantom Setup
Follow this process to prepare for the automated SNR (Signal-to-Noise) Test using the 1.5T HD 8-Channel Foot Ankle Coil by Invivo (M3340CD).
Procedure
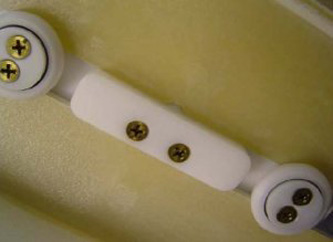
- Place the baseplate of the coil on the table:
- Lock the baseplate (shown below) to ensure the coil is centered
on the table.
Figure 1. Locking Baseplate
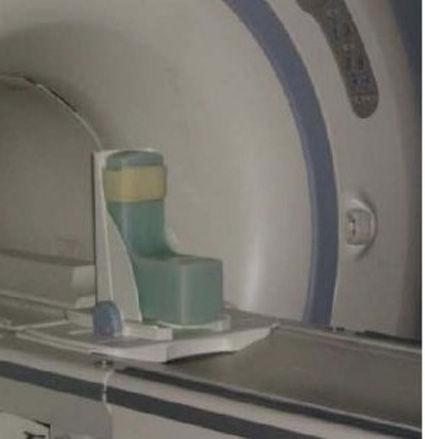
- Insert the phantom as shown below.
Figure 2. Inserting Phantom
- Lock the baseplate (shown below) to ensure the coil is centered
on the table.
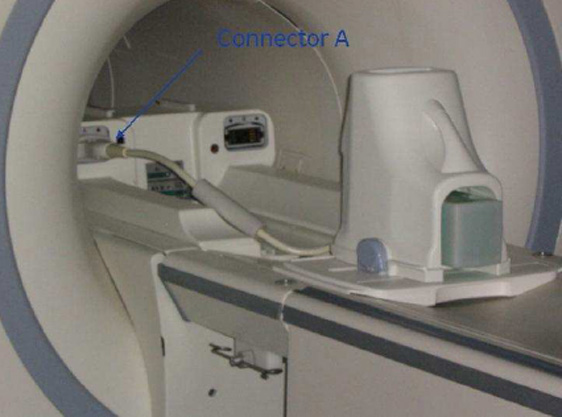
- Place the coil on the baseplate, and connect the coil to Port
A on the Hypertronics Connector in the Low Profile Carriage Assembly
(LPCA) as shown.
Figure 3. Hypertronics Connector
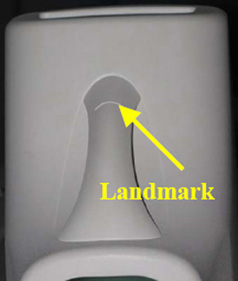
- Establish the landmark on the top of the coil as shown and Advance to Scan.
Figure 4. Landmark Position of Coil

- Run the Multi-Coil Quality Assurance Tool.
Unified Phantom Setup
Follow this process to prepare for the automated SNR (Signal-to-Noise) test using the 1.5T HD 8-Channel Foot Ankle Coil by Invivo (M3340CD).
Procedure
- Place the Foot Ankle Coil baseplate on the table as shown.
Figure 5. Foot Ankle Coil Baseplate on Table
- Place the Small, Cylindrical Unified Phantom horizontally and
the Cubical Unified Phantom vertically, and fix the phantom to the
baseplate using the Velcro® as shown.
Figure 6. Cubical Unified Phantom on Baseplate
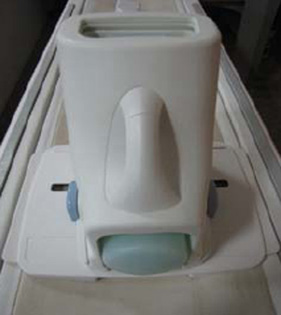
- Cover the baseplate with the coil.
Figure 7. Coil Over Baseplate
- Connect the Foot Ankle Coil to Port A of the system LPCA, and
landmark the coil at the crossmark on the coil handle.
- Press Advance to Scan.
- Run the Multi-Coil Quality Assurance Tool.
Figure 8. Crossmark on Coil Handle
- After the test is completed, carefully remove the cubical then the cylindrical phantom from the baseplate to avoid damage to either phantom.
What to do next
Finalization
No finalization steps.