- Topic ID: id_18717796
- Version: 1.0
- Date: Sep 20, 2018 2:04:02 PM
CTPM-1323 (SCHLEIFRING Maint, Inspect Brush)
Prerequisites
Overview
Procedure Effectivity:
1 Schleifring Slip Ring PM Requirements
Procedure
- Vacuum brush dust at the following intervals:
- The FIRST 250k gantry revolutions after brush module replacement.
- Every 500k gantry revolutions thereafter.
- It is required to inspect the slip ring and brushes while vacuuming.
2 General Information about Slip Ring Vacuuming
Procedure
- The vacuum brush must be free of contaminates and oil. Do not introduce foreign contaminates from a dirty or oily brush.
- Regardless of how heavy or old the brush dust accumulation is, a good vacuuming to remove ALL of the dust is sufficient for Schleifring maintenance. Do not use solvents to remove brush dust.
- When done properly and on a regular PM schedule, slip ring vacuuming is ample to avoid pre-mature power ring, brush or communication failures. It will also prevent any need for ring repair, or craytex sanding.
- Not removing ALL of the brush dust will cause arcing on the power rings.
This will necessitate repair action that involves cratex sanding and use of
alcohol for cratex residue removal. This is not a good thing because:
- Alcohol, as a binding agent, will encourage dust accumulation in ring crevices and will contaminate the brush tips, resulting in increased communication issues, maintenance and other problems.
- It is never necessary to use alcohol on the Schleifring during normal operation and wear of this ring. Alcohol cleaning is a service action to repair damage resulting from improper vacuuming; it is NOT a PM function.
- Arcing on the power rings will most times cause pitting and will necessitate sanding with the Craytex sanding crayon. Sanding the rings will remove ring material and significantly reduce ring life and if the residue from the sanding is not completely removed, will significantly increase brush wear. Sanding with a Craytex sanding crayon is a service repair action resulting from improper vacuuming, it is NOT a PM function.
3 DUST VACUUMING PROCESS
Procedure
 danger
- Tag and Lock A1 Disconnect.
- notice
- Remove slip ring covers. Reference the appropriate section in the General Service Manual.
- Remove the grounding strap from the power brush block.
- During the vacuuming process, visually inspect all slip ring tracks.
Properly seasoned tracks will normally have a brownish black lubricant laid
on the ring. This “patina” of carbon / silver is two to three
thousands thick, and self-renewing. DO NOT remove this film of lubricant.
Look for pits or deposits, which are sometimes hard to see. Deposits can be silver or black from arching. If there is a suspect area on the ring, take the end of a CLEAN tie wrap and gently drag it across the suspect area. You should be able to feel a vibration in the tie wrap if a pit or deposit is present. If pits or deposits are found, refer to PM procedure CTPM-1306 (Clean Slip Ring Tracks).
- notice
- notice
- notice
- Brush Block Wear Inspection - Refer to the System Service Manual for
Brush Block removal procedure details.
-
Expected signal brush life is 5 million gantry rotations.
-
Expected power brush life is 2.5 million gantry rotations.
-
Alcohol and its contaminants will significantly reduce brush tip life.
-
Remove the brush block as per the System Service Manual.
note:Do not touch brushes with your fingers. The skin oils will contaminate the brush and reduce usable life and potentially create future failures.
note:Since brushes are spring-loaded to ensure constant contact with the slip ring during operation, when the block is removed, the springs will relax forward causing the brushes to protrude further from their holders; however, the brushes will not eject from the block!
note:If brush is to be re-used make sure you install it in the same orientation as removed. The brush was seated/conditioned in that position.
-
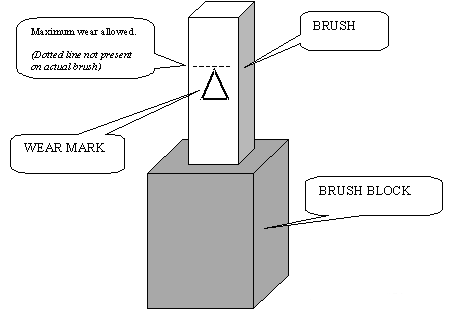
Inspect each brush tip for wear. Each tip will have a triangle stamped on one side (see Figure 1). When the brush wears to the point of the triangle, the brush must be replaced. Refer to the System Service Manual for details on brush replacement.
-
Refer to the System Service Manual for details on how to reinstall the brush block.
note:Brush tips are extremely brittle. Do not apply lateral force, as they will break. You must replace any brush that has been damaged in this fashion.
Figure 1. Inspection of Brush Tip for Wear
-
 |
|
|
|
4 VACUUMING
Procedure
- Vacuuming the Signal brushes.
- Remove all the brush blocks.
- Tap lightly with a small hammer to dislodge the dust particles.
- Vacuum thoroughly.
- Do not replace the removed components until the rest of the ring is vacuumed.
- Vacuuming the Power brushes (Same as Signal brush vacuuming).
- Remove the brush block.
- Tap lightly with a small hammer to dislodge the dust particles.
- Vacuum thoroughly.
- Do not replace the removed components until the rest of the ring is vacuumed.
- Check both top and bottom tips for significant wear. Expect the brush tips to wear at slightly different rates and they may appear out of alignment. DO NOT TOUCH THE TIPS WITH YOUR FINGER OR ANY TOOL.
- Vacuum the inside of the Slip Ring Cover.
- Vacuum the Gantry Rotating base.
- Vacuum the Slip Ring Itself. DO NOT TOUCH THE RING WITH YOUR FINGERS.
- Replace all of the removed components.
- Reassemble of the component is critical to brush and ring performance. Please refer to the proper replacement procedures in the General Service Manual.
- Install the slip ring covers.
5 Finalization
Finalization
No finalization steps.