
- SIGNA™ Hero 3.0T Service Methods
- 5852800-8EN Revision 1.0
- 00000018WIA307B0130GYZ
- id_123736941.7
- Jul 13, 2021 4:29:35 PM
ReportCARD 4 Install and Service
Prerequisites
| Required persons | Preliminary requirements | Procedure | Finalization |
|---|---|---|---|
| 1 | Not Applicable | 60 minutes | Not Applicable |
| Item | Quantity | Effectivity | Part number | Manufacturer |
|---|---|---|---|---|
| ReportCARD 4 software and documentation CD-ROM | 1 | - | - | - |
| Condition | Reference | Effectivity |
|---|---|---|
|
If ReportCARD is not already loaded on the system or a valid license key is unavailable, you can generate the software key through elicense using the Global Order Number (GON). Contact the Advantage Workstation Online Center for assistance generating the key. | - | - |
About this task
Overview
The ReportCARD 4 application is a reviewing and reporting application for Magnetic Resonance Imaging (MRI) data, in particular, Cardiac MRI. It provides simultaneous reviewing and report creation of cardiac MR exams with multiple series containing DICOM images. Multi-phase cardiac images are automatically displayed as time-lapse animations with no user interaction.
This tool is capable of automated calculation of all quantitative results derived from user measurements. It also includes automatic body surface area correction for appropriate cardiac analysis. Once the image analysis is completed, the physician can approve the report using the signature feature.
The ReportCARD 4 application is designed to run on the AW4.2P and forward AW platforms only. For more information about installing an advanced application option on the AW, see the current revision of the appropriate AW Service Manual at http://aw-ib.euro.med.ge.com.
Create an AW 'Config' media before and after the application software installation for use as needed throughout this and other AW service activities.
Configuration information can be read on a PC by viewing the config.txt using text readers like WordPad, Internet Explorer or MSWord.
To read a Save Configuration using a CD-ROM: Insert the disk and type the following into a C Shell:
-
mount /mnt/cdrom
-
cd /mnt/cdrom
-
more (“backup directory name”)
-
cd/
-
unmount /mnt/cdrom
Installing ReportCARD 4
Procedure
- When the AW displays, click on Admin in
the bottom left of the Patient List. A menu of the available applications
opens.
Figure 1. Admin Menu 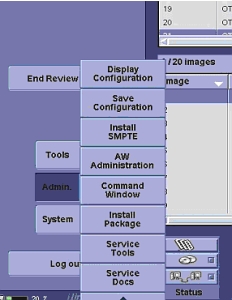
- Select . The Easy Install window opens.
Figure 2. Easy Install Window 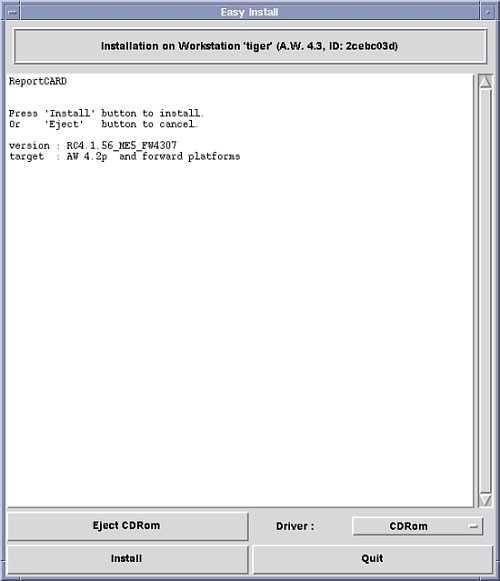
- The ReportCARD Installation dialog box
displays, and asks you to enter the software protection license key.
Figure 3. ReportCARD Installation License Key Dialog Box 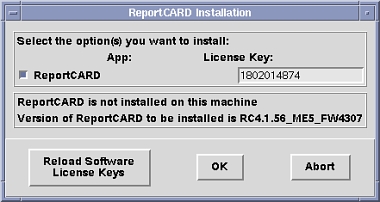 Note:
Note:If ReportCARD is already on the system, the field should auto-fill. If it is not auto-filled or this is the first load, enter the software key that was generated through elicense using the Global Order Number.
- Click OK to install ReportCARD 4.
This process takes 10-15 minutes. When the installation is complete, a CD Installation Successful message displays in the Easy Install window.
Figure 4. Installation Complete Message 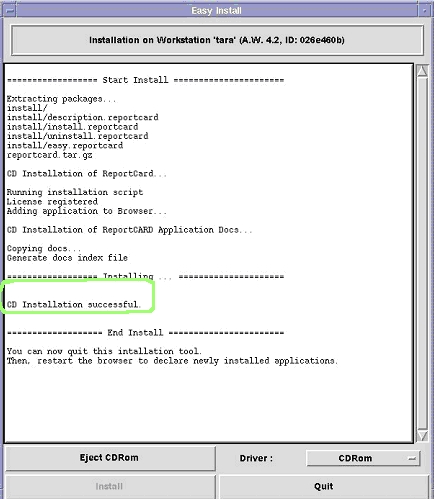
- When the information dialog box displays, click OK, and proceed with restarting the system.
Figure 5. Restart Dialog Box 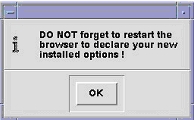
- To restart the system, click System,
and select .
Figure 6. System Menu Restart 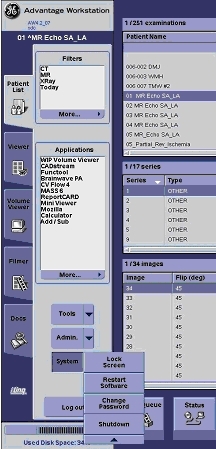
Proceed to Confirming the Installation.
Confirming the Installation
Procedure
- Click on Admin as shown in Figure 1, and select .
When the configuration window opens, confirm that the correct version of ReportCARD displays in the lower right-hand corner.
Figure 7. Configuration Window 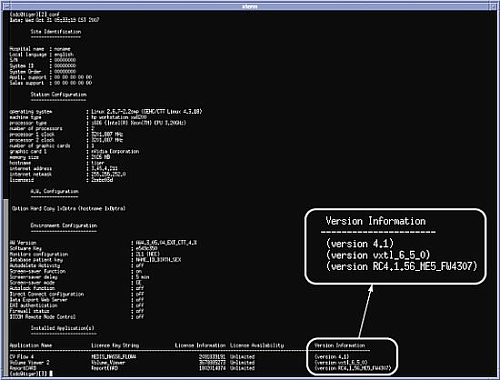
- From the left navigation menu, select ReportCARD.
If the ReportCARD option is not visible, expand the more menu to see it.
Figure 8. Advantage Workstation Window 
The ReportCARD window opens over the entire screen. The display shows images from series one (1) of the select exam.
Figure 9. ReportCARD Window Images 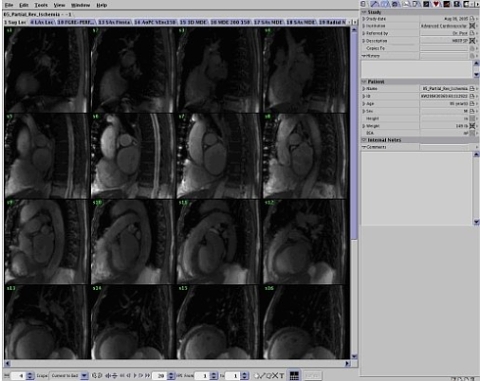
- From the Edit menu, select .
The Preferences window displays. Choose the Default Paper Size and click Save. The Preferences window closes.
Figure 10. Preferences 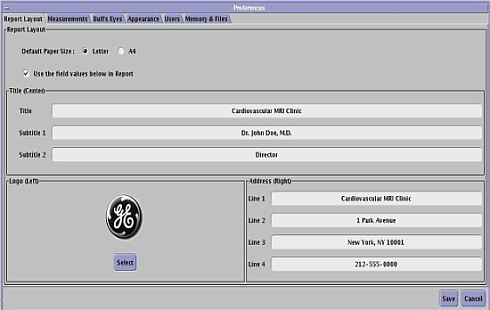
Finalization
Finalization
After the initial installation, the ReportCARD 4 application must be accessed from the Global Install Base (GIB) database in order to fulfill FDA product-tracking requirements. Call the AW Online Support Center for assistance or go to the GIB at http://gib.gehealthcare.com.