
- SIGNA™ Hero 3.0T Service Methods
- 5852800-8EN Revision 1.0
- 00000018WIA30E85630GYZ
- id_189462533.1
- Nov 5, 2020 1:33:28 PM
Installing Service Packs
Prerequisites
| Required persons | Preliminary requirements | Procedure | Finalization |
|---|---|---|---|
| 1 | Not Applicable | 30 minutes | 10 minutes |
| Item | Quantity | Effectivity | Part number | Manufacturer |
|---|---|---|---|---|
| Service Key | 1 | - | - | - |
| Condition | Reference | Effectivity |
|---|---|---|
|
Updates are loaded after MR Apps and service software has been loaded. But Service Packs must be loaded at root level (Applications not up). | - | - |
About this task
Overview
This procedure applies to all Excite MR Systems and all DV MR Systems.
IMPORTANT: Make sure the Service Pack is installed immediately after completion of the Application Software Load process. See the latest revision of MR Service Pack Software Matrix, DOC1667089, available from the online documentation library.
IMPORTANT: Open the “Read Me” file to observe any special processes that need to be completed to properly complete service pack installation. Example: a VRE Reconfiguration is needed to completely install Service pack for HD23_V02 release.
When GE releases new software versions, it may be necessary to install updates to a Host PC. This document includes:
Determining Service Pack Information on System
Procedure
- The Service Pack Information is noted in bold in the results
list. In the example shown below (for system HD16.0_V02), Service
Pack 02 is loaded.
Figure 1. Service Pack Information 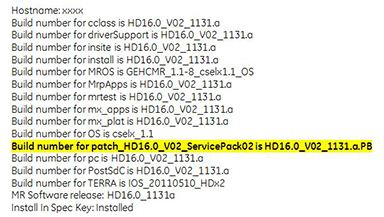
Accessing Guided Install Interface
Procedure
- Expand Utilities and click on Patches, then select the Patches tab displayed below.
Figure 2. Patches Tab 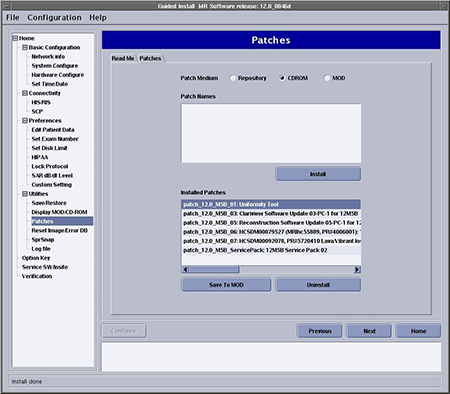
From this GUI, the following tasks can be performed:
-
Examine the “Read Me” file for special patch installation instructions.
-
Review the Installed Patches section to determine the updates that have been loaded on the system disk.
-
Select CDROM to determine the updates that are on the CD/DVD.
-
Select Repository to determine the updates that have been downloaded to the host computer and saved in /usr/g/insite/data via InSite.
-
Select Patch Information to view available help files on the system, CD/DVD, or in the /usr/g/insite/data directory.
-
Loading Updates from Repository or CD/DVD
Procedure
- Click on the applicable update to load and select Install.Note:
Only one update can be loaded at a time.
Figure 3. Available Updates 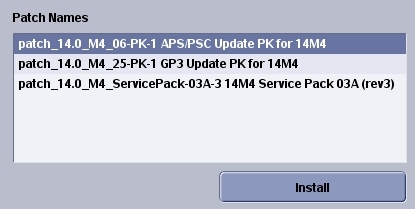
- If the update was properly loaded, it will display in the Installed Patches section. In addition to seeing it there,
the message Install Done displays in the status
section of the GUI to indicate a successful load.
Figure 4. Install Done Message 
-
The update process looks for the software revision and conflicting information before loading. If the software revision of the update does not match the applications revision, this message displays in the status section of the GUI: The Update cannot be loaded.
-
If there is a conflict between the update on the system and the update being loaded, this message displays: Patch_tst_M4_01 = PA conflicts with patch_tst_M4_03-PA-1. This means the update must be deleted on the system before loading the new one. Refer to Removing Updates.
-
Removing Updates
Procedure
Finalization
Complete a Goodbye scan (Check Scan) to verify that the system is functioning properly.