SPT Full Test Mode Procedure
Prerequisites
1 Phantom Positioning for SPT Full Test Mode
If all tests will be run, these elements will be required:
Procedure
- The body sphere with body loader.
- Head coil.
- Head sphere and loader.
- Head loader positioner.
2 Phantom Setup
Procedure
- With landmark still set on the Head Loader,drive the table in
until the position reads 1135mm.
Figure 1. Distance Between Head Coil Landmark and Center line on Body Loader
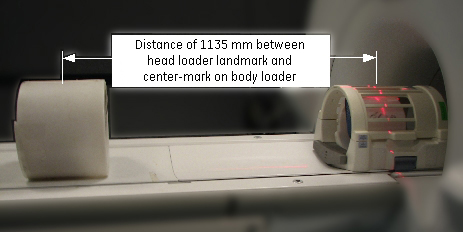
- Without moving the table, move the Body Sphere with body loader so the laser is on the black center line of the loader.
- Place the foam pads/wedges on both sides of the Body Loader to prevent roll.
- Advance to Scan.
3 Invoking SPT Full Test Mode
Procedure
- notice
- Start the SPT Tool.
-
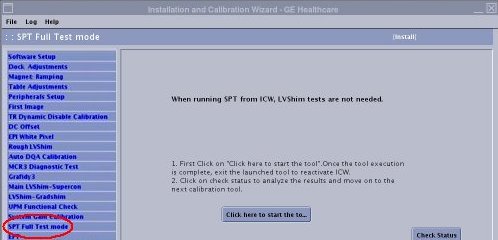
If SPT will be started from ICW, select [Calibration Wizard] from the calibration menu and select [Click here to start this tool]. Once the Calibration Wizard starts, select [SPT Full Test Mode] from the menu, review and okay the pre & post-dependencies, and select [Click here to start this tool] to start the procedure.
Figure 2. SPT start from ICW
-
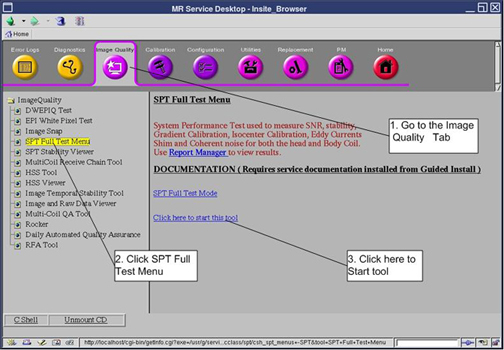
If SPT is started from Service Browser / Image Quality, select [Image Quality] and [SPT Full Test Mode], and select [Click here to start this tool] to start the procedure.
Figure 3. Starting the SPT Test Tool
-
- A SPT Test menu appears in a window on the desktop. Select appropriate test and start SPT. (see Figure 4).
- If SPT Full Mode is invoked from Installation and Calibration Wizard (ICW), set the [Select All Tests] option to [Yes]. Then, select a reason for the test and click Start SPT to begin.
-
To select all SPT tests, click [Yes] next to all tests fields.
-
To select a reason for the test, choose an option from the Test Purpose drop-down list. If desired, enter text in the Comments field.
-
Click Start SPT to begin.
-
- For troubleshooting, select individual tests as desired. Click No for set the [Select All Tests] option. Then, select a reason for the test. and click Start SPT to begin.
-
To select a reason for the test, click the button to the right of Test Purpose. Select a reason from the list. If desired, enter text in the Comments field.
-
Click the On button to select the test that you want to run.
-
To select Multiple Passes of the test(s), select the Multi Passes button, then enter the desired number of passes in the box that appears to the right.
-
Click Start SPT to begin.
You may be prompted to make additional selections as the test begins.
Status messages will appear in the text box below the menu as the tests are run. Use the scroll bar on the right side of the box to move up or down through the messages.
-
If desired, click the WhatFailed button. An example of WhatFailed output can be found in Troubleshooting.
note: This screen will be displayed until you quit SPT, so if you're in a troubleshooting mode, all you need to do is press the Start SPT button to go again.
-
Figure 4. Field Engineer Test Selection - Full Test Example
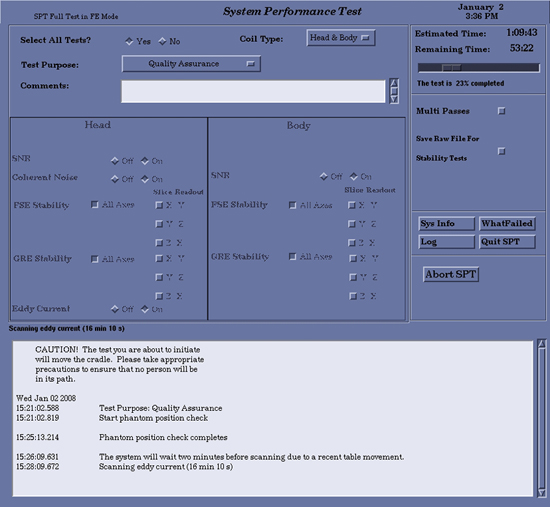
- If SPT Full Mode is invoked from Installation and Calibration Wizard (ICW), set the [Select All Tests] option to [Yes]. Then, select a reason for the test and click Start SPT to begin.
- To exit SPT, click the Quit SPT button.
- To view SPT results, select the Utilities tab on the Service Browser, then select Report Manager.
- Enter the report manager password (mrgo1) and press Enter.
4 Finalization
Procedure
- Do a TPS Reset after completing SPT to put the system back into a know state.
- If for any reason a SPT scan is aborted, Shutdown and Reboot the system.