HP z420 Lower Level FRU Replacement
Prerequisites
Overview
This procedure describes the steps to replace lower-level FRUs (LLFRUs) in the HP z420 host PC.
-
DVD Drive Replacement
-
Hard Drive Replacement
1 Prepare the Workstation
Procedure
- (For Hard Drive Replacement) Ask the customer to archive all images to an external storage device (PACS, DVDs, etc.).
- Perform SaveInfo.
- Close any PC applications and power down the GOC System Startup and Shutdown.
The GOC supports an optional UPS. Confirm your site’s configuration.
- Perform LOTO for the GOC/Operator Workspace. See the MR Service Safety Manual, PN 5452735. For added protection, disconnect the twist-n-lock main power cable from the rear of the console.
2 Remove HP z420 Host Computer from GOC
Procedure
- Remove the two screws on the left side panel of the GOC. Remove
the panel by lifting it up.
When removing the side panel, avoid straining the ground lead.
Figure 1. Ground Lead
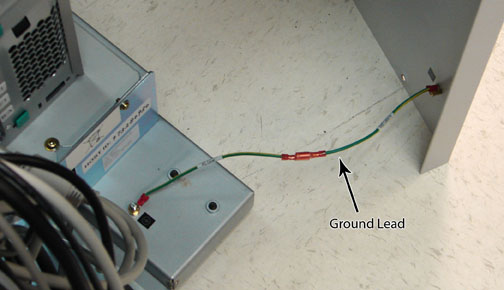
- Disconnect the short ground lead that connects the side panel to the GOC main chassis at the center of the lead.
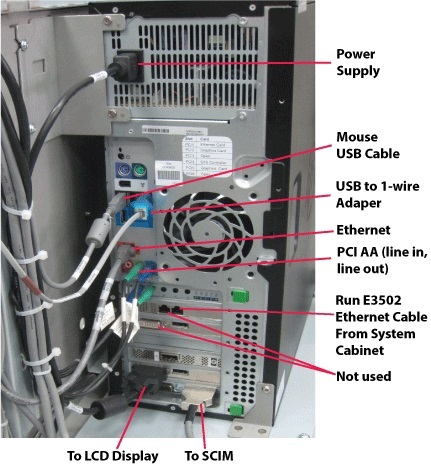
- Remove all the cables connected to the computer.
Verify that all cables are labeled and clearly marked. If necessary, add a label for clarity.
Figure 2. HPz420 Cable Configuration
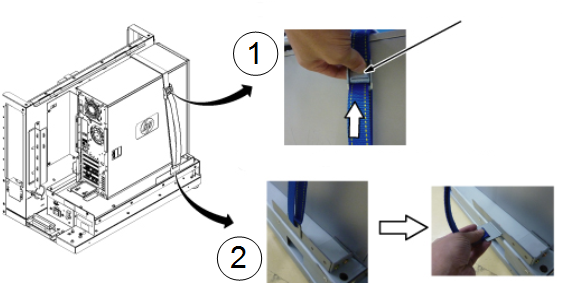
- Loosen the strap holding the computer in the GOC and unlatch
the hook.
Figure 3.
- Remove the host computer from the GOC.
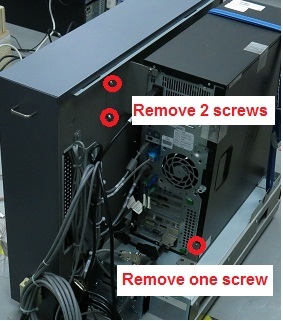
- Remove the two screws securing the back bracket to the GOC.
- Remove the one screw on the side plate.
Figure 4. Removing the Computer from the Brackets
- Carefully remove the computer using the back and bottom brackets from the GOC.
- Place the computer in an area where the interior of the computer can be easily accessed.
- Remove the screws that hold the left side panel to the rear of the computer.
- Remove the access panel (left side) of the PC by pulling the latch out and sliding the cover back. Set the cover aside in a safe area.
3 Replace LLFRUs in HP z420 Host Computer
Follow the steps below to replace the LLFRUs. When the replacements are complete, continue with Reinstall HP z420 Host Computer in GOC. Replacement instructions for the LLRFUs are
3.1 DVD Drive Replacement
Procedure
- To prevent damage, do not remove the DVD drive from its antistatic packaging until you are ready to install.
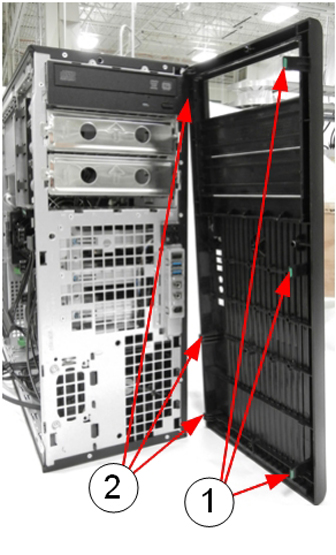
- Remove the front panel on the computer by gently unsnapping
the plastic locks located on the left side and pulling on the left
side of the cover.
- Pull the cover out just far enough to disengage the locks. If you pull them out too far, you can damage the locks on the right side of the cover.
- Push the cover slightly to the right as you pull out on the cover.
- Set the front cover aside in a safe location.
Figure 5. Remove the Front Panel
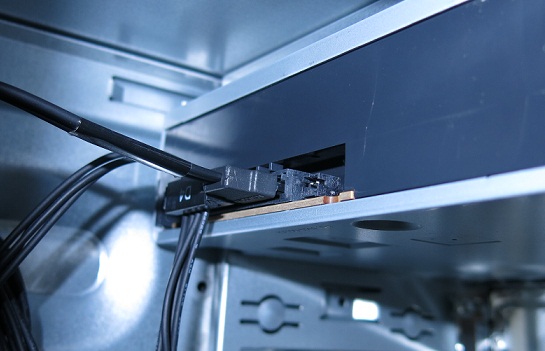
- Locate and unplug the power/data cable harness (D4) on the back
of the DVD drive.
Figure 6. Power/Data Cable Harness (D4) on Rear of DVD Drive
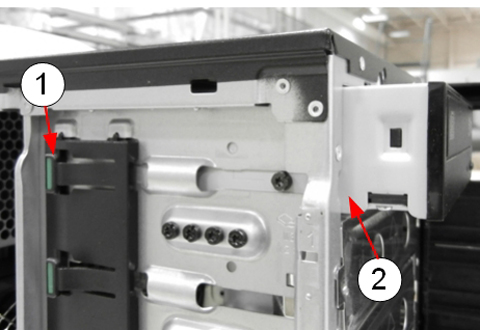
- Pull out the plastic lock located on the left side of the PC
and carefully slide out the DVD drive.
Figure 7. Remove the DVD Drive
- Remove the guide screws from the old DVD and install on the new unit.
- Install the new DVD drive by pulling out on the plastic lock and sliding the new drive into the open slot until it is securely seated.
- Reconnect the power/data cable harness to the new DVD drive.
- Reinstall the front panel on the PC.
- Proceed to Reinstall HP z420 Host Computer in GOC.
3.2 Hard Drive Replacement
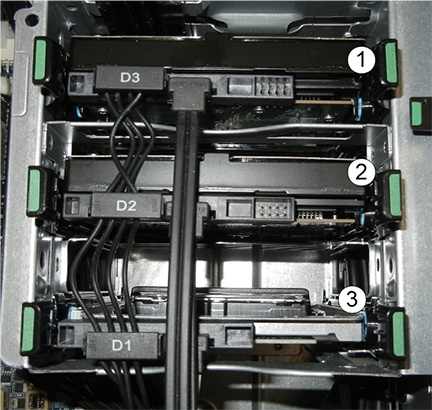
The HP z420 has three drives.
Figure 8. Hard Drives in HP z420
Procedure
- To prevent damage, do not remove the hard drive from its antistatic packaging until you are ready to install.
- Lay the computer on its side to allow for better access.
- Remove the power/data cable harness from the hard drive.
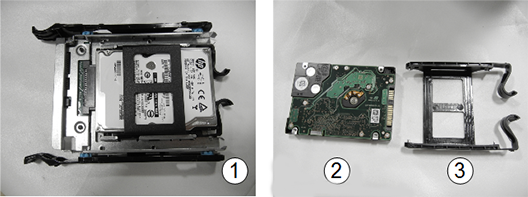
- Press gently in on the two green tabs on either side of the hard drive and slide the hard drive carrier out of the slot.
- Press gently in on the two back tabs of the hard drive carrier and remove it from the slot carrier. sliding it .
 caution
- Remove the drive from the by twisting the carrier slightly to
disengage the 4 pins holding the hard drive into the carrier.
Figure 9. Hard Drive and Carrier
- Remove the new hard drive from its antistatic packaging.
- Install the new hard drive into the hard drive carrier. Carefully
line up the pins and secure the drive.
Avoid touching the circuitry on the bottom of the hard drive.
- Slide the hard drive carrier into the slot carrier until it is firmly seated.
- Insert the slot carrier into the drive slot.
- Attach the power/data cable harness.
- Confirm the data cables from all three hard drives are connected
to the correct SAS device locations as shown in the illustration and
table below.
- If you are replacing HDD1, software needs to be reload. If you are replacing HDD2 or HDD3, restore the images that were saved in Step 1.
- Proceed to Reinstall HP z420 Host Computer in GOC.
 |
4 Reinstall HP z420 Host Computer in GOC
Procedure
- Reinstall the access panel on the host computer.
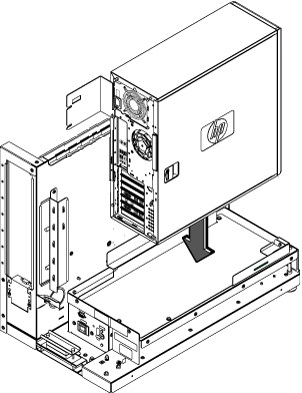
- Position the computer in the GOC as shown below.
Figure 10. Placement of Host Computer in GOC
- Install 3 screws and reinstall computer.
Figure 11. Install 3 screws

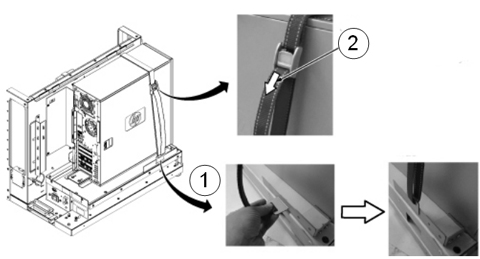
- Reinstall straps or screws to secure host computer to GOC.
Figure 12. Tighten the Strap Holding the Host Computer
- Mount the power cord to the rear of the host computer chassis, and verify that its power switch on the host computer power supply is turned to the ON position.
- Replace the rear cable connections.
5 Finalization
Procedure
- Confirm all cables and covers have been reinstalled and are secure.
- Perform LOTO on the GOC to return power. If needed, reconnect the twist-n-lock main power cable to the rear of the console. See the MR Service Safety Manual, PN 5452735.
- Power up the GOC System Startup and Shutdown.
- Verify that the host computer front panel power LED is illuminated
as a steady blue signal.
- Run a Check Scan.
- Confirm that all customer functions are operational (auto voice, filming, network, archive).