DQA II Tool
Prerequisites
The DQA tool determines proper gradient polarity (positive to positive, and negative to negative) and proper gradient wiring (X amplifier drives X coil, Y amplifier drives Y coil, Z amplifier drives Z coil) by scanning a series of axial and coronal images of the DQA III phantom. The tool also verifies that the proper phantom is being used. After proper gradient orientation is confirmed, the tool adjusts for Z-isocenter and Gradcal. If Z-isocenter adjustments or Gradcal adjustments are required, the DQA tool needs to restart, so DQA completion time may vary.
Procedure
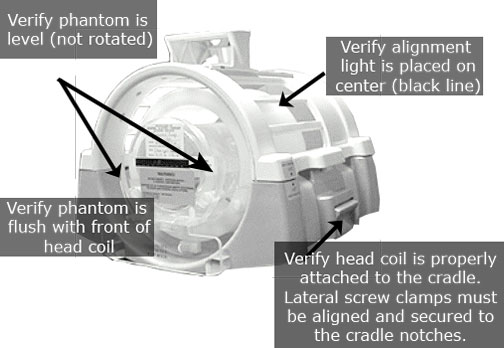
- Insert the appropriate DQA III phantom into the head coil as described below, and verify that it is level and oriented correctly.
- Landmark on the center line of the DQA III phantom. The laser must be in the middle of the black circumferential maker line. The correct phantom type, position and landmark are all critical to successful operation of the DQA II tool.
(For 1.5T with new style head coil, and 3.0T short bore magnet) Use the phantom with green solution and loader, P/N 2322997-2.
Figure 1. Phantom Orientation – Split Top Head Coil
Use the correct phantom as described below:
-
(For 1.5T with old style head coil) Use the phantom with green solution and no loader, P/N 2131027-2.
-
(For 3.0T long bore magnet, E2) Use the phantom with clear solution and no loader, P/N 2258365.
Figure 2. Old Phantom Orientation – Bird Cage Head Coil

-
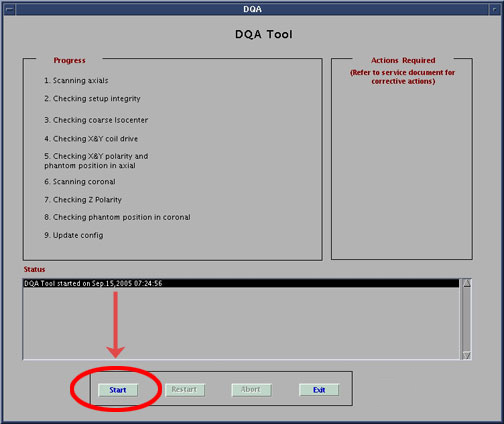
- Start the DQA tool.
- Proprietary Service Tools: Make sure the Service Key is installed. On the Common Service Desktop, from the Calibration menu, select Calibration Wizard > Click here to start this tool. After the Calibration Wizard starts, select DQA from the menu, review and okay the pre- and post-dependencies, and select Click here to start this tool to start the procedure.
- Non-proprietary Service Tools: On the Common Service Desktop, from the Calibration menu, select Calibration > DQA > Click here to start this tool to start the procedure.
- When a new window displays, select Start to begin the DQA calibration.note:
To stop the DQA tool, select Abort at any point.
Figure 3. DQA at Startup
- All phantom images acquired during use of the DQA tool can be
viewed in the browser. As the DQA tool progresses, the status displays
in the Progress area. If problems are encountered, they display in
the Action Required section. To resolve these issues, see DQA Troubleshooting.
Figure 4. DQA Screen with Actions Required
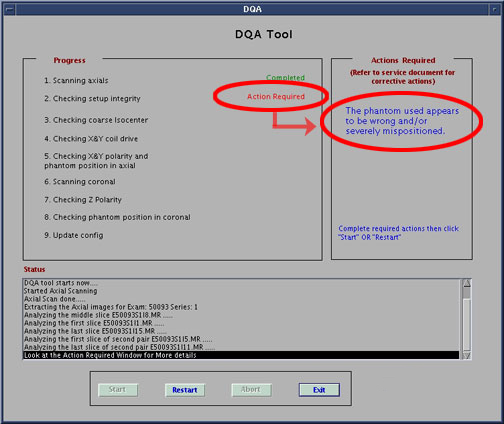
- After the issues are addressed (indicated in Action Required),
select Restart to start the DQA tool a second
time from the beginning.
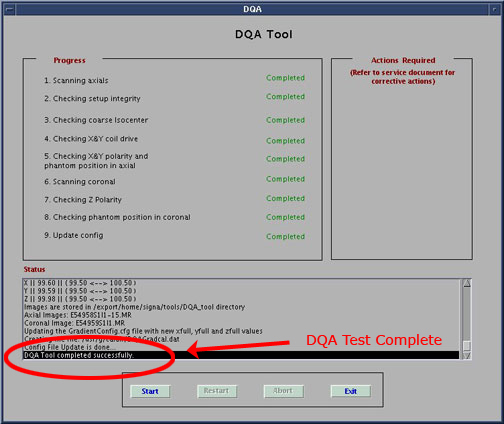
The tool indicates when it has completed successfully.
Figure 5. Successful Test
- Click Exit to exit the DQA tool.
Finalization
No finalization steps.