- Topic ID: id_16157435
- Version: 5.0
- Date: May 9, 2022 11:46:00 PM
Options Inspection
 |
|

|
|
1 Ceiling Mounted Component Bolts
These instructions refer to any GE-supplied ceiling-mounted object.
-
Acquire and place an appropriately-sized ladder under the ceiling-mounted component.
-
Remove any ceiling covers and ceiling tiles to access the pedestal base.
note: For the more detailed steps, please refer to the option installation manual. -
Verify that the mounting plate and pedestal base are securely bolted.
-
If the mounting plate is loose, inform the customer to have their contractor check and repair the structural integrity.
-
If the pedestal base is tight, confirm that the bolts that were marked at install have not moved.
-
If the bolts were not marked at install, mark the bolt and plate using a permanent marker.
-
If any loose hardware is detected, use a torque wrench and re-secure. Add a new visual inspection mark.
-
-
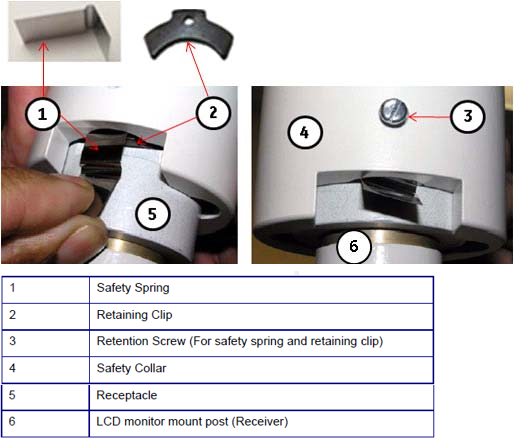
Inspect the arm assembly and confirm that the assembly is tight.
-
Check the safety spring (1) exists and the retention screws (3x2) at the arm assembly joint are tight. Tighten any loose hardware. The retaining clip (2) is very important to hold the arm assembly.
Figure 1. Safety Spring and Retaining Clip
-
Check the component end and confirm that the mounting hardware is tight. Tighten any loose hardware.
-
Reinstall all removed covers and ceiling tiles and store the ladder.
2 Injector Inspection
Follow the vendor-supplied installation manual for your Nemoto injector.
Non-Nemoto injectors are not covered. This is the customer's responsibility.
3 Cardiac Option Inspection
3.1 Cardiac Monitor Setup
Before you begin, verify that the following cords/cables are connected to the gantry option panel:
-
Turn on the monitor.
-
Follow the monitor self-test setup procedure using the document shipped with the system.
3.2 Cardiac Scan Setup for Functional Check
-
On the setup screen, enter the following selections:
-
New Patient: GE Test
-
On the screen, select the tab (see Figure 2).
-
On the tab, select Chest.
-
-
On the scan monitor (on the dark blue bar) select: Gating On
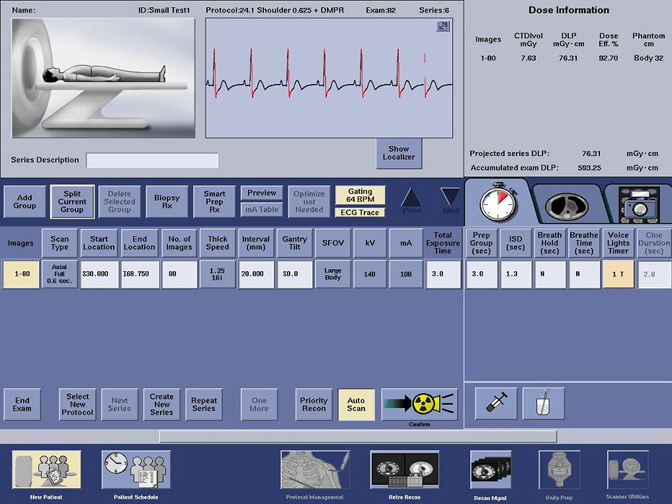
-
Look for the following diagnostics to display (see Figure 3):
-
Heart rate on the gantry display board
-
Cardiac pulses shown on the screen
-
Gating BPM displayed on the screen
-
ECG trace highlighted on the screen
-
Figure 2. Protocol Selection Screen
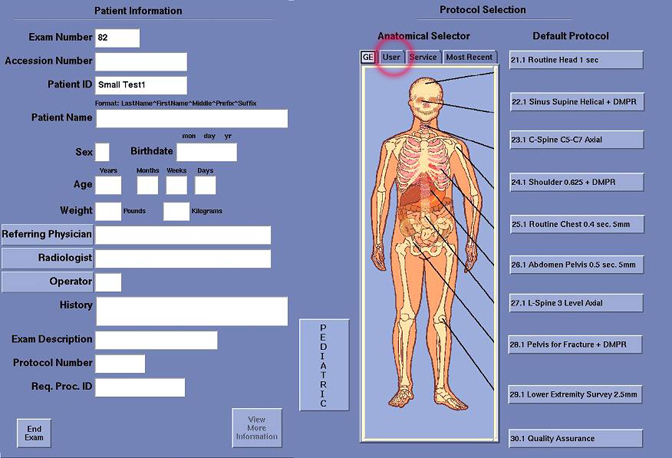
Figure 3. Cardiac Scan Screen
4 Depth Camera Inspection
Complete a Camera Inspection (For procedure, see Depth Camera Calibration).
5 RCK-AVIMOS Inspection
Complete the AVIMOS Inspection (For procedure, see RCK Planned Maintenance).