- Topic ID: id_23554319
- Version: 2.0
- Date: Sep 26, 2020 10:13:42 PM
DAS Cooling Fans Replacement (RT)
Prerequisites
Overview
Replace faulty fan and clean DAS air plenum and filters:
-
Remove gantry covers
-
Remove DAS air plenum
-
Replace part
-
Clean filters and plenum
Procedure
- Position the table to its lowest position.
- Remove gantry right side cover.
- notice
- Turn OFF Axial Enable, HVDC, and 120VAC switches on the Service Switch panel.
- Remove gantry top and front covers.
- Position the DAS at 12 O’clock.
- Lock the gantry in position, using the rotational lock.
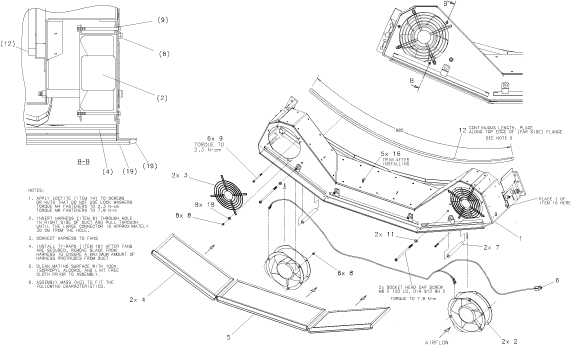
- Remove the DAS air plenum.
- Loosen the thumbscrew that holds the filter above the fan that is to
be replaced, and remove the filter from the plenum.
Figure 1. Remove Filter, Remove 3 Screws, Remove push-on connectors
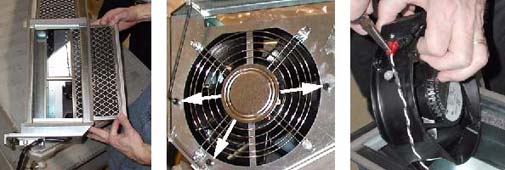
- Remove the three (3) 3mm Hex screws and three (3) hex nuts that hold
the fan in place.
It is not necessary to remove the finger guard.
- Remove fan from plenum interior. If the support tube interferes with removal, then remove the bolt that holds the tube in place, and remove the tube.
- Unplug the two (2) push-on terminals. Needle-nose pliers can be used for this process.
- Connect push-on terminals to new fan, and place fan in plenum with airflow indicator pointing inward. Orient fan so that all three mounting holes align properly.
- Reattach fan to plenum, using the three (3) 3mm hex screws and hex nuts.
Reinstall support tube, if applicable. Torque to 2.3 N-m (20.35 lbs-in).
- Inspect filter for dirt. Clean with a vacuum (or soap and water), if necessary, and reinstall. Secure the filter with the bracket and thumbscrew.
- Reinstall plenum.
Figure 2. DAS Air Plenum Assembly
 note:
note:For a larger version of the above illustration, click on the pdf icon below:
Figure 3. DAS Air Plenum Assembly
248732.pdf
 |
Finalization
- Verify fans operate correctly.