- Topic ID: id_18480599
- Version: 3.0
- Date: Jan 20, 2020 8:35:27 PM
SCIM Replacement
Prerequisites
Overview
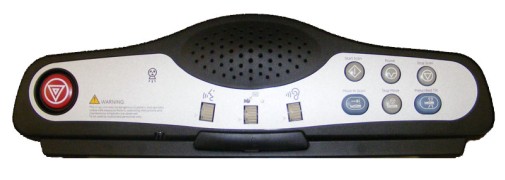
This procedure describes and illustrates the steps necessary to replace the Scan Control Module (SCIM) Assembly.
Figure 1. Scan Control Module (SCIM) Assembly
1 Power-Off (Shut Down) the Console
Procedure
- Select one of the following methods to power off the Operator
Console:
-
If applications are running, click the Shut Down icon and select Shut Down.
-
If applications are down, open a Unix Shell using the Toolchest. Type: {ctuser@hostname} halt. Press Enter.
The Operator Console monitor will display a ‘System Halted’ message when it is acceptable to power off the Operator Console.
-
- Power OFF the Operator Console at the front panel switch.
2 Remove Old SCIM Assembly
Procedure
- Remove the HD-50 cable connection from the back of the SCIM assembly being replaced.
- Disconnect the keyboard USB cable from the upper bulkhead panel
and pull the keyboard free from the SCIM plate.note:
Keyboard is held in place with Velco©.
- Remove the SCIM assembly and set aside.
3 Install Replacement SCIM
Procedure
- Place the replacement SCIM assembly on the Operator Console.
- Reattach the keyboard to the SCIM plate, remembering to pass the keyboard USB cable through the opening in the SCIM plate.
- Reconnect the SCIM HD-50 cable the rear SCIM assembly.
Figure 2. SCIM Connections
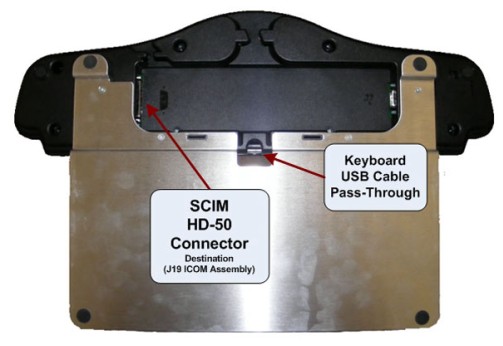
- Reconnect the keyboard USB cable at the upper bulkhead panel.
4 Power-On the Operator Console
Procedure
- Power ON the Operator Console at the console front panel switch.
5 Verify Replacement SCIM Operation
Procedure
- Verify the keyboard is functional.
- Verify that all controls on the SCIM assembly are mechanically working (i.e. Pushbuttons and Volume controls move freely).
- No other verifications required.
6 Finalization
Refer to SCIM & ICOM Functional Checks to confirm proper operation.