- Topic ID: id_15460432
- Version: 3.0
- Date: Jan 20, 2020 8:32:18 PM
SCIM and ICOM Functional Checks
Prerequisites
Overview
The following is a procedure for checking the functionality of the SCIM and ICOM Assemblies for proper operation.
Figure 1. Scan Control Interface Module (SCIM)
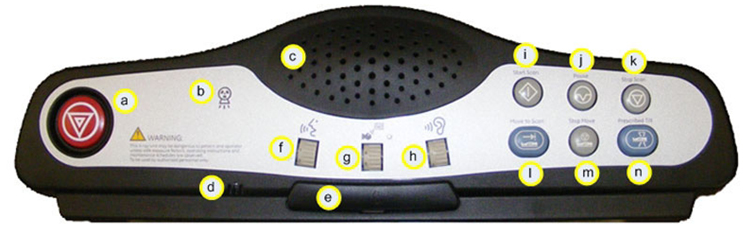
1 Emergency Stop
Procedure
- Start any basic CT scan, wait till X-Ray exposure has started
and then press the Emergency Stop Button (a).
- Any Gantry or Table motion shall stop.
- Any X-Ray exposure in process shall stop; Exposure Indicator (b) shall not be illuminated.
- Reset Gantry key on Gantry Control Panel shall flash once every two seconds.
- Press Reset Gantry key on Gantry Control Panel to return System to normal operation.
2 Intercom (ICOM)
Allows communication with the Scan Room.
note:
Requires assistant to be in Scan Room.
Procedure
- Press Talk Bar (e) and speak towards the Intercom Microphone (d).
- Volume Control (f). This dial controls the volume of the Operator’s
voice to the Patient. Speak into the Microphone (d) and vary the
dial, with assistant listening in Scan Room.
- An upward adjustment of the dial increases the volume.
- A downward adjustment of the dial decreases the volume.
- Volume Control (g). This dial controls the volume of the Autovoice
to the Gantry. Select Protocol Management / Autovoice on the Scan
Monitor and play a pre-recorded voice message.
- An upward adjustment of the dial increases the volume on Speaker in Gantry.
- A downward adjustment of the dial decreases the volume on Speaker in Gantry.
- Volume Control (h). This dial controls the volume of the patient’s
voice to the operator. Have assistant talk in Scan Room close to
Gantry.
- An upward adjustment of the dial increases the volume on Speaker (c).
- A downward adjustment of the dial decreases the volume on Speaker (c).
3 Scan Controls
Procedure
- Start Scan (i). Setup and run any basic CT scan with a prescribed
Gantry tilt and Cradle start position.
- The Start Scan indicator flashes green once the tube has reached exposure speed.
- Start Scan will flash for 30 seconds before timing out.
- If Start Scan times out, press the solid green Start Scan button to bring the system back to the ready state.
- Pressing Start Scan while it is flashing begins the scan.
- Pause Scan (j).
- Pressing Pause Scan causes the system to pause scanning, once the current scan is completed.
- Resume the scan by selecting [Resume] from the view/edit screen.
- Stop Scan (k).
- Pressing Stop Scan aborts the scan immediately.
- Resume the scan by selecting [Resume] from the view/edit screen.
- Move to Scan (l).
- The Move to Scan indicator flashes green indicating that the system is ready to advance the cradle into the starting position.
- Move to Scan will flash for 180 seconds before timing out.
- If Move to Scan times out, pressing the solid green Start Scan button again to bring the system back to the ready state.
- Pressing the Move to Scan button will advance the cradle.
- Stop Move (m).
- Pressing Stop Move stops cradle motion in/out.
- Resume the scan by selecting [Resume] from the view/edit screen.
- Remote Tilt or Prescribed Tilt (n).
- Pressing Prescribed Tilt and hold the button down until the prescribe tilt is achieved.
- The Remote Tilt button on the SCIM can be used to return the Gantry to zero once all the prescribed scans for the exam have been acquired.
4 Finalization
No finalization steps.