- Topic ID: id_15460488
- Version: 3.0
- Date: Jun 15, 2020 11:00:39 PM
Power Distribution Box Replacement
Prerequisites
Overview
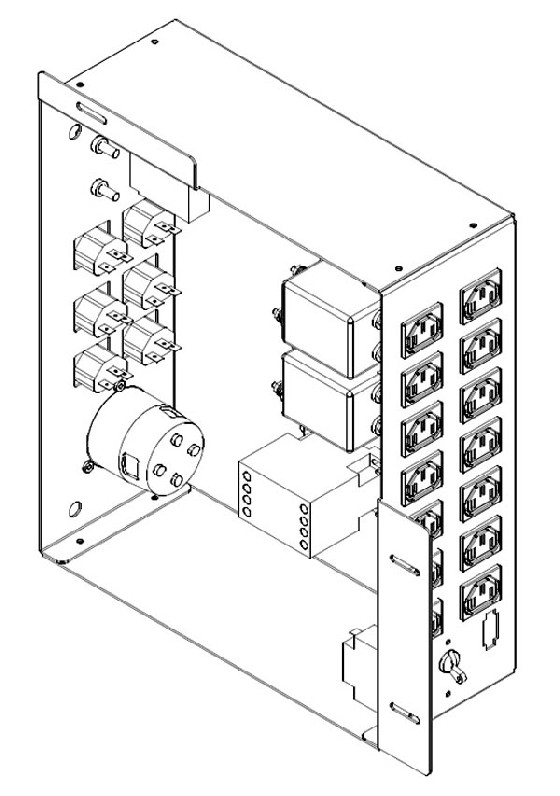
This procedure describes and illustrates the steps necessary to replace a Power Distribution Box in the left compartment of the Operator Console. The Power Distribution Box comes as an assembly.
This procedure requires major disassembly of the Console Chassis. Allow ample time and work space to perform this procedure.
Figure 1. Power Distribution Box
1 Power-Off (Shut Down) the Console
Procedure
- Select one of the following methods to power off the Operator
Console:
-
If applications are running, click the Shut Down icon and select Shut Down.
-
If applications are down, open a Unix Shell using the Toolchest. Type: {ctuser@hostname} halt. Press Enter.
The Operator Console monitor will display a ‘System Halted’ message when it is acceptable to power off the Operator Console.
-
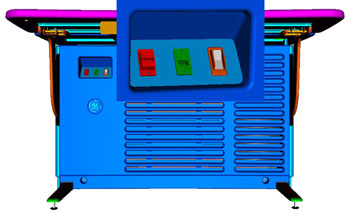
- Power OFF the Operator Console at the front panel switch. (See Figure 2.)
Figure 2. Console Power Switch
- Perform prescribed Lockout/Tagout procedure. For added protection, disconnect the Twist-N-Lock Main Power Cable from rear of console.
2 Remove Power Distribution Box Assembly
Procedure
- Remove console Keyboard Tabletop to allow for better access to console chassis.
- Remove the front and rear Operator Console Covers per prescribed cover removal procedure.
- Disconnect all power cords connected to the Power Distribution Box, both internal and external to console chassis. Confirm each cable and power cord is labelled appropriately.
- Disconnect the Console Power Switch Assembly wiring harness from the Power Distribution Box.
- Removed Console Power Switch assembly from console chassis to allow access to Power Distribution Box.
- Disconnect the SysLite Cable from J24 on the side of the Power
Distribution Box (Figure 3).
Figure 3. SysLite Connector
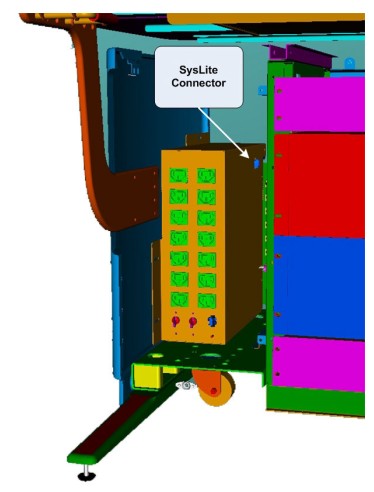 note:
note:The SysLite connector is located on the upper right side of Power Distribution Box. The connector may be difficult to see, as numerous other cables distributed in this area may hide it.
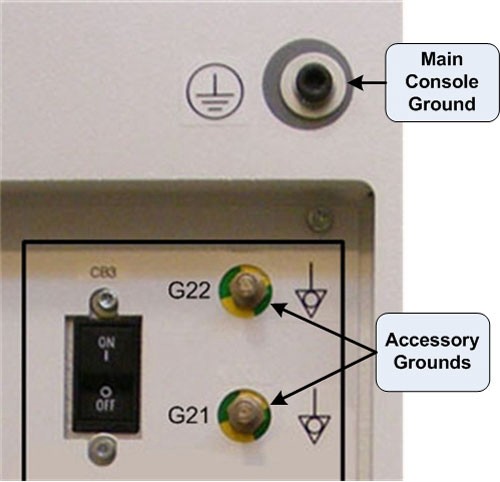
- Disconnect the Accessory Ground Cable(s) from Rear Bulkhead
Panel of console. Confirm each ground cable is labelled appropriately.
Figure 4. Main and Accessory Grounds
- Remove the three (3) 7mm Hex mounting nuts holding the Power
Distribution Box to the console chassis.
Figure 5. Power Distribution Box Removal
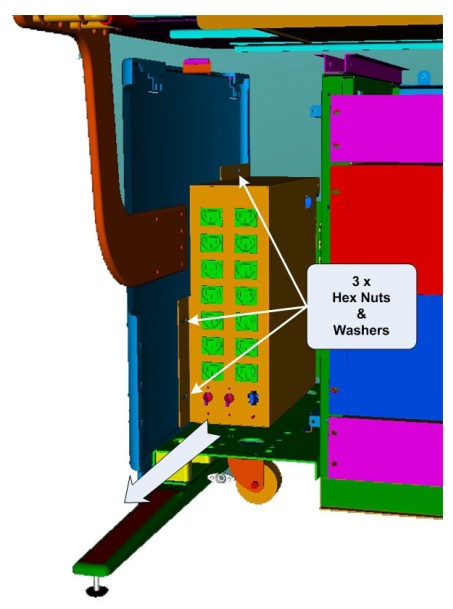
- Slide the Power Distribution Box towards the front of the console and remove the entire Power Distribution Box assembly from console.
3 Install Replacement Power Distribution Box Assembly
Procedure
- Slide replacement Power Distribution Box in left compartment of console.
- Install the Power Distribution Box to the console chassis using the three (3) 7mm Hex mounting nuts removed earlier.
- Connect the Accessory Ground cable(s) to rear of console.
- Connect the SYSLITE Cable to the side of the Power Distribution Box.
- Replace the Console Power Switch Assembly removed earlier.
- Connect the Console Power Switch Assembly wiring harness to the Power Distribution Box.
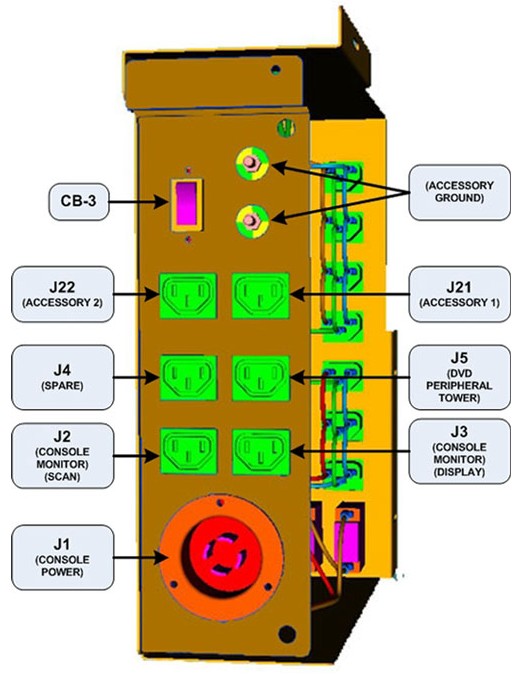
- Connect all power cords connected to the Power Distribution
Box, both internal and external to console chassis.note:
It is important that the Power Cords be connected to their assigned outlets on the Power Distribution Box to maintain proper power load balance.
Figure 6. Power Distribution Box Connections: Internal View

Figure 7. Power Distribution Box Connections: External View
- Check that all three (3) Circuit Breakers on the Power Distribution Box are set ON.
4 Power-On the Operator Console
Procedure
- Reconnect the Twist-N-Lock Main Power Cable from rear of console and remove Lockout Tagout protection applied earlier.
- Power ON the Operator Console at the console front panel switch.
5 Verify Replacement Power Distribution Box Operation
Procedure
- Visually verify the Operator Console powers up and that all
components (Computers, Monitors, Peripheral Towers, etc.) have power.note:
See Power Distribution Box Troubleshooting if any problems appear.
- No other verifications required.
6 Finalization
Procedure
- Refer to System Scanning Test to confirm proper operation.
- Reinstall Console Front and Rear Covers.
- Reinstall Console Keyboard Tabletop.