- Topic ID: id_15460322
- Version: 5.0
- Date: Jan 22, 2020 7:16:58 PM
Host Computer (Z840) System/Image HDD Replacement
Prerequisites
Overview
This procedure shall be followed when replacing the System or Image hard drive in a Z840 computer.
1 Host Computer Removal
Procedure
- Shutdown system. Select one of the following methods to Power
OFF the Console:
-
If Applications are up, click on the [Shut Down] button on desktop display and select [Shutdown].
-
If Applications are down, open a Terminal Window. Type: halt , then press ENTER.
-
When halt command has finished, power Off the console at the front panel switch.
-
- Apply LOTO. See Equipment Service - Lockout-Tagout-PPE procedure.
- Remove Front and Top covers. Refer to the following procedure.
NIO64: Refer to Replacement → Console (NIO64) → RIO / NIO64 Console Cover Removal and Installation
GOC6.6: Refer to Replacement → Console (GOC6.6) → Console Cover Removal and Installation
- Remove the host computer from console chassis. Refer to the
following procedure.
NIO64: Refer to Replacement → Console (NIO64 Z840) → NIO64 Host Computer (Z840) Replacement
GOC6.6: Refer to Replacement → Console (GOC6.6) → GOC6.6 VCT Host Computer (Z820) Replacement
2 System or Image Hard Drive Removal
Procedure
- Open the host computer side access panel.
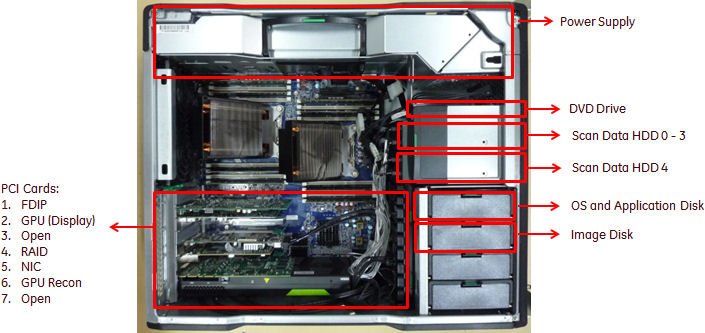
- Locate System or Image Hard Drive FRUs by referencing the Illustrations
below.
Figure 1. Z840 Component Location
- Remove the original Hard Drive assembly from the computer’s drive bay.
3 System or Image Hard Drive Preparation
Procedure
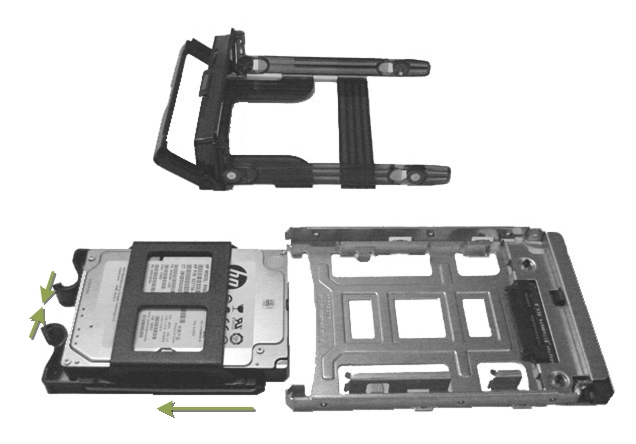
- Remove the 2.5 to 3.5 inch Form Factor Adapter Bracket with Hard Drive from the Hard Drive carrier rails. See Illustration 3.
- Remove the 2.5 to 3.5 inch Form Factor Adapter Bracket from Hard Drive and set Hard Drive aside. See Illustration 3.
- Install replacement Hard Drive into the original 2.5 to 3.5 inch Form Factor Adapter Bracket removed from original Hard Drive.
- Install replacement Hard Drive with Form Factor Adapter Bracket
into original Hard Drive carrier rails.
Figure 2. Hard Drive Form Factor Brackets and Carrier Rail Assembly
4 System or Image Hard Drive Install
Procedure
- Install the replacement Hard Drive assembly into the computer drive bay.
- Close Side Access Panel.
5 Restore the Console
Procedure
- Install Host computer into Console chassis. Refer to the following
procedure.
NIO64: Refer to Replacement → Console (NIO64 Z840) → NIO64 Host Computer (Z840) Replacement
GOC6.6: Refer to Replacement → Console (GOC6.6) → GOC6.6 VCT Host Computer (Z820) Replacement
- Reconnect all cables removed earlier to the Z820/Z840 computer.
- Install Console covers. Refer to the following procedure.
NIO64: Refer to Replacement → Console (NIO64) → RIO/NIO64 Console Cover Removal and Installation
GOC6.6: Refer to Replacement → Console (GOC6.6) → Console Cover Removal and Installation
- Remove LOTO on console.
6 Finalization
Procedure
- Perform a Load From Cold (LFC).
Refer to appropriate LFC procedure in Service Methods.
note:When a hard disk drive, which was previously used in a RAID volume, is reused ads system or image disk, clearing the configuration information in the hard disk drive is required.
Refer to RAID Disk Clear Configuration Procedure.
- Reinstall console covers.
- Perform the Functional Checks → System Scanning Test instructions from the procedure list.
- SSA Gen2 license needs to be recreated.
Check the new 16 digital code at CSD Home page, create new SSA Gen2 license and install the license. Refer to SSA License File Installation.