- Topic ID: id_15460812
- Version: 2.0
- Date: Nov 8, 2018 1:38:00 AM
GOC4/GOC5 Fan Replacement
Prerequisites
Overview
This module describes the procedures used to replace the Rear Fan in the GOC4 or GOC5.
1 Power-Off (Shut Down) the Console
Procedure
- Select one of the following methods to Power OFF the Operator Console:
- If Applications are UP, click on the Shut Down button and select Shutdown. The Operator Console monitor will display a 'Power Down' message when it is acceptable to power OFF the Operator Console.
- If Applications are DOWN, open a Unix Shell. Type: halt.
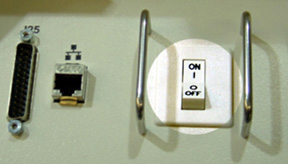
- Power OFF the console at the front panel switch. (SeeFigure 1.)
Figure 1. Console Power Switch
2 Remove the Rear Cover
Refer to Console Cover Removal and Installation, for details.
3 Replace the Existing Fan
Procedure
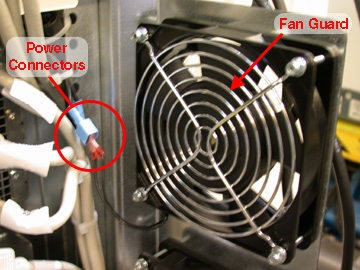
- Disconnect the Power to the Fan. See Figure 2.
- Firmly grasp the blue power Connector with one hand and firmly grasp the red power connector with the other hand.
- Pull apart.
- Repeat for the second power connector.
Figure 2. Fan Power Connector and Fan Guard
- Remove the four (4) screws that hold the Fan in place. Save the screws
and the fan guard.note:
Take Care to insure that the Air will be lowing out of the console, Use the arrow indicators on the Fan as a guide. The Arrow should be pointing out of the Console.
- Install the replacement fan using the four (4) screws, nuts and fan guard from the previous step.
- Reattach the power to the fan.
4 Test the Replacement Fan
Procedure
- Apply power to the console.
- Verify that the fan is blowing air in the proper direction.
-
Air should be blowing OUT of the console.
-
If the air is blowing IN, you must reverse the fan. Refer toReplace the Existing Fan.
-
5 Finalization
Procedure
- Install the console Rear cover.
- Turn the system ON.