|
1. Remove the gantry dollies by removing the three dolly
bolts.
|
|
|
2. Manually rotate the gantry until the collimator faceplate
is at the 5 o'clock position.
|
|
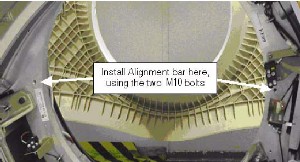
3. Install the alignment bar and level the bar by rotating
the gantry.
|
|
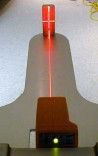
4. Attach the laser centering plate to the alignment
bar. Then attach the laser to the alignment bar and turn it on using
the controls on the back.
|

|
|
5. Set the beam profile to "|" and align the laser so
that the "|" beam shines through the center of the alignment sight
mounted on the end of the alignment plate.
|
|
|
6. Secure the laser to the alignment bar. Use caution
when tightening as the laser may move.
|
|
7. Verify that the alignment bar is still level. Place
a piece of masking tape on the back wall and mark a line on the tape
where the laser appears.
|
|
8. Remove the laser centering plate and store it in the
alignment case.
|
|
9. Install the table cradle laser alignment plates.
|
|
10. Gantry Zero Tilt: Place the digital level on the
rear corner of the gantry and check that the gantry is at 90 degrees
+/- 0.3 degrees.
|

