- Topic ID: id_15460826
- Version: 2.0
- Date: Nov 8, 2018 1:36:22 AM
Install Software Options and Complete Computer Integration
1 Install Customer Options
1.1 Time & Personnel
1.2 Tools and Test Equipment
None
1.3 Preparation
-
Your system has one or more DVDs that contain customer-purchased options. Standard options are required for system operation. Install the Options DVD(s) at this time, following the instructions in this section. A more complete listing of options are located on the Service CD-ROM shipped with your system.
-
The following tables are options clarification and identification for installation purposes only.
-
Standard options are loaded before additional options. Load the standard options in the order listed in Table 1.
-
Customer software options are located in the Option and Documentation Tray on the lean cart.
Additional options must be loaded in the following order for proper operation.
1.4 Install Options Procedure
Continue to Install Software Options to complete the installation.
2 Network and Service Integration and Checkout
-
If additional network connections are needed for this installation, complete as required. Confirm network operation.
-
If additional service integration is required to complete this installation, complete as required.
-
Verify that the system information on the service home page is correct and that system service information is present on the service desktop.
3 Camera
3.1 Time & Personnel
3.2 Tools and Test Equipment
-
Data collected from data sheets. (See System Configuration Data Sheets.
-
Software Load Procedures manual
-
System Service manual.
3.3 Preparation
If a DASM is required, notify the PMU that the DASM is not supported on systems with GOC6.
For details on camera configuration, refer to the Software Load Procedures manual.
For details on troubleshooting the camera, refer to the System Service manual.
3.4 Procedures
-
Click on the SERVICE DESKTOP icon.
-
Select CONFIGURATION icon.
-
Select INSTALL CAMERA.
-
Read WARNING message, and click OK.
Figure 1. Camera Warning

-
From the remote printer list select a camera, and select ADD for new install.
-
ADD
-
UPDATE
-
DELETE
-
-
Select DICOM or POSTSCRIPT*.
* Follow the manufacturers suggested setup instructions.
-
Follow the procedures on the screen.
note:Camera and film information is required. Review this information with the customer. Data sheets are available in Service Information CD under Alignment, Setup and Calibrations.
-
Return to the Home Page
-
Click the SERVICE DESKTOP icon.
-
Click SHUTDOWN
-
Click REBOOT.
Restart the system.
ENABLE THE CONSOLE LAPTOP PORT-
On the console in a unix shell, change user to root and enable the console laptop port:
-
Type: su - ENTER
-
Type the root password; press ENTER
-
Type: enableFEportENTER
-
4 Save System State and Start Up Applications
-
Insert a new Save State DVD into the Peripheral Tower DVD RAM drive.
-
Click the SERVICE DESKTOP icon.
-
If reloading software, click UTILITIES.
-
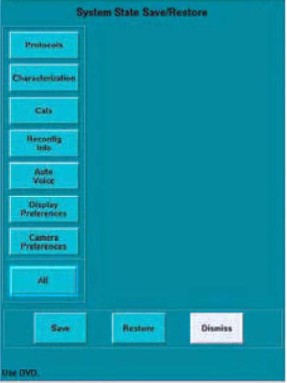
Select SYSTEM STATE.
Figure 2. System State Save
-
Click ALL to select all the cals, characterizations, etc.
-
Click SAVE.
-
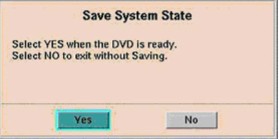
If the following message appears, insert a DVD into the DVD drive and click YES.
Figure 3. Save System State Prompt
-
When completed, click DISMISS.
-
Label and date the disk including the suite name.
-
Close the Service Desktop window at the upper left corner of the screen.