- Topic ID: id_18717987
- Version: 1.0
- Date: Sep 20, 2018 2:07:16 PM
Table Characterization Procedures
Prerequisites
Overview
This module contains:
-
Cradle Characterization
-
Elevation Characterization
1 Procedure
Procedure
- Remove the right Table Base Cover and right Table Rail cover (Place the Tape Switch Jumper Plug into socket).
- Remove the MTCB Cover.
- From the MTCB, turn the Service Switch, S4, to the SERVICE MODE.
- Turn the Char Switch, S7, to the ON position.
2 Cradle Characterization
Procedure
- Remove the Plastic Cradle Drive Belly Pan from the underside of the Table, near the Gantry, by loosening the two finger screws.
- Install the 2 Char Plates.
- Install the Corner Calibration Plate.
- Install the Side Calibration Bar in the extended position on the right side of the Table.
- Unlatch the Cradle.
- Remove the Char Pin from under the table near the gantry (See Figure 1).
- Move the table all the way into the gantry (there will be a click when the limit switch is pressed).
- Install the Char Pin in the char location (wiggle the cradle to insert the Char Pin).
- Press the Cradle Char Button, S9, on the MTCB (the LED should change).
- Remove the Char Pin.
- Move the table all the way out of the gantry, until it locks.
- Install the Char Pin in the char location (Wiggle the cradle to insert the Char Pin).
- Press the cradle char button on the MTCB.
- Wait about 3 seconds; the cradle LEDs will turn off if char is successful.
- If the cradle OUT char LED is on, repeat from step 5.
- Return cradle char pin to the storage location, reinstall the
belly pan and the Table Covers.
Figure 1. Location of Char Pin and Characterization Positions
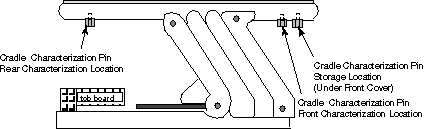
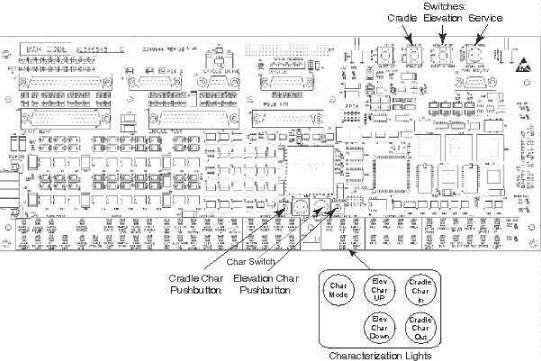
Figure 2. TCB Layout
 note:
note:For a larger version of the illustration, click on the pdf icon below:
Figure 3. TCB Layout
303782.pdf
3 Elevation Characterization
Procedure
- Lower the table until the pivot pin is 374.1mm above the char
plate.note:
The table can move in either FAST or SLOW mode by the Fast/Slow Switch, S6. Place the table in SLOW mode for more accurate positioning.
- Press the ELEVATION CHAR Button (the LED will change from DN to UP).
- Raise the table until the pivot pin is 849.1mm above the char plate.
- Press the Elevation Characterization Button, S5.
- Wait about 3 seconds; the elevation char LEDs will turn off if char is successful.
- If the elevation DN char LED is on, repeat from step 3.
Measurements for elevation characterization should be taken from the bottom edge of the characterization plates to the center of the rear upper pivot pin (using the dimple). Make sure that the tape measure is vertical to ensure accurate measurements.
4 Saving Characterization Values
To save characterization values, cycle table power by pressing a gantry emergency-off button, and then pressing E-Stop Reset S8, on the gantry service switch panel.
5 Finalization
Procedure
- After save all characterization values, restore S4 and S7 to their original position. S4 back to [NORMAL MODE], S7 back to [OFF] position.