
- SIGNA™ Hero 3.0T Service Methods
- 5852800-8EN Revision 1.0
- 00000018WIA30A10F20GYZ
- id_131062982.2
- Jul 13, 2021 3:56:30 PM
SPT Body Check
Prerequisites
| Required persons | Preliminary requirements | Procedure | Finalization |
|---|---|---|---|
| 1 | Not Applicable | 1 hours | Not Applicable |
| Item | Quantity | Effectivity | Part number | Manufacturer |
|---|---|---|---|---|
| Form Support for ECMT and Phantom | 1 | - |
5554839 | - |
| Head TLT Phantom Positioner for TDI HNU | 1 | - |
5554484 | - |
| Head TLT Sphere for 3.0T (Pink Solution) | 1 | - |
2359877 | - |
| TDI Head Neck Unit | 1 | - |
See FRU Manual | - |
| Body TLT Sphere for 3.0T (Pink Solution) | 1 | - |
2360025 | - |
| Body TLT Loader for 3.0T | 1 | - |
2360037 | - |
| Condition | Reference | Effectivity |
|---|---|---|
|
Cancel all previous exams. Click End Exam. | - | - |
|
Remove any patient positioning devices, such as patient restraints or other attached devices. | - | - |
|
Insert an FE or Advanced Service Key into USB port on host computer. | - | - |
About this task
System Performance Test (SPT) runs phantom position checks before starting any user-selected SPT except the Coherent Noise Test. It takes approximately two minutes for the head phantom position check and two minutes for the body phantom position check. The test will not start unless the phantom position checks are successful.
Important: After SPT begins, you can stop it at any time by clicking Abort SPT or Quit SPT. If you abort the test, all valid test results are assembled into a results file. See Troubleshooting SPT Problems for additional information about clearing conditions that can occur after an untimely abort.
Positioning Short Body Loader with Body Sphere
About this task
Follow this process to properly position the body sphere and loader.
Procedure
- Run the cradle in so the display reads I 1135 mm.
Figure 1. Distance between HNU Landmark and Center Mark on Body Loader 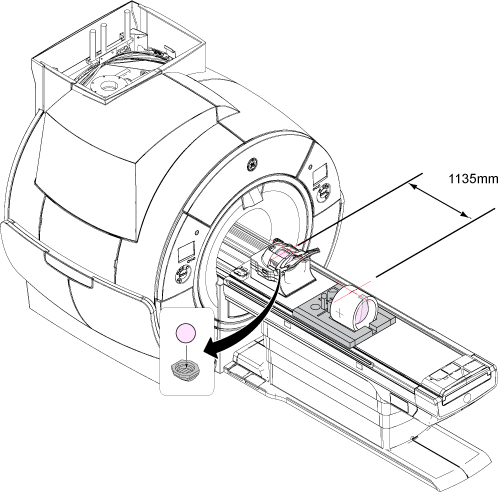
Invoking SPT Full Test Mode
Procedure
- To start the SPT Full Test tool from the Service Browser, select
the Image Quality tab and follow the steps
shown in the illustration below.
Figure 2. Starting SPT Test Tool 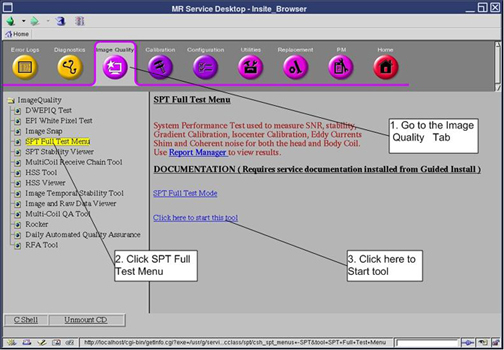
- An SPT Test menu window displays on the desktop. Always use
the Full Test Mode. Note:
This screen displays until you quit SPT. If you are in troubleshooting mode, click the Start SPT button to run the test again.
Figure 3. Test Selection - Full Test Example 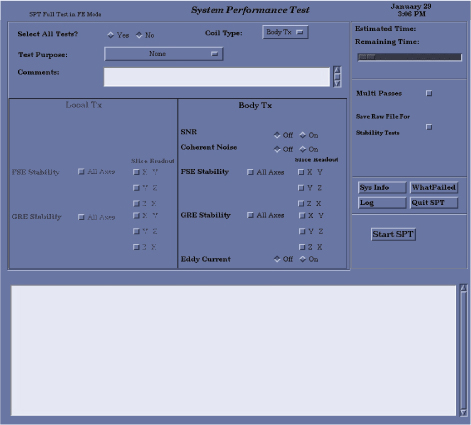
As each test is running, a message displays in the window indicating which data is being collected or processed. Start time and estimated completion times also display. Although the estimated time may expire, the test is not complete until you see a successful or failure message.
Troubleshooting SPT Problems
About this task
There are three utilities that are useful when you use SPT:
-
Sptreset - If a problem occurs when exiting SPT in an unusual manner, and the system configuration is not normal, type the following in a C-shell: cd /usr/g/service/cclass/spt
sptreset Enter
This puts all the files and configuration values back in their original condition.
-
T File Cleanup - File space management tool. It cleans up the /usr/g/service/data directory. See the procedure for T File Cleanup for more information (found in Software > System level software utilities in the documentation).
-
WhatFailed - A quick way to know which SPT tests failed. The preferred way to see the SPT results is by using Report Manager and SPT Stability Viewer (if applicable). This utility scans through user-selected SPT result files and reports what portion of the test failed, and the actual result and test spec for that test.
Figure 4. WhatFailed Application 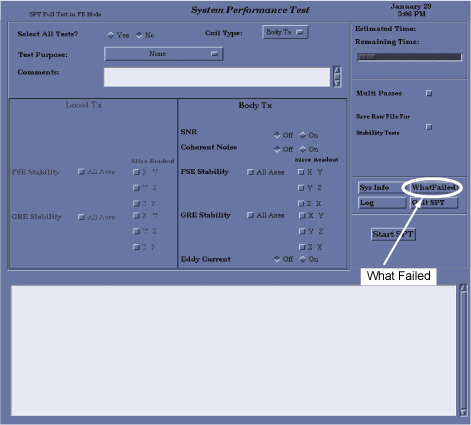
To run the WhatFailed utility, you can either:
-
Open a C-shell from the Common Service Desktop, then type: whatFailed (case sensitive) and press Enter
or
-
Select the WhatFailed button on the System Performance Test GUI.
A menu of all the SPT files for that system displays. Select one of the tests (or quit). The utility reads the file comparing each test (except for Coherent Noise) against its limits.
If there are no failing values in the file, you see the following message:
WhatFailed does not check Eddy Current results. Please use Report Manager to see Eddy Current PASS/FAIL and specs.
Press Enter to continue. The system displays each failure it finds one at a time. Press Enter to move through the list of failures.
-
Viewing Results - Report Manager Tool
About this task
After SPT has finished the analysis, the data files can be viewed using the Report Manager Tool.
Viewing Specification Files
About this task
The specification files can be viewed using a text editor. Compare the results from the Report Manager tool with the values in the specification files to determine which parameter is out of specification.
Procedure
Finalization
Procedure
- Complete a TPS reset, which takes a few minutes, after completing SPT.
- If for any reason an SPT scan is aborted, check the error log to determine why, and then determine next steps.
- Remove service equipment from the system.