
- Discovery MR750 3.0T System Service Methods
- 5690009-2EN Revision 4
- 00000018WIA30C42110GYZ
- id_20035074.5
- Oct 11, 2021 6:13:21 PM
Running LVShim rough
LVShim Rough is used for new site installations only. The objective is to improve the homogeneity to a point where Grafidy and other calibrations can be done.
Prerequisites
-
The objective is to improve the homogeneity to a point where Grafidy and other calibrations can be performed. Use the three-piece LVShim phantom. The Rough LVShim process is performed with the sampling diameter of 45 cm DSV and a bandwidth higher than Fine Shim and Gradient Shim.
-
Rough LVShim is usually required at new sites that were never previously shimmed. For a new magnet installation, the magnet ATR shim currents are used for Rough LVShim.
About this task
| DANGER | |
|---|---|
This procedure is required for new sites that were never shimmed. The setup procedure to perform Supercon Shim - Rough and Supercon Shim - Fine are the same, but the specifications for each mode are different. The LVShim tool scans at different bandwidths and is analyzed at 45 cm DSV.
- The bandwidth for Supercon Shim - Rough is 1,000 Hz and automatically selected.
- The bandwidth for Supercon Shim - Fine is 400 Hz.
Procedure
- After launching the LVShim tool, select Supercon Shim-Rough from the Shim Type menu (manual mode option is automatically selected).
Figure 1. Selecting shim type 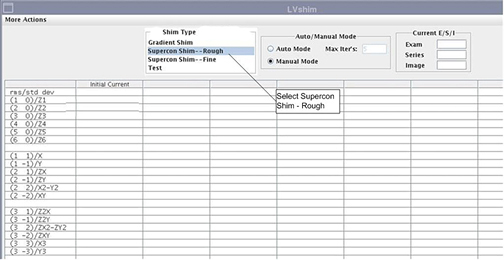
- When a Dial In Currents window is displayed, enter the original manufacturing plant currents one by one in the Modify Currents column, pressing Enter after each entry to move to the next line. After the entire column is modified, click Dial in Currents.
Figure 2. Adding original manufacturing plant currents (examples) 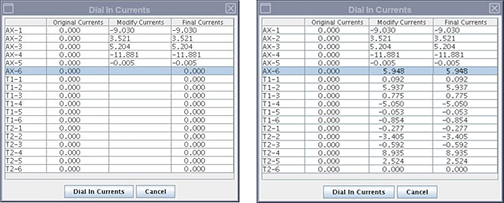
- On the LVShim user interface, click Scan.Note: To abort the scan, click Abort or press the Stop Scan button on the control panel.Note:
During LVShim procedures, the system performs a Body SPT SNR to verify system integrity. If the Body SPT SNR fails, troubleshoot the SNR issue (in particular, check the I and Q drive cable connections) before continuing with LVShim.
Figure 3. Starting a scan 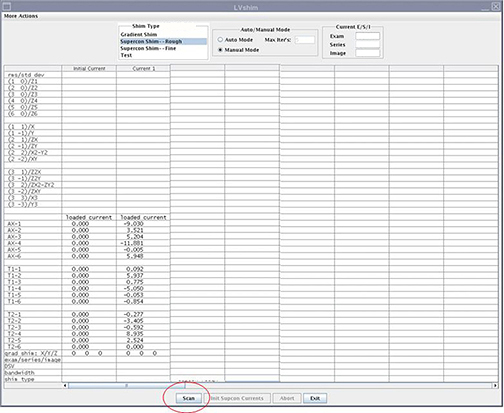
Result
After the scan is completed, the tool calculates the harmonics and compares them with the specifications.
- Green cell = Passed specification
- Red cell = Failed specification
Figure 4. Harmonics and specifications comparison 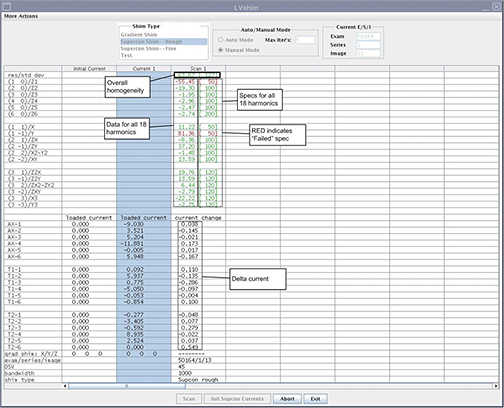
The tool calculates the delta currents and the new currents, and displays currents in a pop-up dialogue.
Figure 5. Currents displayed 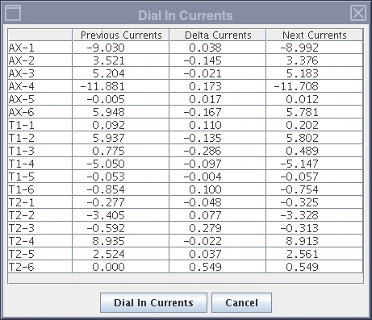
- Accept or decline the new currents:
- If all harmonics data cells are green, decline the new currents by clicking Cancel.
-
If any harmonics data cells are red, click Dial in Currents to accept the new currents.
The new currents will be displayed in a new column in this window. Dial in the currents from the new Loaded Current column using the Supercon Shim power supply. See the applicable Magnet and Cryogens Subsystem Manual for information about dialing in the currents.
Figure 6. Second iteration of LVShim 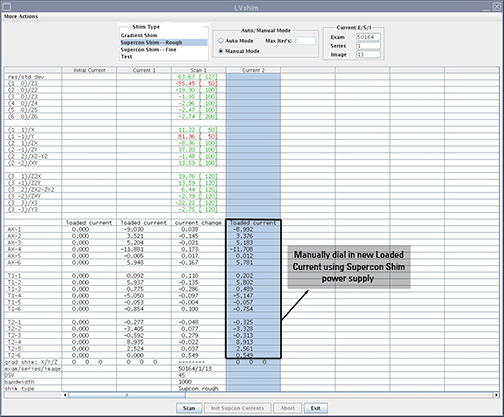
Note: If the current is not accepted, the delta currents in the LVShim user interface change to purple and the new Loaded Current column is not displayed.